10. DJing With Mixxx
Mixxx was designed to be easy to learn for both novice and experienced DJs.
This part of the manual provides you with directions for importing and managing you music collection and playing your tracks.
10.1. Opening Mixxx
![]() Once you’ve installed Mixxx, start by opening
Mixxx and import your music to the Mixxx library.
Once you’ve installed Mixxx, start by opening
Mixxx and import your music to the Mixxx library.
- Windows
Double-click the Mixxx icon on the Desktop. Alternatively, browse your Windows start menu and click the Mixxx icon, or perform a search for
Mixxx.exe.- Mac OSX
Double-click the Mixxx icon in the
Applicationsfolder. Alternatively, drag the Mixxx icon to the dock and double-click it there, or perform a search forMixxx.app.- GNU/Linux
Simply type mixxx into the terminal, then hit Return. With some distributions like Ubuntu you can also double-click the Mixxx icon in the launcher. Alternatively, perform a search for
mixxx.
10.2. Importing your audio files
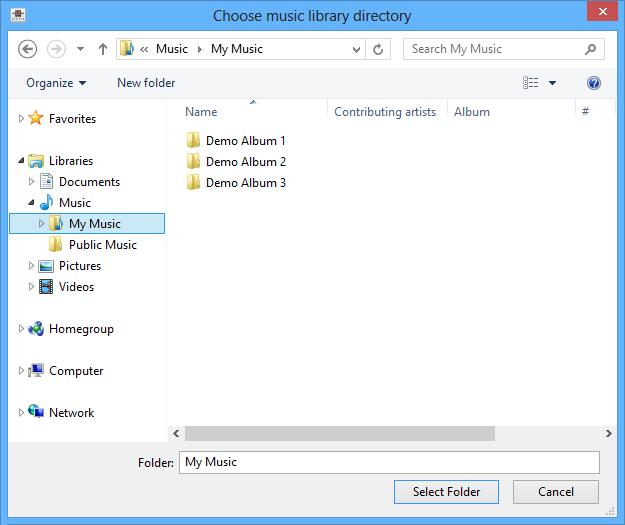
Mixxx running on Windows 8 - Choose music library directory dialog
- Setup the music library
The first time you run Mixxx, you are asked to select a directory where your music is stored. By default, the dialog points to a location where music files are typically held.
Click Select Folder and Mixxx will scan your music library. Depending on the size of your library this could take some time. All of the supported music files Mixxx detects will be listed in the Library - View and edit your whole collection.
Mixxx automatically detects newly added tracks on each subsequent run. If you want to manually refresh your library without exiting (for example because you added or moved files), you can do this with in the menu. If you want to rescan at every launch, select .
Aviso
On Windows 7 and 8 the import dialog points to your Windows “Music“ Library, a special-purpose virtual folder. You can not use these virtual folders. Select a regular folder instead, usually “My Music“, like pictured above.
- Compatible files
Mixxx supports a variety of file formats: Wave (wav), Aiff (aiff, aif), MP3 (mp3), Ogg vorbis (ogg), FLAC (flac), and AAC (aac, m4a) if supported by your OS. DRM protected files, such as m4p files purchased in the iTunes Store, are not supported.
AAC (M4A) is supported on Windows Vista and Mac OSX 10.5 onwards. On Linux, Mixxx does not have AAC (M4A) playback support enabled by default due to licensing restrictions.
Veja também
To enable playback of AAC (M4A) files, you can build Mixxx from source. http://www.mixxx.org/wiki/doku.php/compiling_on_linux#build_with_m4a_file_support
- Changing the music directory
The Mixxx music directory can always be changed at a later time in . You might want to run a library rescan afterwards, select in the menu.
- Import external libraries
If you have iTunes, Traktor or Rhythmbox installed, Mixxx allows you to access your tracks and playlists in the Mixxx library, see iTunes, Traktor, Rhythmbox - Using external libraries.
- Import remote files
To import audio files which are not in your music library directory, drag them directly from an external file manager or from the Browse section to the track list.
Nota
You can not drag complete folders to the library because currently Mixxx can not recursively scan folders for compatible music files.
- Import music from CDs
Mixxx can not play music from Audio CDs. Convert the content to compatible files in good quality and add them to them Mixxx library. See https://en.wikipedia.org/wiki/Ripping
10.3. Loading Tracks
Tracks can be loaded into a deck in several ways:
Right-click the library track table: Right-clicking on a track in the table will present the options Load in Deck 1 and Load in Deck 2, among others. Making either selection will load a track into a deck.
By Using a Keyboard to load the selected track from library track table.
Drag-and-drop from library track table: Dragging-and-dropping a track from the track table onto a waveform display will load a track into a deck.
Drag-and-drop from external file browser: Dragging-and-dropping a track from an external file browser directly onto a waveform display in Mixxx will load that track. This function also works with some other applications. For example, on Mac OS X, dragging-and-dropping a track from iTunes onto one of Mixxx’s waveform displays will load that track into a deck.
10.4. Finding Tracks (Search)
The search function searches for a match only in the current selected list (e.g. a playlist, a crate or even the whole library).
Activate the search input field by pressing CTRL + F (Windows/Linux) or CMD + F (Mac). Alternatively click into the search box.
Type your search term. Mixxx filters the tracks and retains only the ones that match the search term. Search terms can include an artist’s name, a song title, BPM, etc.
To clear the search string hit ESC or click the clear button right next to the input field.
Hit TAB to cycle between the search and the list of results in the library. Use the ARROW UP and ARROW DOWN keys to scroll in the list of results.
Nota
If the search input field has focus, the Mixxx keyboard shortcuts are disabled, see Using a Keyboard.
10.4.1. Using search operators
Novo na versão 1.11.
Search operators allow you to form more complex search queries. They allow you to limit certain search terms to particular properties of your tracks.
Mixxx supports the following filters:
Text filtering: For artist, album, genre, title, composer, comment, key
Numeric filtering: For year, track, bpm, duration, played, rating, bitrate
You can combine operators but there’s no way to do an “OR” search right now. The following example list all tracks by “Danger” that are rated 4 or 5:
artist:Danger rating:>=4
Examples for text filtering |
Examples for numeric filtering |
|---|---|
artist: “com truise” |
bpm:140 |
album:Danger |
bpm: >140 |
genre: Trance |
year: <2010 |
title: foo |
bpm: >=140 |
composer: foo |
rating: <=4 |
comment: foo |
bpm: 140-150 |
played: >10 |
|
Note it doesn’t matter if you have space between the colon and the argument or not. Quotes must be used for multi-word text arguments. |
Note that you can put a space between the colon but currently there must be no space between the operator and the number. |
10.5. Previewing Tracks
Novo na versão 1.11.
To pre-listen to a track, activate the Preview column in a library
view. Clicking the  icon in the library’s
Preview column loads the selected track in a special Preview
Deck that will only output sound in the
headphones channel. Click the
icon in the library’s
Preview column loads the selected track in a special Preview
Deck that will only output sound in the
headphones channel. Click the
 icon to stop the playback.
Alternatively, select a track from the track list of the Mixxx library, drag the track to the waveform view of the Preview Deck and click the Play button next to the waveform.
To display the Preview deck, press CTRL + 4 (Windows/Linux) or CMD + 4 (Mac).
10.6. Waveform displays
There are two main waveform displays in Mixxx that are used to display the waveform of the tracks you are mixing. These are useful because they allow you to see features in a track (like a breakdown) before you hear them.
Depending on the skin Mixxx displays either separate waveforms (default) or parallel waveforms. Select your preferred appearance in .

Mixxx default skin (Deere) - Separate waveforms
With some skins the waveform displays are aligned parallel to each other in order to make beatmatching easier, as it is possible to beatmatch visually by aligning the beats that appear in each waveform.
Mixxx alternative skin (Latenight) - Parallel waveforms
The mouse can be used on the waveforms to scratch, spin-back or throw the tracks. Right-clicking and dragging on the waveforms allows you to nudge the track and make temporary pitch adjustments. Using the mouse-wheel on the waveform zooms the waveform in or out. You can choose whether or not to synchronize the zoom level between the decks in . The waveform display is updated in realtime upon seeking.
There are two smaller waveform summary displays located adjacent to the main waveform displays. Clicking on a waveform summary allows you to seek through the track. These smaller displays show the waveform envelope of the entire track, and are useful because they allow DJs to see breakdowns far in advance. Vinyl DJs will find this familiar because quiet sections of tracks can be visually distinguished when looking at a vinyl record. This is a useful tool when planning your mixes on-the-fly.
10.7. Beatmatching and Mixing
Beatmatching is the process of adjusting the playback rate of a track so that it matches the tempo of another track. Beatmatching also involves adjusting the phase of the beats in a track so that they are aligned with the beats in the other track. Matching the tempo and aligning the beats are the two things a DJ must do to beatmatch.
Mixxx can match the tempo and align the beats for you but this requires an accurately detected BPM value and a correct beat grid for both tracks. To enable this feature, hit the SYNC button. To beatmatch manually, the tempo of the two tracks must be synchronized by adjusting the playback rate sliders. You can adjust the phase of the beats by right-clicking and dragging on either waveform display to temporarily speed up or slow down one of the tracks until the beats are aligned. The temporary pitch bend buttons can also be used to momentarily adjust the playback rate, allowing you to “shuffle” the beats in a track forwards or backwards, so they can be aligned with another track. See the chapter Sync and Rate Controls.
Two tracks are beatmatched once their tempos are matched and their beats beats are aligned. A “perfect” beatmatch is nearly impossible - there will always be a tiny difference in the playback rates. A keen DJ will keep his or her ears open and listen for the beats drifting out of alignment. This has a distinct “double bass kick” sound which is often preceded by the kick weakening in intensity as the two kicks drift out of phase. When this happens, the beats can be realigned by simply tapping one of the temporary pitch bend buttons a few times in the appropriate direction.
10.8. Headphone Cueing
Headphone cueing is a technique DJs use to listen to the next track they want to play in their headphones before playing it on the main speakers. Headphone cueing is useful because it allows a DJ to beatmatch the next track in their headphones before bringing it into their mix by sliding the crossfader.
Mixxx allows a DJ to route audio from either deck to their headphones by toggling either of the Headphone buttons in the mixer section of Mixxx’s interface. See the chapter The Mixer Section.
10.9. BPM and Beat Detection
Previous versions of Mixxx were able to detect BPM values but unable to determine where the beats are. Consequently, the beat grids often looked unaligned. The DJ had to adjust the beat grid manually in oder to make use of auto-beatmatching via SYNC button.
Alterado na versão 1.11: Mixxx comes with a new ultra-precise BPM and beat detector.
The beat grid is adjusted after track analysis is finished. Manual adjustments are redundant in many cases because Mixxx knows where the beats are.
10.9.1. Analyser Settings
BPM and beat detection is a complex operation. Depending on your computer and the track’s bitrate and duration this may take some time. By default Mixxx analyzes the complete track. To accelerate beat detection on slower computers, a “Fast Analysis” option is available. If enabled, the BPM is computed by analyzing the first minute of the track. In most cases this does not affect the beat detection negatively because most of today’s dance music is written in a 4/4 signature with a fixed tempo.
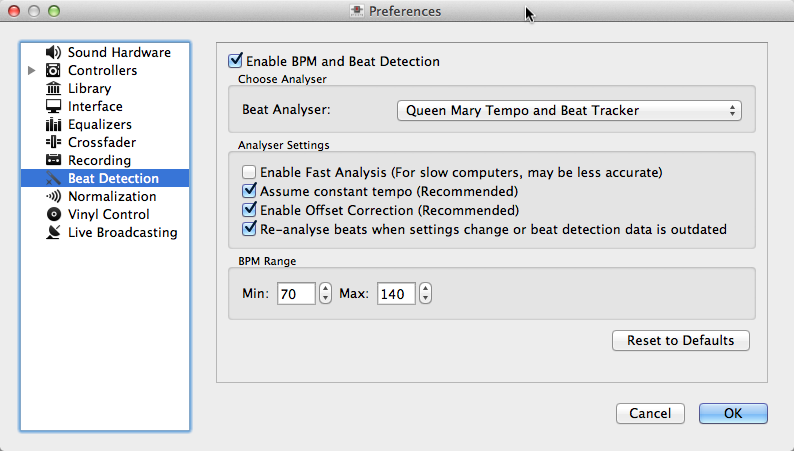
Mixxx preferences - BPM settings
The table below summarizes the beat detection settings:
Option |
Description |
|---|---|
Enable Fast Analysis |
If enabled, BPM detection results from the first minute of audio. |
Assume constant tempo |
If enabled, Mixxx assumes that the distances between the beats are constant. If disabled, the raw beat grid obtained by the analyzer is presented. The latter is appropriate for tracks with variable tempo. |
Enable Offset Correction |
Prevents beat markers from being placed incorrectly. |
Re-analyze beats when settings change or beat detection data is outdated |
If enabled, Mixxx over-writes old beat grids from Mixxx before v1.11. Moreover, it will re-analyze the BPM if your beat detection preferences change or BPM data from 3rd party programs are present. |
10.9.2. Correcting Beat Grids
There may be situations where BPM and beat detection do not result in a proper beat grid.
Typically, the detected BPM is correct but the analyzer has failed to detect the location of the first beat. Consequently, the beat markers are shifted, i.e. the beat markers are always a fixed distance from the true beat. To adjust the beat grid, cue the track before a real beat and click the Beat-grid Adjust button in the Deck Options Button Grid.
If the detected BPM is not accurate, the corresponding beat grid will also be inaccurate. A deviation of 0.02 BPM units from the correct BPM will cause beatgrid alignment issues on long tracks (e.g. a club mix). If this happens, your beatgrid may look aligned for the few minutes but you will notice a slight drift as the song goes on. Finding the correct BPM is easy in many cases - just follow the note below.
Nota
If the detected BPM value is not sufficiently accurate but very close to an integer value, try to set the BPM value manually to the integer.
10.10. Recording your Mix
With the integrated recording feature you can record your mix as an audio file and listen to it later, distribute it as Podcast or burn it to CD. Mixxx records the master output - the audio you hear from the speakers including the microphone.
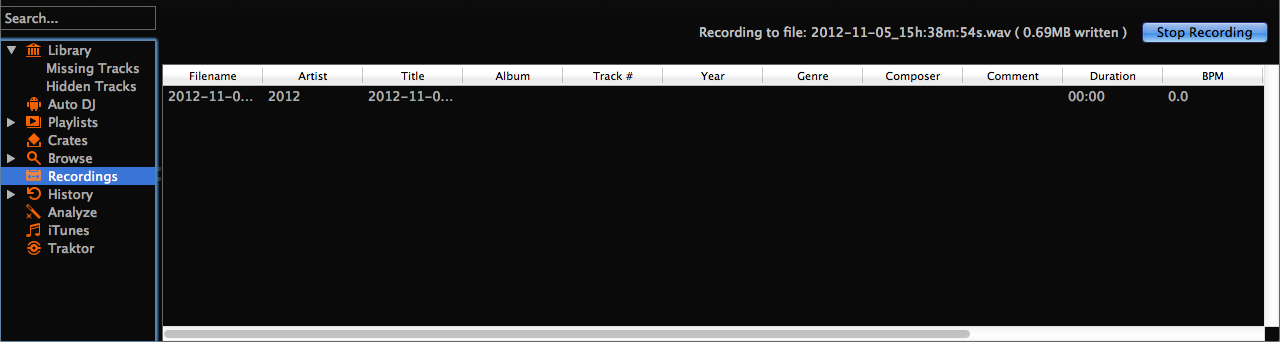
Mixxx library - Recordings view
Novo na versão 1.11: Allows to specify a custom recordings directory
Mixxx can record your mix in various audio formats and quality settings. You can
split your recordings, generate cue files, choose a custom
recording directory and even set your own metadata. By default, Mixxx
saves your recordings as lossless wav files to a
Mixxx/Recordings sub-folder in the Mixxx music directory. Before you
start recording, we recommend that you adjust the settings in
.
If you click on the Recordings icon in the sidebar of the Mixxx library, the track table to the right displays the content of your recordings directory. New recordings are automatically saved to this directory as well as CUE files if you choose to create them in the preferences.
10.10.1. Record your mix to disk
Click on the Recordings icon in the sidebar to switch to the Recordings view
Click the Start Recording button or click in the menu on top of the Mixxx application window.
The display above the track table shows how much data has already been recorded.
Perform your mix
Click the Stop Recording button to stop the recording when the mix has finished.
Dica
You can instantly play your recording as track in Mixxx. Simply drag-and-drop the track to a deck.
10.10.2. Burn your recorded mix to a CD/DVD
Select your recording in the Recordings view
Right-click and select Open in File Browser to locate the file on your disk
Now burn the recording to a CD/DVD using a 3rd-party program, for example CDBurnerXP for Windows or Burn for Mac OS X.
Nota
Due to licensing restrictions, MP3 recording is not enabled per default. In order to enable MP3 streaming you must install the LAME MP3 codec yourself. Go to the chapter Activate MP3 streaming support for more information.
10.11. Using Auto DJ for automatic mixing
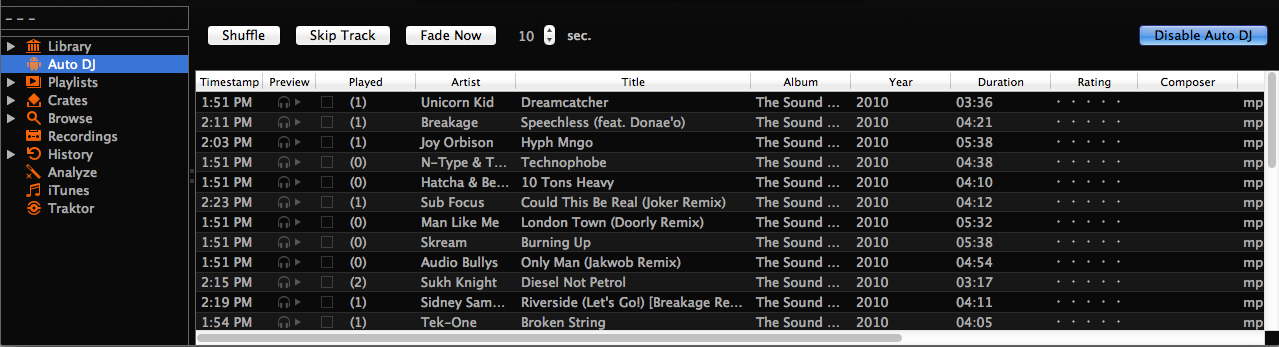
Mixxx library - Auto DJ view
Auto DJ allows you to automatically load tracks from the Auto DJ playlist when the current track is nearly finished, and crossfade into it. See Auto DJ - Automate your mix.
10.11.1. Loading tracks into Auto DJ
To play tracks automatically, they must first be loaded into the Auto DJ playlist. The Auto DJ playlist is empty by default.
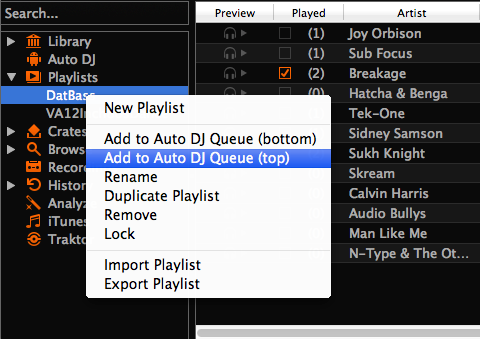
Mixxx library - Adding a playlist to Auto DJ
There are several ways to load tracks into the Auto DJ playlist:
Select single or multiple tracks from the library, a regular playlist or crate and drag them to the Auto DJ icon on the left.
Select a regular playlist or crate, right-click with the mouse and select Add to Auto DJ from the mouse menu. This adds all tracks to Auto DJ.
While in the Auto DJ view of the library, drag tracks from external file managers to the Auto DJ icon in the sidebar or to the Auto DJ track table on the right.
10.11.2. Playing tracks in Auto DJ
Now that you have loaded tracks into the Auto DJ playlist, you can activate Auto DJ as follows:
Click on the Auto DJ icon in the sidebar to switch to the Auto DJ view of the library.
Click the Enable Auto DJ button.
The first tracks from your list are loaded into the decks and the playback starts.
Mixxx will continue to automatically mix until the Auto DJ playlist is empty.
Click the Disable Auto DJ button to stop the automatic mixing