5. An Overview of the Mixxx Interface
Welcome to the Mixxx interface. This is where the magic happens. You are going to want to get very familiar with this interface because it is the main way to use Mixxx. In this chapter, we present the default interface of Mixxx and describe its elements, knobs and faders.
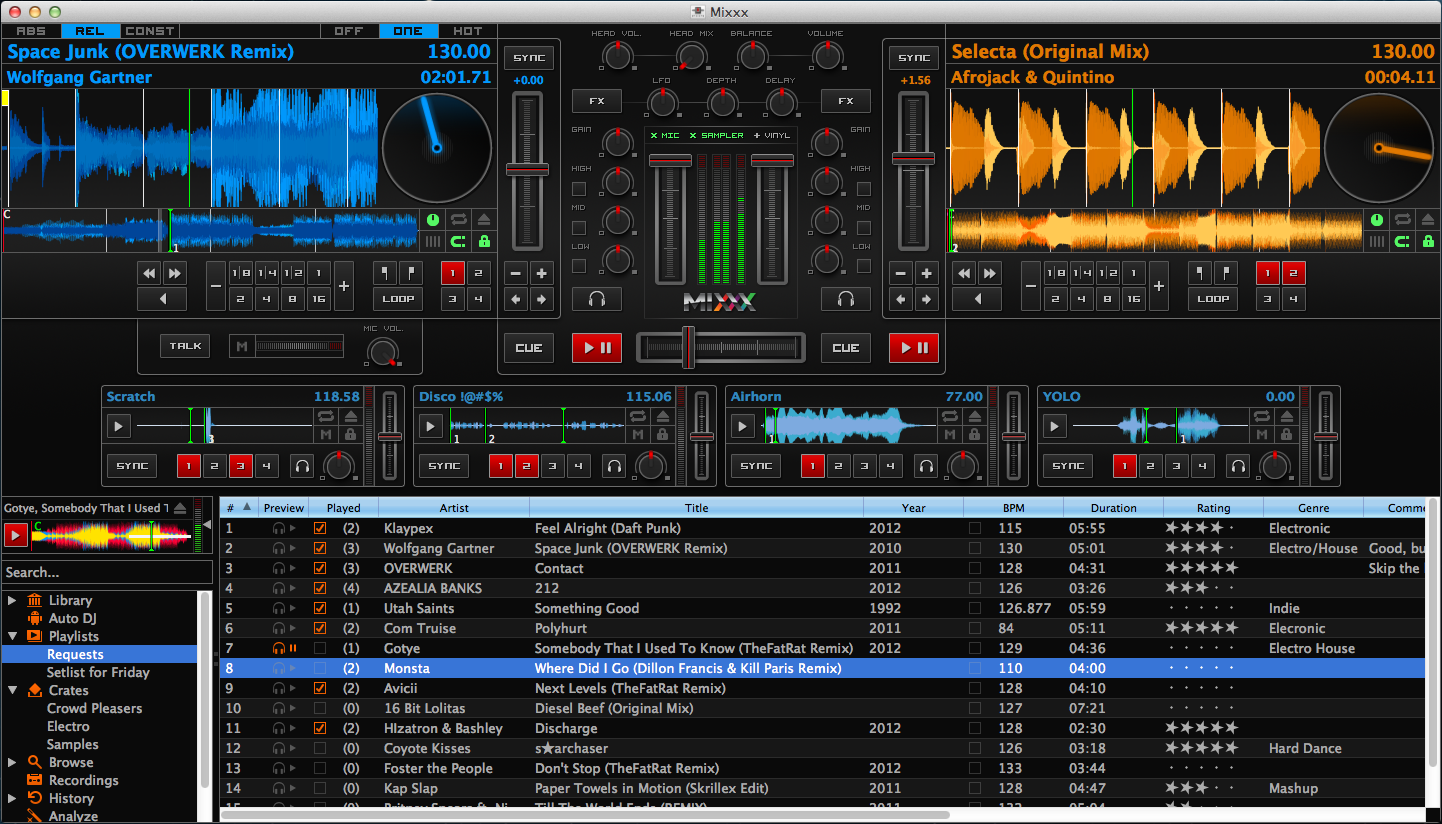
The Mixxx interface - Deere skin
This is the Deere skin. It is the default skin supplied with Mixxx. There are a variety of others skins included with Mixxx. You should explore them all to figure out which one you prefer. This section will focus on Deere only.
5.1. The Deck Sections
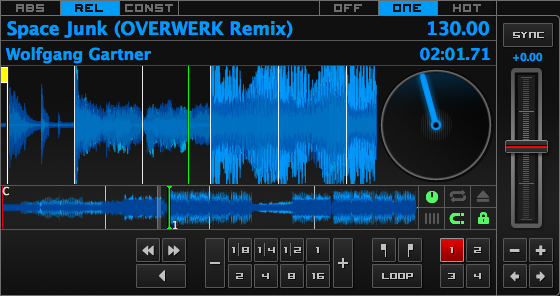
A deck with a track loaded
The deck section allows you to control everything relating to a virtual turntable deck. We are going to break this down into sections.
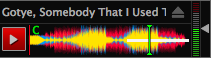
5.1.1. Track Information Display

The track information section of the deck
- Track Title
The title of the track that was loaded into a deck is displayed on top. This is the same as the title listed under the Title column heading in the Mixxx library. This information is initially loaded from the tracks metadata.
- Track Artist
The title of the track is listed below. It is the same as listed under the Artist column heading in the Mixxx library.
- BPM (Tempo)
The number at the top right is the effective BPM of the track. This is the detected BPM of the track, adjusted for the playback rate of the track. For example, if the track is normally 100 BPM, and it is playing at +5%, then the effective BPM will read 105 BPM.
Nasvet
Click directly on the BPM display and tap with the beat to set the BPM to the speed you are tapping. You can also use a keyboard shortcut, go to Using a Keyboard for more information.
- Time Elapsed/Remaining
By default it displays the total elapsed time in the track up to the millisecond. Clicking on the display switches to the Time Remaining view, which indicates how much time is left before the track reaches the end. You can change the default in .
5.1.2. Waveform Displays
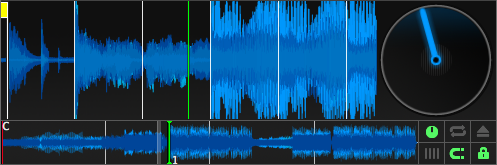
The waveform summary and waveform overview of the deck
The waveform section of a deck allows you to visualize the audio changes that occur throughout the track, you can basically “see” your music.
- Waveform summary
The big waveform summary shows the waveform envelope of the track near the current playback position and is updated in realtime. The mouse can be used on the waveform to pause, scratch, spin-back or throw the tracks. Right-clicking on the waveforms allows you to drag with the mouse to make temporary pitch adjustments.
Nasvet
You can select from different types of displays for the waveform, which differ primarily in the level of detail shown in the waveform, in .
- Waveform overview
The smaller, zoomed-out version of the waveform shows the various markers within the track as well as the waveform envelope of the entire track. This is useful because they allow DJs to see breakdowns far in advance. Clicking somewhere on the waveform allows you to jump to an arbitrary position in the track.
- Vinyl Widget
The line on the vinyl widget rotates if the track moves. It is similar to the position marker found on scratch records. Use the mouse on the vinyl widget to pause, scratch, spin-back or throw tracks - just like a real record. When performing Loop rolls or right-clicking on the vinyl during playback, a “ghost” marker hints where the playback will continue. The Vinyl Widget is hidden by default and can be enabled in the Deck Options Button Grid.
If Vinyl control is enabled, it can optionally display the time-coded vinyl signal quality. Activate the option in .
- Waveform Zoom
Using the mouse-wheel everywhere in the waveform summary will zoom the waveform in or out. You can choose whether or not to synchronize the zoom level between the decks in .
- Waveform Marker
While mixing, various additional markers can appear on the waveforms:
Position marker: The static vertical line in the center of the waveform summary indicates the playback point of the deck.
Beat marker: The regular white lines on the waveform summary indicate the locations of beats in the audio, also called the beatgrid.
Cue marker: Indicates the position of the cue point.
Hotcue marker: Indicate the position and number of a hotcue point if set.
Loop-in/Out marker: Indicate the beginning and the end of a loop.
Loop overlay: Is drawn between the Loop-in/Out markers and changes color depending on whether a loop is activated or not.
Track ending notification: If the waveform overview flashes red, only 30 seconds are left before the track reaches the end.
Poglej Tudi
To learn how to get most out of the waveforms while mixing, go to the chapter Waveform displays.
Opozorilo
If you have a slower computer and notice performance issues with Mixxx, try to lower the frame rate or change the level of detail shown in the waveform in in .
5.1.3. Deck Options Button Grid

The Options Button Grid of the deck
The six buttons at the bottom right below the waveform allow you to configure the deck. Starting from the top-left and moving counterclockwise the buttons are as follows:
- Show/Hide Vinyl Widget
Toggles the visibility of the Vinyl Widget in the Waveform Displays.
- Repeat Mode Toggle
If enabled, the repeat mode will jump back to the beginning and continue playing when the track finishes.
- Eject Track Button
Clicking this button ejects the track from the deck. Alternatively you can use a keyboard shortcut, go to the chapter Using a Keyboard for more information.
- Beat-grid Adjust Button
Clicking this button adjusts the track beat-grid so that the current position is marked as a beat. This is useful if Mixxx was able to accurately detect the track’s BPM but failed to align the beat markers on the beats. For more information, go to the chapter BPM and Beat Detection.
- Quantize Mode Toggle
If enabled, all cues, hotcues, loops, and beatloops will be automatically quantized so that they begin on a beat.
- Keylock Toggle
Keylock locks the track’s pitch so that adjustments to its tempo via the rate slider do not affect its pitch. This is useful if you would like to speed up or slow down a track and avoid the “chipmunk” effect that speeding up vocals has.
5.1.4. Vinyl Control Mode and Cueing controls

The Vinyl Control Mode and Cueing controls of a deck
The control above the waveforms relate to the vinyl control feature in Mixxx and is hidden in the default Mixxx user interface. Click the VINYL section expansion button in the mixer section, or use the specific Application shortcuts to show or hide the section.
Abs/Rel/Const button
Absolute mode: The track position equals needle position and speed.
Relative mode: The track speed equals needle speed regardless of needle position.
Constant mode: The track speed equals last known-steady speed regardless of needle input.
Off/One/Hot button
This button determines how cue points are treated in vinyl control relative mode:
Off: Cue points are ignored.
One Cue: If the needle is dropped after the cue point, the track will seek to that cue point.
Hot Cue: The track will seek to nearest previous hotcue point.
Poglej Tudi
For more information on how to use Vinyl control in your setup, go to the chapter Vinyl Control.
5.1.5. Sync and Rate Controls

Rate controls
The rate controls allow you to change the rate at which tracks are played. This is very useful for beatmatching two tracks together in a mix. You can control rate changes also from your computer’s keyboard, see the chapter Using a Keyboard for more information.
SYNC button
Left-Click: Changes the rate of the track so that the BPM and phase of the track matches the other deck.
Right-Click: Only changes the rate of the track to match the other deck but does not adjusts the phase.
Spremenjeno v verziji 1.11: Changed Sync mode (Ghetto Sync™)
Decks and samplers now pick which sync target to sync to on the fly. Decks can’t sync to samplers and samplers can only sync to decks. The sync target is:
The first (in numerical order) deck that is playing (rate > 0) a track that has a detected beatgrid.
The first (in numerical order) deck that has a track loaded with a detected beatgrid (could be stopped).
So basically, if you sync a sampler and both deck 1 and deck 2 are playing a track with a beatgrid then deck 1 will win since numerically it is first. This will change again in the future once Mixxx gets a proper master sync feature.
- Pitch/Rate slider
The slider allows you to change the speed of the song, by default up to 10% from the tracks original tempos. The speed will increase as you move the slider up, opposite to the behavior found on DJ turntables and CDJ. Right-clicking on the slider will reset the tempo to its original value.
- Pitch Rate Display
The percent that the track’s rate is sped up or slowed down is noted here. Is the Pitch/Rate slider positioned at the center, the pitch rate display is at +0.0%, which indicates no change.
- Pitch/Rate buttons
The plus and minus buttons increase or decrease the tempo in steps at which a song is played, same as pulling the pitch slider slightly. By right-clicking the buttons you get even finer adjustments.
- Temporary Pitch/Rate buttons (Nudge)
Pushing the the left and right arrow buttons is like nudging the metal edge of a turntable, or the outer edge of a CD player. It will give the track a push or pull forwards or backwards. If the buttons are released the previous tempo is restored. The buttons can act as either a fixed pitch bend or a ramping pitch bend.
Poglej Tudi
To customize the amount by which the buttons alter the pitch of the track, the slider range as well as the direction, go to .
Nasvet
If the tempo of a track changes, you’ll notice that the tone changes based on the pitch used (e.g. playing at faster pitch gives a chipmunk sound). You can enable the Keylock feature to maintain a constant tone.
5.1.6. Transport Controls

The transport controls of the deck
- Fast-Rewind button
As long as the button is pressed, the track will play in reverse with increased speed. Right-clicking on the button will seek the play position to the beginning of the track.
- Fast-Forward button
As long as the button is pressed, the track will play with increased speed. Right-clicking on the button will seek the play position to the end of the track.
- Reverse button
As the name suggests, this button plays a track backwards.
5.1.7. Loop Controls
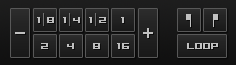
The beatloop and looping controls of the deck
In this section of the Mixxx interface you can control (beat-)loops and set the loop points of a track.
Beatlooping Buttons
Instant loop: The numbered buttons represents a different bar length. Clicking on any of that buttons will set a loop of the defined number of beats from the beat immediately following the current playback position. If a loop is set, a loop overlay will be drawn on the waveforms.
Loop roll:
Novo v verziji 1.11.
Right-click on any of the numbered loop buttons to temporarily setup a rolling loop over the defined number of beats. Playback will resume where the track would have been if it had not entered the loop.
Double loop: Clicking on the plus button will double the current loop’s length up to 64 bars. The length of the loop overlay in the waveform will increase accordingly.
Halve loop: Clicking on the minus button will halve the current loop’s length down to 1/32 bars. The length of the loop overlay in the waveform will decrease accordingly.
Loop Buttons
Loop-In: This button allow you to manually set the start point of a loop. A loop-in marker is placed on the waveform indicating the position. If clicked when a loop was already set, it moves the start point of a loop to a new position.
Loop-Out: This button allow you to manually set the end point of a loop. A loop-out marker is placed on the waveform indicating the position. If clicked when a loop was already set, it moves the end point of a loop to a new position.
Loop: Also dubbed Reloop, this button toggles whether the loop is active or not. This works for manually placed loops as well as automatic loops set by the beatlooping buttons. Depending on the current status of the loop, the loop overlay on the waveforms changes color.
Nasvet
If you are playing inside a loop and want to move the end point beyond its current position in the track, click on the Loop button first and when the play position reaches the desired position, click on the Loop-Out button.
Poglej Tudi
If the Quantize mode is enabled, the loops will automatically snap to the nearest beat. This is disabled by default, click on the Quantize Mode Toggle to enable it.
5.1.8. Hotcue Controls

The hotcue controls of the deck
To jump in between different parts of a track, you can use these numbered buttons. You can also use keyboard shortcuts, go to Using a Keyboard for more information.
5.1.8.1. Setting Hotcues
Clicking on a numbered button will set a hotcue at the current play position on the track. A marker with the corresponding number will appear in the waveform and the button will lit up to indicate that the hotcue is set.
5.1.8.2. Playing Hotcues
While playing: Tap a hotcue button to cause the track to instantly jump to the location of the hotcue and continue playing. If you are playing inside a loop and tap a hotcue whose position is outside of the loop, then the track still instantly jumps to the hotcue but the loop will be deactivated.
While stopped: Tap a hotcue button to cause the track to instantly jump to the location of the hotcue and start playing as long as the button is pressed. Press the Play keyboard shortcut while the hotcue button is pressed to continue playback, then release the hotcue button.
5.1.8.3. Deleting Hotcues
To delete a hotcue, right-click on the numbered button. The marker in the waveform will be deleted as well.
Opomba
Mixxx supports up to 36 hotcues per deck. By default, only some of them are visible in the user interface. You can customize your keyboard or controller mappings to use all of them.
Poglej Tudi
Just as with the loops (see above), if the quantize mode is enabled, the hotcues will automatically snap to the nearest beat. This is disabled by default, click on the Quantize Mode Toggle to enable it.
5.2. The Mixer Section
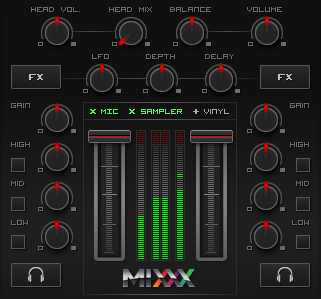
The mixer section
The mixer section of the Mixxx user interface allows you to control how the different decks and samplers are mixed together.
5.2.1. Channel Faders and VU Meters
- VU meters
In the center of the mixer section are 4 VU meters. The two outer-most VU meters are for each deck, while the 2 inner-most VU meters are the left and right VU meters for the master output.
The light at the top of the VU meter indicates when the audio in the selected channel is clipping. If this light goes on, reduce the gain or EQs for this deck to eliminate distortion.
- Line faders
The two large faders on either side of the VU meters are the deck volume faders, also known as Channel- or Line-faders. Adjusting these controls the volume of each deck.
Nasvet
Some DJ’s prefer to use the line faders over the crossfader for fading between tracks. Try it, you may like it.
5.2.2. Section Expansion Buttons

The section expansion buttons
Above the VU meters in the mixer are the optional section expansion buttons.
If you click on either MIC, SAMPLER, or VINYL then you will enable control sections for interacting with:
Novo v verziji 1.11: You can also use the specific Application shortcuts.
5.2.3. Headphone and Master Mix Controls

The headphone and master mix knobs
- Head-Mix Knob
Allows you to customize how much of the master output you hear in your headphones. It works like a crossfader between the stereo Master and stereo Cueing signal. If the knob is set to the left, you only hear the cueing signal which can be useful for prelistening tracks.
Opomba
Don’t forget to activate the PFL button on the deck you want to listen to in your headphones.
- Head volume Knob
This button adjusts your headphone volume. You can adjust the volume of a single deck’s signal you are listening to in the headphones with the Gain knob.
- Balance Knob
This knob allows you to adjust the balance (left/right orientation) of the master output.
- Volume Knob
The Volume Knob controls the overall volume of of the master output. Adjust this knob so that the Master VU meters are just at the peak.
Nasvet
If the Peak indicator on top of the Master VU meter flashes, the master output signal is clipping (too loud). Lower the volume with using the volume knob.
5.2.4. PFL/Headphone Button

The headphone buttons of both decks in the mixer
The headphone button is also known as the pre-fader listen or PFL button. Pressing this button allows you to listen and synchronize the track you will play next in your headphones before your audience hears the track (headphone cueing). You can select more than one PFL button simultaneously.
Poglej Tudi
Headphone cueing is only available if you have configured a Headphone Output in .
5.2.5. Equalizers and Gain Knobs
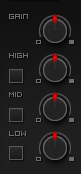
EQ Controls
Novo v verziji 1.11: Latch mode for Kill Switches
- Gain Knob
Above these knobs, the gain knob allows you to adjust the gain of the deck. In general, you should adjust this knob so that at full-volume the deck’s audio is just at the peak of the center VU meters. This is so you can achieve the widest dynamic range for your track.
- EQ Knobs
The low, mid, and high knobs allow you to change the filters of the audio. This allows you to selectively reduce or boost certain frequency ranges of the audio.
- Kill Switches
The small boxes next to each EQ knob are called kills. Hold these buttons to fully remove that frequency range. Short click on the buttons for latching. When in Latch mode, click again to restore the frequency range. If the Kill switches do not work as expected, check the high/low shelf EQ settings in the preferences.
Poglej Tudi
You can customize the EQ settings in .
5.2.6. Crossfader

The crossfader section of the mixer with Play/Pause and Cue buttons
Novo v verziji 1.11: Reverse crossfader (Hamster style)
The crossfader determines the actual volume of each deck when moving the slider from left to right. If both decks are playing and the crossfader is in its default center position, then you will hear both decks. Right-clicking on the crossfader will reset the slider to its default position.
You can reverse the configuration of the crossfader, so that the right deck is on the left end of the crossfader and vice versa. This is also known as Hamster Style. To adjust the crossfader to your style of mixing, go to .
Nasvet
Using the AutoDJ feature in Mixxx, you can automate the crossfade between the decks.
5.2.9. Effects Controls

The effect control section of the mixer
Currently, the only available internal effect in Mixxx is a flanger. This effect applies a “sweeping” sound to the channel and can add extra depth to a mix when used tactfully.
- FX Button
The FX (“Effects”) button enables a built-in flanger effect on the selected channel.
- Delay/Depth/LFO Knobs
Adjusts the phase delay, intensity and the the wavelength of the flange effect.
Nasvet
For the most noticeable effect, enable the FX button and turn the Depth knob completely to the right.
Poglej Tudi
As an advanced user, you can route your audio signal to external software and then apply additional effects. Go to Additional Effects via external Mixer Mode for more information.
5.3. The Sampler Section

A sample deck
Samplers are miniature decks. They allow you to play short samples and jingles but also additional tracks in your mix. They come with a small overview waveform and a limited number of controls. All controls work just like on the regular decks, see The Deck Sections.
The Sampler section is hidden in the default Mixxx user interface. Click the SAMPLER button in the mixer section, or use the specific Application shortcuts to show or hide the section.
5.3.1. Waveform Display
- Waveform overview
The waveform shows the various markers within the track as well as the waveform envelope of the entire track. Clicking somewhere on the waveform allows you to jump to an arbitrary position in the track.
- Waveform Marker
While mixing, some additional markers can appear on the waveforms:
Position marker: A vertical line indicates the playback point of the sample deck.
Hotcue marker: Indicate the position and number of a hotcue point if set.
5.3.2. Track Information Display
- Track Artist/Title
The artist and title of the track that was loaded into a sampler deck is displayed here.
- BPM (Tempo)
The number at the top right is the effective BPM of the track. Tap the BPM to set the BPM to the speed you are tapping.
5.3.3. Deck Options Button Grid
The buttons grid next to the waveform overview allow you to configure the sampler deck. Starting from the top-left and moving counterclockwise the buttons are as follows:
- Repeat Mode Toggle
If enabled, the repeat mode will jump back to the beginning and continue playing when the track finishes.
- Eject Track Button
Clicking this button ejects the track from the deck.
- Mix Orientation Toggle
This control determines the microphone input’s mix orientation.
- Keylock Toggle
Keylock locks the track’s pitch so that adjustments to its tempo via the rate slider do not affect its pitch.
5.3.4. Sample Deck Controls
Novo v verziji 1.11: Samplers can sync to decks.
- Play/Pause button
Clicking the button starts and stops playback. Right-clicking on the button will seek the play position to the beginning of the sample.
- Sync Button
Syncs the Sampler deck to a regular deck, as described in Sync and Rate Controls.
Left-Click: Changes the rate of the track so that the BPM and phase of the track matches the sync target.
Right-Click: Only changes the rate of the track to match the sync target but does not adjusts the phase.
- Hotcue Controls
To jump in between different parts of a sample, you can use these numbered hotcue buttons.
- PFL/Headphone Button
If active, the pre-fader listen or PFL button allows you to listen to the track in your headphones.
- Gain Knob
Allows you to adjust the volume of the track.
- VU Meter
Shows the level of the signal and can be adjusted with the Gain knob.
- Pitch/Rate slider
The slider allows you to change the speed of the sample. Right-clicking on the slider will reset the tempo to its original value.
5.4. The Microphone Section

The Microphone section
The microphone section is hidden in the default Mixxx user interface. Click the MIC button in the mixer section, or use the specific Application shortcuts to show or hide the section.
Setup the microphone
Most computers have built-in microphones, while some are connected through USB. These work adequately, but don’t expect them to be high-quality.
The best solution is to connect a good external microphone to the “Mic” or “Line” input on your audio device. If available, use the “Gain” knob on the device to adjust the input signal.
Select the microphone input in and click Apply.
5.4.1. Microphone Controls
Talk Button
Spremenjeno v verziji 1.11: Latch mode added.
Hold this button and talk to mix the microphone input into the Mixxx master output. Short click on the button for latching. This is handy for talking for an extended period, for example when streaming a radio show. When in Latch mode, click again to mute the microphone input.
- Mix Orientation Toggle
This control determines the microphone input’s mix orientation. Either to the left side of crossfader, to the right side or to the center (default). Clicking cycles through all the options.
- Microphone Volume Meter
This displays the microphone volume input signal strength.
- Microphone Gain Knob
Use this knob to adjust the gain of the microphone output. Try to keep the volume at a reasonable level to avoid signal clipping.
5.5. Preview Deck Section
The Preview Deck with a track loaded
Novo v verziji 1.11.
The Preview Deck is a special deck that allows you to pre-listen to tracks in the headphones before using them in your mix. Pre-listening a track does not change the tracks’s Played state as well as the play counter and is not logged in the History. Press CTRL + 4 (Windows/Linux) or CMD + 4 (Mac) to display the Preview Deck.
The features in detail:
Track Artist/Title: The artist and title of the track is displayed here. This is the same listed under the Track and Title column in the Mixxx library. This information is initially loaded from the track’s metadata.
Eject Track: Clicking this button ejects the track from the deck.
Waveform overview: Shows the various markers (Cues, Hotcues) within the track as well as the waveform envelope of the entire track. Clicking somewhere on the waveform allows you to jump to an arbitrary position in the track.
Gain: Move the slider to adjust the gain of the track.
VU-Meter: Shows the current volume of the track. If it’s too loud and distorted, a peak indicator flashes red.
Poglej Tudi
For more information, go to the chapter Previewing Tracks.