2. Getting Started
2.1. Opening Mixxx
![]() Once you’ve installed Mixxx, start by opening
Mixxx and importing your music to the Mixxx library.
Once you’ve installed Mixxx, start by opening
Mixxx and importing your music to the Mixxx library.
- Windows
Double-click the Mixxx icon on the Desktop. Alternatively, browse your Windows start menu and click the Mixxx icon, or perform a search for
Mixxx.exe.- Mac OSX
Double-click the Mixxx icon in the
Applicationsfolder. Alternatively, drag the Mixxx icon to the dock and double-click it there or search for mixxx in Spotlight.- GNU/Linux
Click the Mixxx icon in the applications menu or launcher of your desktop environment or perform a search for
mixxx. Alternatively type mixxx into the terminal, then hit Return. If your audio interface is not accessible from Mixxx because it is used by other applications via PulseAudio, you may close and restart Mixxx using pasuspender mixxx. See Command line options for an overview of Mixxx’s command line options.
2.2. Importing your audio files
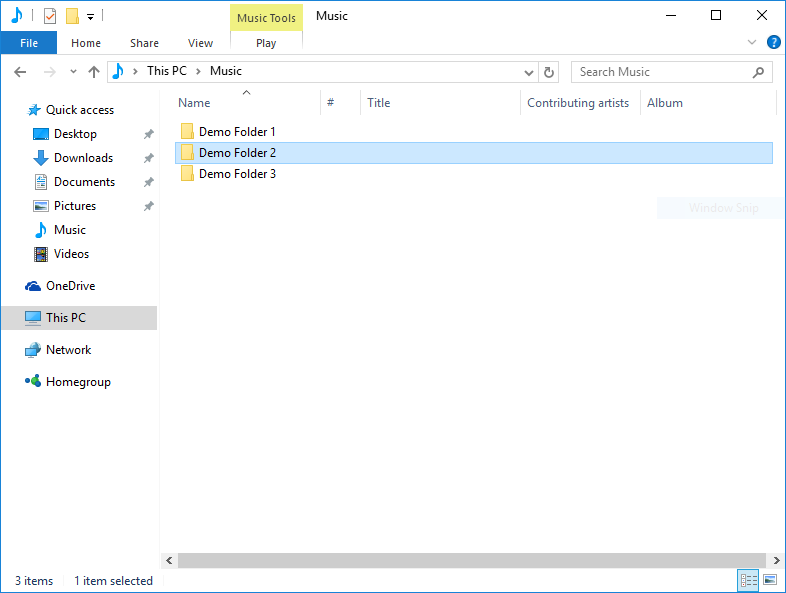
Mixxx running on Windows 10 - Choose music library directory dialog
The first time you run Mixxx, you are asked to select a directory where your music is stored. By default, the dialog points to a location where music files are typically held, but you can select any location on your computer.
Click Select Folder and Mixxx will scan your music library. Depending on the size of your library this could take some time. All the supported music files Mixxx detects will be listed in the Tracks - View and edit your whole collection.
If you want to refresh your library (for example because you added or moved files), you can do this with in the menu. If you want to rescan at every launch, select .
Waarschuwing
On Windows 7 and 8 the import dialog points to your Windows “Music“ Library, a special-purpose virtual folder. You can not use these virtual folders. Select a regular folder instead, usually “My Music“, like pictured above.
2.3. Analyze your library
 Mixxx automatically analyzes tracks the first time you load
them in a deck, nevertheless it is recommended that you analyze them before
playing live to ensure the beatgrids are correct. Furthermore, track
analysis takes considerable CPU power and might cause skips in the audio —
things you surely don’t need while performing.
Mixxx automatically analyzes tracks the first time you load
them in a deck, nevertheless it is recommended that you analyze them before
playing live to ensure the beatgrids are correct. Furthermore, track
analysis takes considerable CPU power and might cause skips in the audio —
things you surely don’t need while performing.
Once you have imported your music library, press OK on the Preferences window. Go to the Analyze view on the left side panel of the library. This allows you to run beatgrid, key, and ReplayGain detection on tracks in advance. While analyzing, the progress in percentage and total queue length are shown.
Zie ook
For more information, go to Beat Detection.
2.4. Configuring sound input and output
Before you can start using Mixxx, you need to configure Mixxx to use your sound hardware in . You do not need to configure all inputs and outputs.
The DJ Hardware chapter explains different types of DJ hardware and how to set them up with the the input and output options. For Mixxx to perform the best it can on your system, configure the other Sound Hardware preferences in addition to the inputs and outputs.
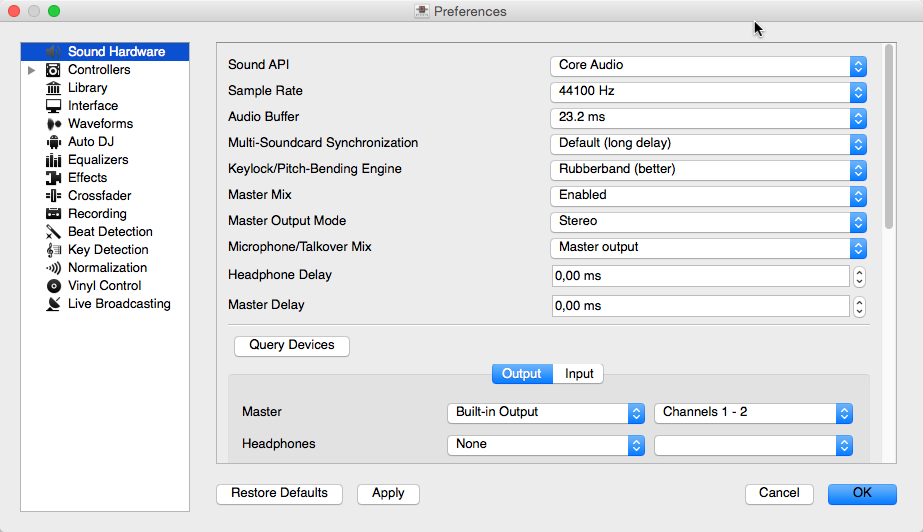
Mixxx Sound Hardware Preferences
2.4.1. Output Options
Internal mixing:
Use these outputs if you are not using an external hardware mixer. If you are using a controller with a built-in audio interface, use these outputs.
Master: all decks, samplers, microphones, and auxiliary inputs mixed together. This output is sent to the speakers for the audience.
Headphones: all decks, samplers, microphones, and auxiliary inputs assigned to pre-fader listening
Booth: same as Master output, but has a separate gain control
External mixing:
Decks 1-4: the individual unmixed decks to send to an external mixer
Bus Left/Center/Right: all decks, samplers, and auxiliary inputs assigned to each side of Mixxx’s crossfader
2.4.2. Input Options
Internal mixing:
Use these inputs if you are not using an external hardware mixer. If you are using a controller with a built in audio interface, use these inputs.
Microphone 1-4: live microphone or musical instrument inputs
Auxiliary 1-4: other sound sources
External mixing:
Record/Broadcast: When this is configured, Mixxx will record and broadcast from this audio interface input instead of the internal master mix. If you have a microphone plugged into the mixer, do not configure the Microphone 1-4 inputs.
Either internal or external mixing:
Vinyl Control 1-4: timecode input from turntables or CDJs for manipulating decks 1-4
Zie ook