7. Controlling Mixxx
Mixxx can be controlled with a keyboard, a mouse, MIDI/HID controllers, time-code records/CDs, or a combination of these. The choice usually depends on your budget or style of DJing.
7.1. Using a Mouse and Touchpad
Use your mouse to interact with the controls in the Mixxx User Interface on your computer screen. You can perform actions by pointing and clicking with your mouse.
Single Left Click: Performing a left mouse click on buttons triggers the default action for that control. Moreover if you click on a value in the track list of the Mixxx library, you can change the value. For example the year of a track.
Single Right Click: On most buttons, performing a right click triggers a different action than a left click. You can return any knob or fader to its default value by right-clicking that control.
Mouse Drag: Click on a knob or fader, hold the left mouse button and move your cursor to change the value of the control. Use mouse drag to drop tracks from the file list to the decks, crates, playlists, etc.
Mouse Wheel: Just like Mouse Drag, you can change knob and fader values by placing the cursor over the control and moving the mouse wheel.
Ndihmëz
If you hover with the mouse over a control (e.g the crossfader) in the Mixxx user interface, the tooltip lists the left- and right-click action respectively.
Ndihmëz
On a Macbook or a computer with a touchpad that lacks mouse buttons, a two-finger click gesture is often treated as a right click.
Shihni edhe
Using the Mouse drag/wheel on the waveforms you can adjust zoom and playback rate of the tracks. For more information, go to Waveform Displays.
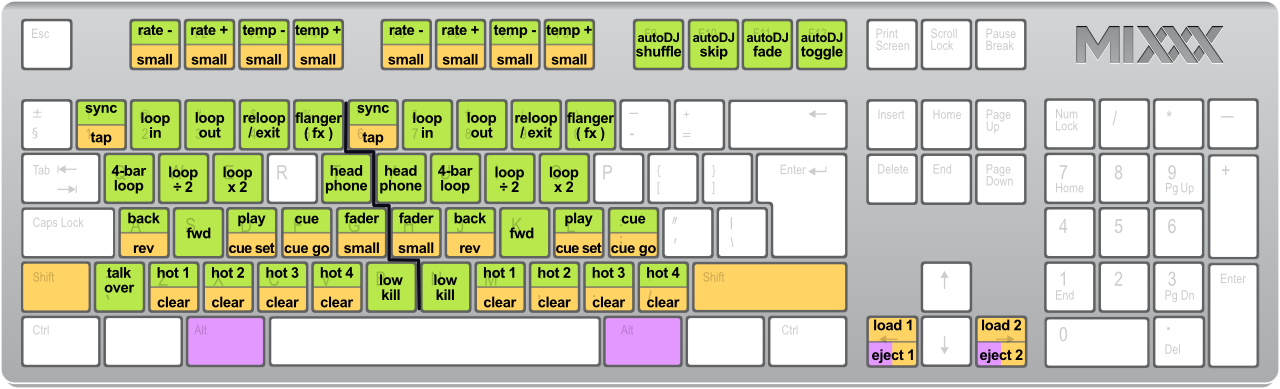
7.2. Using a Keyboard

Mixxx Keyboard shortcuts (for en-us keyboard layout)
Controlling Mixxx with a keyboard is handy. Unlike mouse control, the keyboard allows you to manage things simultaneously. For example, you can start playing a track on deck 1 whilst stopping deck 2 at the same time.
The default mapping for English keyboards is depicted in the figure above. It is divided into a left-hand side for deck 1 and right-hand side for deck 2. Please note that you can also access the functions through Mixxx’s interface.
For some user groups, like those using controllers or vinyl control, it might be useful to enable/disable the keyboard mappings at runtime. You can do so by clicking .
Ndihmëz
If you hover with the mouse over a control (e.g. the crossfader) in the Mixxx user interface, the tooltip lists the keyboard shortcuts of the control among a description of the control.
Shihni edhe
For a list of default shortcuts, go to Keyboard mapping table.
7.2.1. Customizing the keyboard mapping
Mixxx allows you to customize the keyboard control. For more information, go to:
7.3. Using MIDI/HID Controllers
Mixxx supports MIDI and HID controllers which are external hardware devices used to control audio applications. Many DJs prefer the hands-on feel of a controller with Mixxx because it can feel similar to using a real mixer and turntables or CDJ.
7.3.1. Loading a controller preset

Mixxx Preferences - Loading a controller preset
Without loading the correct preset, your controller does not work with Mixxx.
Connect your controller(s) to your computer
Start Mixxx
Go to
Select your device from the list of available devices on the left, and the right pane will change
Activate the Enabled checkbox
Select the mapping for your controller from the Load Preset drop-down menu
Click Apply and Mixxx can now be controlled by your controller(s).
Repeat step 4-7 for any of the controllers you want to use
Ndihmëz
If you do not find a connected device in the list, make sure to install any necessary drivers for that device.
7.3.2. Supported controllers
Mixxx can use any MIDI/HID controller that is recognized by your OS (some may require drivers), as long as there is a MIDI/HID mapping file to tell Mixxx how to understand it. Mixxx comes bundled with a number of mappings for various devices. There are two levels of controller mappings:
Mixxx Certified Mappings: These mappings are verified by the Mixxx Development Team.
Community Supported Mappings: These mappings are provided and have been verified as working by the Mixxx community, but the Mixxx Development Team is unable to verify their quality because we don’t have the devices ourselves. They might have bugs or rough edges.
If you run into issues with any of these mappings, please file a bug report on our Bug Tracker or tell us about it on our mailing list, forums, or IRC channel. Device support varies for each supported OS, so make sure to consult the documentation of the device.
Ndihmëz
Additional mappings are available in the Controller presets forum.
Shihni edhe
Before purchasing a controller to use with Mixxx, consult our Hardware Compatibility wiki page. It contains the most up-to-date information about which controllers work with Mixxx and the details of each.
7.3.3. Installing a preset from the forum
To use a controller mapping that did not come bundled with Mixxx, place the controller mapping in your User Presets folder. This is the folder called «controllers» inside your User Preferences folder. To open your User Presets folder, go to and click the Open User Preset Folder button. Alternatively, navigate to the folder in your OS file browser:
GNU/Linux:
/home/<username>/.mixxx/controllersmacOS:
/Users/<username>/Library/Application Support/Mixxx/controllersWindows Vista and newer:
C:\Users\<username>\AppData\Mixxx\controllersWindows XP:
C:\Documents and Settings\<username>\AppData\controllers
On Windows, the AppData folder is hidden, so if you have not already,
you will need to set Windows Explorer to show hidden files and folders (how to
do this varies with each version of Windows).
If the mapping was posted as a .zip file, first extract the .zip
file by right clicking on it in your file browser and selecting the option for
extracting an archive or compressed folder. Copy the .xml file into your
User Preset folder. If there is a .js file, also copy that to your
User Preset folder. Restart Mixxx and load the preset.
7.3.4. Map your own your controller
There is no mapping available for your controller or you want to change an existing mapping? You can map your controller by using the Controller Wizard or take full control with the MIDI Scripting support in Mixxx.
Shihni edhe
Go to Adding support for your MIDI/HID Controller for detailed information.
7.4. Using Timecode Vinyl Records and CDs
Vinyl control allows a user to manipulate the playback of a track in Mixxx using a turntable or CDJ as an interface. In effect, it simulates the sound and feel of having your digital music collection on vinyl. Many DJs prefer the tactile feel of vinyl, and vinyl control allows that feel to be preserved while retaining the benefits of using digital audio.
Shihni edhe
Go to Vinyl Control for detailed information.