Hercules P32 DJ
https://www.hercules.com/wp-content/uploads/2018/05/HerculesDJ_HerculesP32DJ_top-1400x747.jpg
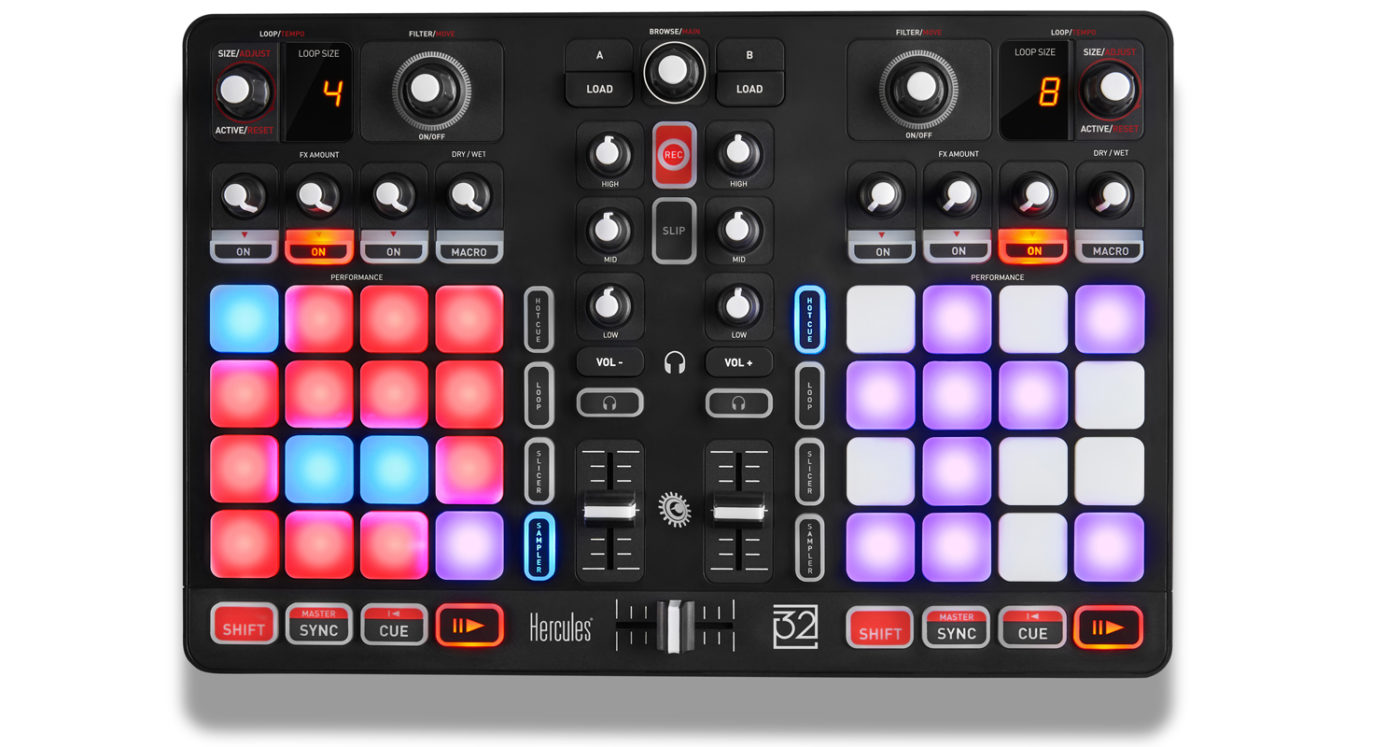
The Hercules P32 DJ is a relatively compact DJ controller with a built-in sound card. Rather than jog wheels, it has a 4 x 4 multicolor (red/blue/purple) pad grid for each deck. The pad grids can be switched between 4 different layers to perform a variety of functions.
Thanks to Hercules for supporting the development of this mapping by providing a controller.
Uusi versiossa 2.1.
Muutettu versiossa 2.3.0: Add pitch controls in loop mode and increased head mix knob precision.
Muutettu versiossa 2.3.5: Dry/Wet knobs can be replaced by pregain (optional)
Compatibility
This controller is a class compliant USB MIDI and audio device, so it can be used without any special drivers on GNU/Linux, Mac OS X, and Windows. However, it recommended to install the driver on Windows to be able to use the ASIO sound API.
Sound card setup
This device has a built in 4 channel output sound card. There are 2 RCA outputs for the main output and a 1/4” TRS stereo headphone jack. There are buttons in the center of the controller that adjust the sound card’s headphone output volume in hardware. These do not adjust the headphone gain in Mixxx.
Varoitus
There is no master output volume control on the device, but the master output volume of the sound card can be controlled from the OS mixer. The device comes with the main output set to 45%. So, for the best gain staging, turn the volume of the main output all the way up in your operating system mixer.
Mapping description
User configurable options
There are a few user configurable options available for you to customize. You can change these by opening the Hercules-P32-scripts.js file with your text editor of choice (such as Notepad, TextEdit, Kate, or gEdit) and editing the lines at
the very top of the file.
loopEnabledDot: whether to use the dot on the loop size LED display to indicate that a loop is active. This restricts loop sizes to 2-32 beats and may be helpful if you never use loops less than 2 beats long. Otherwise the dot indicates a loop size equal to 1/(# on the LED display).
samplerCrossfaderAssign: whether to assign the samplers to the crossfader. If true, the samplers controlled by the left pad grid are assigned to the left of the crossfader and the samplers controlled by the right pad grid are assigned to the right of the crossfader.
toggleEffectUnitsWithDecks*: whether to automatically toggle the effect unit controls between units 1 & 3 on the left and units 2 & 4 on the right when toggling decks between decks 1 & 3 and 2 & 4
Encoders
The encoders do not behave exactly as labeled.
Browse encoder: scrolls through library. Pushing toggles big library view. Turning with shift controls the cue/main mix going to the headphone output. Pushing with shift toggles split cue mode (left ear of headphone output plays cue signal, right ear plays main signal).
The mapping of the encoders does not match their labels. They are labeled on the controller symmetrically, but they are mapped asymmetrically like the rest of the deck controls:
Left encoder: Turning halves/doubles the loop size. Turning with shift beatjumps by 1 beat forward/backward, or if a loop is enabled, moves the loop 1 beat forward/backward. Pushing (de)activates a loop. Pushing with shift reactivates a disabled loop, or if a loop is enabled, jumps to the loop in point and stops the deck.
Right encoder: Turning adjusts the pitch, or with keylock on, just the tempo. Pushing resets the pitch to the track’s default. Turning with shift jumps forward/backwards by the beatjump size. If a loop is enabled, turning with shift moves the loop by the beatjump size. Hold shift, push, and turn to adjust the beatjump size, shown on the LED display on the controller. When the encoder is released, the LED display goes back to showing the loop size.
Effects
Refer to the Standard Effects Mapping page for details on how to use the effects sections.
When the pad grid is in Slicer mode, the pads in the top left of the grid assign the deck to Effect Units 1-4.
Pressing the headphone button with shift assigns the effect unit on that side to the headphone channel. This is useful for previewing an effect on a playing deck before using it. The headphone (PFL) button must also be pressed on the deck to hear the effect on it in headphones.
Other controls
Record button: toggles recording on and off.
Slip button: toggles slip mode on and off for all decks. With shift, toggles between decks 1 & 3 on the left and decks 2 & 4 on the right.
Pad grid: Press the Hotcue/Loop/Slicer/Sampler buttons to activate different modes
Hotcue mode: Press an unlit pad to set a hotcue. Press a red pad to activate a hotcue. Press a red pad with shift to delete a hotcue.
Loop mode: Control manual loops and other miscellaneous functions. On the top row, from left to right, the pads set the loop in point, loop out point, and toggle the loop (without changing its size). Hold the loop in or loop out button while moving the waveform with the mouse to adjust the loop in/out point (new in Mixxx 2.1). On the bottom row, the two purple buttons temporarily decrease/increase the playback speed while they are held down for beatmatching. The button to the right of those shifts the beat grid to the current position. The right column is for pitch management, from top to bottom: match the key with the other track, pitch up, pitch down, and reset to the default key of the track.
Slicer mode: refer to Effects section above
Sampler mode: Press an unlit pad to load the track selected in the library to that sampler. Pads are blue when the sampler is loaded but not playing and red when playing. Press a blue pad to play the sample from its cue point. Press a red pad to jump back to the sample’s cue point. Press a red pad with shift to stop a playing sample. Press a blue pad with shift to eject a sample. Note that samplers are independent from decks; the left grid controls samplers 1-16 and the right grid controls samplers 17-32.
Sync: Short press to sync to other deck. Press and hold to enable master sync.
Shift + sync: toggle quantize
Shift + cue: jump to beginning of track and stop
Shift + play: toggle reverse playback
Shift + load: ejects a track from the deck
EQ knobs, volume faders, crossfader, headphone button, play, cue, sync, and load all behave as labeled. Dry/wet knob can optionally be used as pregain (see dryWetKnobAsPregain variable)