12. Sendo DJ com o Mixxx
O Mixxx foi projetado para ser fácil de aprender para DJs novos e experientes.
This part of the manual provides you with directions for using Mixxx’s features to create your own mixes.
12.1. Setting Your Levels Properly (Gain Staging)

Setting your levels properly, also known as gain staging, is essential for getting the best sound quality out of the equipment you are using. At every link in your signal chain, from Mixxx’s channel gains to the power amplifier, the level should be well above the noise floor, but lower than the maximum level before the signal clips. The level meters should mostly be around the top of their green region. The level meter pictured to the left shows where Mixxx’s level meters should average at the loudest parts of tracks. The average level should not be in the yellow region. Use the yellow region to leave headroom, or available level above the average before the signal clips. The loudest parts of the music (the transients) should briefly go into the yellow region.

A waveform at a good level. Note that the example waveforms in this section were made by adjusting the visual gain of the waveform display in Mixxx to illustrate the concepts. Adjusting the visual gain of the waveform display does not change the level of the audio.

If a level meter is in its red region, the signal is clipping and the gain should be turned down. Some equipment doesn’t have a level meter and only has an LED that turns on when the signal clips. Clipping means that the peaks of the waveform are flattened because the equipment has reached the maximum level that it can amplify the signal to. This distorts sound in an unpleasant way and can damage equipment by driving it with more power than it is designed to handle. Increasing the gain past the point where clipping begins (further into the red on a meter) will distort the signal more. If you want to make the sound louder when every part of the signal chain is at its maximum without clipping, use more speakers or use speakers that are more sensitive and convert electrical energy into acoustic energy more efficiently.

A clipping waveform

On the other hand, the signal should not be too low. This is because every audio device generates a little noise at a level referred to as its noise floor. Additionally, analog signals pick up noise as they travel along wires. The signal measured by the meter on the left is relatively close to the noise floor. When a device is turned up, the noise floor does not go up; only the signal does. However, every time the signal is amplified by the gain of another piece of equipment, both the noise and the signal from previous devices in the signal chain are amplified. For example, if your sound card is turned down and you turn the gain up on your mixer to compensate, the signal-to-noise ratio (SNR) of the sound card output will be low and the mixer’s gain will amplify the signal and the noise from the sound card, plus the noise picked up along the wire. The end result will have more noise than if the output of the sound card was turned up before the signal reached the mixer and the mixer’s gain did not have to be turned up.

A waveform that is too close to the noise floor
Nota
To adjust the output volume of a sound system while maintaining a high signal-to-noise ratio, the gain should be adjusted as close to the speakers as possible. Refer to the Gain Knob section for details.
12.2. Beatmatching e Mixagem
Beatmatching is the process of adjusting the playback rate of a track so that it matches the tempo of another track. Beatmatching also involves adjusting the phase of the beats in a track so that they are aligned with the beats in the other track. Matching the tempo and aligning the beats are the two things a DJ must do to beatmatch.
O Mixxx pode igualar o tempo e alinhar as batidas para você porém isso requer um valor detectado de BPM preciso e uma grade de batidas correta para ambas as faixas. Para ativar esta funcionalidade, clique no botão guilabel:SINCRONIZAR. Para igualar as batidas manualmente, o tempo das duas faixas tem que ser sincronizado ao ajustar os deslizantes de taxa de reprodução. Você pode ajustar a fase das batidas ao clicar com o lado direito e arrastar em ambos os mostradores de onda para acelerar ou desacelerar temporariamente a velocidade até que as batidas se alinhem. Os botões de pitchbend temporários também podem ser usados para ajustar momentaneamente a taxa de reprodução, permitindo que você “empurre” as batidas da faixa para frente ou para trás, para que elas sejam alinhadas com as da outra faixa. Veja o capítulo Controles de Sincronização e Pitch.
Duas faixas tiveram um beatmatching terminado quando os seus tempos ficarem iguais e suas batidas forem alinhadas. Um beatmatching “perfeito” é praticamente impossível - existe sempre uma diferença minúscula nas taxas de reprodução. Um DJ afiado vai manter as suas orelhas abertas para ouvir as batidas ficando fora do alinhamento. Existe o distinto som de “bumbo grave duplo” que é precedido por um bumbo perdendo força porque os dois bumbos ficam fora de fase. Quando isso acontece, as batidas podem ser realinhadas simplesmente pressionando em um dos botões de pitch bend temporários algumas vezes na direção apropriada.
12.3. Sincronização Mestre
Master Sync is an intelligent assistant that allows you to leave the beatmatching to Mixxx so you can focus on track selection, effects manipulation, looping, 4 deck mixing, and other advanced DJing techniques.
To activate Master Sync on a deck, push and hold (or click and hold) the SYNC button. You’ll know Master Sync is on because the sync button will remain lit. Changing the rate of any deck that has Sync lit will change the rates of all other decks that also have the Sync button lit. There is no need to set specific decks to be a master or followers. You can play, stop, eject, load, and queue any track with master sync and it won’t interrupt the playback of the other decks. However, changing the rate of a stopped deck will change the rate of playing decks.
A Sincronização Mestre também vai perceber se uma de suas faixas é o dobro do BPM de outra faixa e vai igualar elas corretametne. Se você quiser mixar uma faixa de 140 BPM de drum & bass com uma faixa de 70 BPM de dubstep, a Sincronização Mestre irá certificar que as duas fiquem alinhadas corretamente.
Dica
Geralmente, a Sincronização Mestre vai certificar apenas que os deslizantes de taxa fiquem posicionados corretamente. Se você também quiser que as batidas fiquem sincronizadas, ativar o botão QUANTIZAR. Quando ativado, o botão Quantizar vai certificar que as batidas estão perfeitamente alinhadas também.
12.4. Mixagem Harmônica
Harmonic mixing is a technique to mix songs with matching melodies and harmonies. To learn more about harmonic mixing you might want to check out the mixshare archive.
Mixxx has two features to help you with harmonic mixing. The first is a key lock. When it is active changing the speed of a track won’t affect the key. To enable key lock, click the key lock button in the Grade de Botões de Opções do Deck. The second is that Mixxx can automatically detect the key of a track and will display it in the library and the decks. The notation which is used to display a key can be changed in Key Detection Preferences.
12.5. Gravando sua Mixagem
With the integrated recording feature you can record your mix as an audio file and listen to it later, distribute it as a Podcast or burn it to CD.
By default, Mixxx records the Master output. Alternatively, Mixxx can record the output of an external mixer if you have an audio interface configured for the Record/Broadcast input in . Refer to Recording And Broadcasting With An External Hardware Mixer for details.
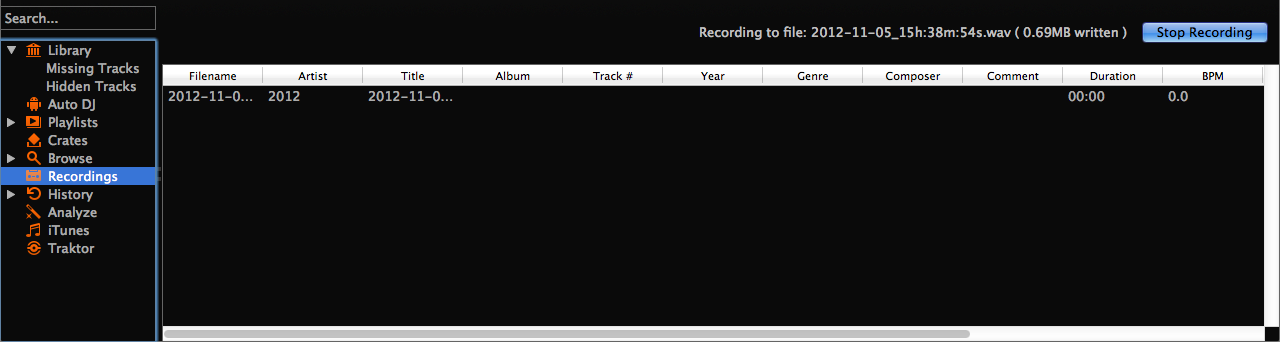
Biblioteca do Mixxx - Visualização das Gravações
Mixxx can record your mix in various audio formats and quality settings. You can
split your recordings, generate cue files, choose a custom
recording directory and even set your own metadata. By default, Mixxx
saves your recordings as lossless WAV files to a
Mixxx/Recordings sub-folder in the Mixxx music directory. Before you
start recording, we recommend that you adjust the settings in
.
Se você clicar no ícone Gravações na barra lateral da biblioteca do Mixxx, a tabela de faixas na direita vai mostrar o conteúdo do seu diretório de gravação. Novas gravações são automaticamente salvas nesse diretório e também os arquivos CUE se você escolher criá-los nas suas preferências.
Dica
Recording your mixes and listening to them later to critique yourself is a great tool for improving your DJing skills. Sending your mixes to other DJs for feedback can also be helpful.
Grave a sua miaxgem no disco
Click on the recording icon on top of the application window to start, and stop the recording session. The duration of the running recording is displayed next to the icon.
Nota
The recording widget might not be available in some skins.
Alternatively:
Clique no ícone Gravações na barra lateral para trocar para a visualização Gravações
Clique no botão Iniciar Gravação ou clique no menu no topo da janela da aplicação do Mixxx .
The display above the track table shows how much data has already been recorded, as well as the duration of the recording.
Faça a sua mixagem
Clique no botão Parar Gravação para parar a gravação quando a mixagem estiver terminada.
Dica
You can instantly play your recording as a track in Mixxx. Simply drag-and-drop the track to a deck.
12.6. Intro and Outro Cues
Intro/Outro cues are used to mix in and out of tracks and they can also be used with Auto DJ to mix in and out at those points. Unlike hotcues, they do not mark only one point. The into and outro are sections and each section is defined by two points.
Mixxx detects where the first and last sounds are when analyzing a track making it easy to stop playing silent parts at the beginning and at the end of the track. The analyzer places the intro start point at the first sound and the outro end point at the last sound. The first and last sounds are determined by the first time the signal rises above -60 dBFS and the last time it goes below -60 dBFS.
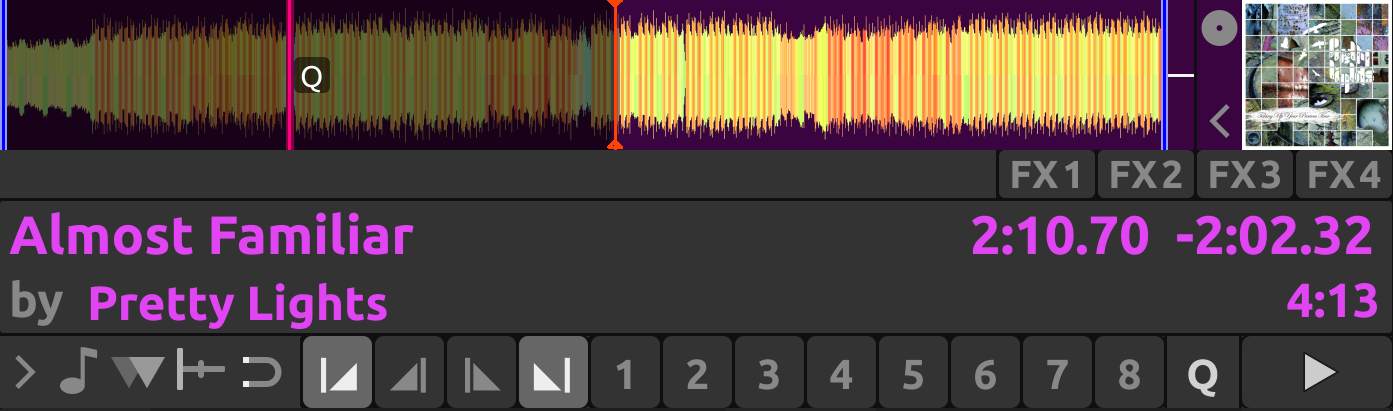
Intro start and outro end cues placed at the first and last sound of a track respectively by the analyzer
You can decide where to place the intro end and the outro start points. Marking the whole intro and outro allows Mixxx to calculate how long each section is and show it on the overview waveform. This information can help you know when to press play on the next track. Auto DJ can also use this information to line up tracks and determine how long to crossfade.
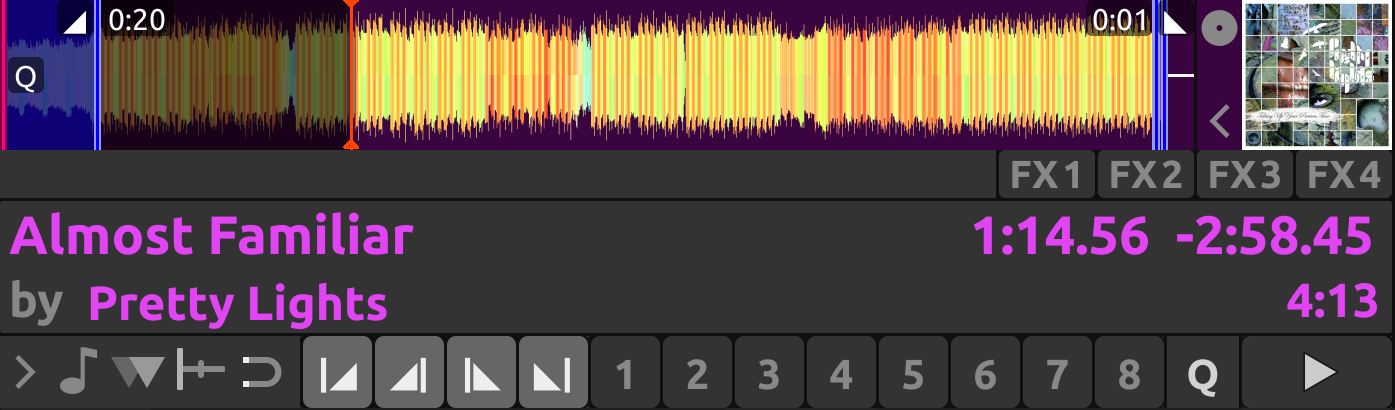
Intro end and outro start markers placed on the track alongside the intro start and the outro end markers to make sections
Mixing With Intro & Outro Cues
You can line up the ends of the intro and outro so the energy of the new song picks up right as the old track ends.

Intro and outro end markers aligned showing on the waveform
If the intro and outro are short enough to fit on the waveform at the same time, you can simply watch the waveforms and press play when the markers align. Otherwise, you can watch the time remaining on the deck and hover your mouse cursor over the outro end line on the overview waveform. Mixxx will show you how much time is left until that point. When that time equals the length of the intro, press play to precisely line up the end of the intro. If you have changed the tempo of the track, the time remaining scales to show the real time remaining at the adjusted tempo.

Alternatively, you can line up the start of the intro & outro. In this case, watch the scrolling waveform when the outro start point is coming up on the old track. Then, press play on the new track when the old track reaches the outro start.
Nota
There are no rules on which method should be used. The method you decide to use is an artistic judgement based on the musical content of each track, what the vibe of the crowd is at that moment, and what you want to do with the mix.
If you do not have the intro end and outro start points marked when loading a track, you can find and mark these in headphones before you mix in the track. Then seek back to the intro start to get the track ready. If you don’t have time to find the outro end point before mixing in the track, you can use the deck cloning feature to drag and drop to a new deck, then seek ahead on the new deck and listen in headphones to mark the outro start point. If you don’t have time to do that either, you can right click on the overview waveform where you think the outro starts. Then look for how far that is from the end of the track to compare it to the length of the intro of the next track.
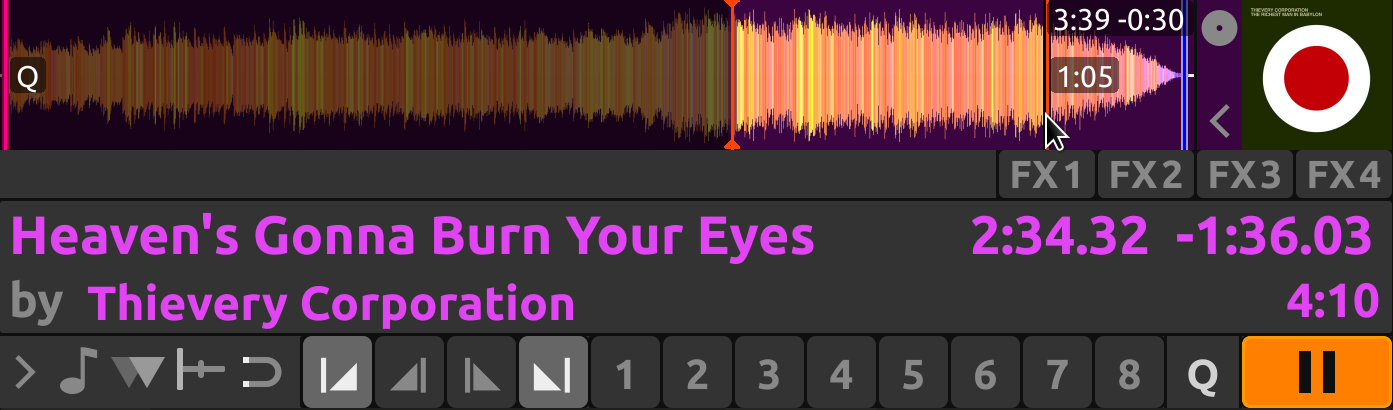
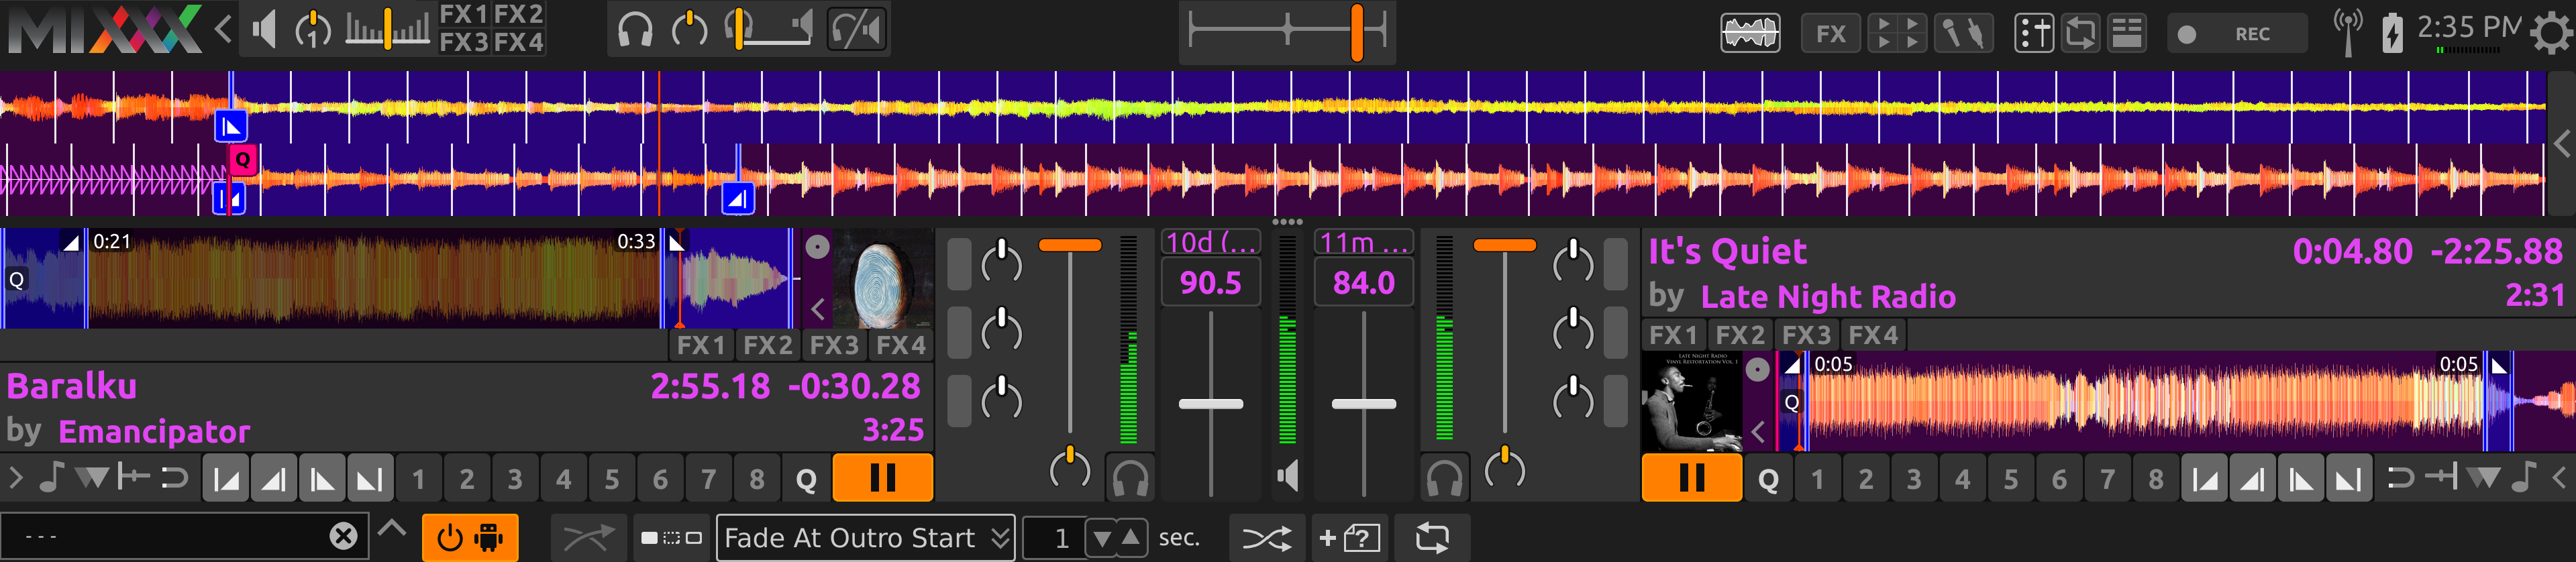
Here the outro is approximately 30 seconds long. However, the analyzer placed the outro end point before the end of the track, so the outro is actually a little bit shorter than 30 seconds. Without marking the outro start point, you would have to do some math in your head to find exactly how long the outro is.
12.7. Auto DJ
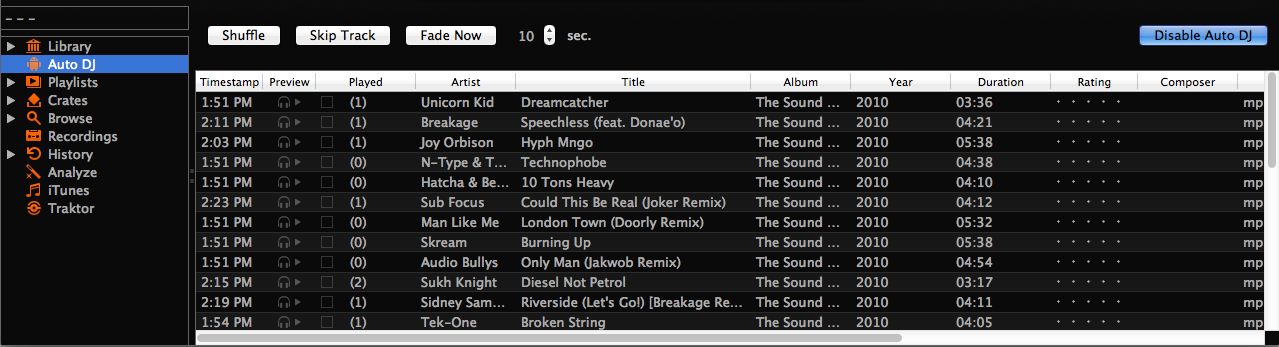
Biblioteca do Mixxx - Visualização do Auto DJ
O Auto DJ permite que você carregue automaticamente faixas da lista de reprodução do Auto DJ quando a faixa atual estiver quase acabando, e faz a transição para ela. Veja Auto DJ - Automatize a sua mixagem.
Auto DJ does not take into account the volume of each track, nor the frequency content, nor the rhythms, so it’s not intended to be a replacement for a human DJ. However, it is good enough to give a human DJ a break without a major disruption to the mix.
Carregando faixas no Auto DJ
Para tocar faixas automaticamente, elas primeiro tem que ser carregadas na lista de reprodução do Auto DJ. A lista de reprodução do Auto DJ é vazia por padrão.
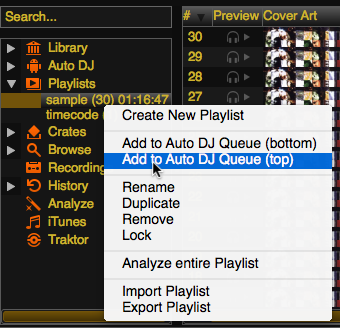
Biblioteca do Mixxx - Adicionando uma lista de reprodução no Auto DJ
Existem várias maneiras de carregar faixas na lista de reprodução do Auto DJ:
Selecione uma ou várias faixas da biblioteca, uma lista de reprodução normal ou caixa e arraste elas para o ícone do Auto DJ na esquerda.
Selecione uma lista de reprodução normal ou caixa, clique com o lado direito e selecione Adicionar ao Auto DJ do menu do mouse. Isso adiciona todas as faixas ao Auto DJ.
Enquanto você estiver na visualização do Auto DJ da biblioteca, arraste arquivos de gerenciadores de arquivos externos para o ícone do Auto DJ na barra lateral ou para a tabela de faixas do Auto DJ na direita.
Automatically adding tracks from crates
Instead of inserting the contents of the crates directly into the Auto DJ playlist, Auto DJ crates are associated crates that become a source of random track selections.
Add a crate to the Auto DJ track sources: Expand the Auto DJ item in the sidebar, and right-click on the Crates sub-item. Select one of the existing crates from the list. This makes the content of the crate available for random selection into the Auto DJ queue for automatic mixing. The name of the crate is now listed as sub-item below.
If you do not have any crates available for selection in the list, go and create a crate first and add some tracks, see Crates - Organizing tracks into collections.
Manually add tracks from track sources to Auto DJ: Click the Auto DJ item in the sidebar and switch to the Auto DJ view of the library. Click the Add random button to add one track at the time from Auto DJ track sources to the bottom of the Auto DJ playlist.
Nota
If you did not set any crates as an Auto DJ track source, clicking the Add Random button will add a randomly selected track from the whole library instead.
Automatically add tracks from track sources to Auto DJ: Mixxx can randomly add tracks to the Auto DJ playlist from track sources as soon as a specified minimum number of tracks remain. Select . Set to change the minimum number of tracks after which random tracks may be added.
Nota
If you did not set any crates as an Auto DJ track source, tracks are selected from the whole library instead.
Remove a crate from the Auto DJ track sources: Expand the Auto DJ item in the sidebar, and right-click on one of the crates listed below the Crates sub-item. Select Remove Crate as Track Source to remove the crate from the Auto DJ track sources.
Tocando faixas no Auto DJ
Agora que você carregou faixas na lista de reprodução do Auto DJ, você pode ativar o Auto DJ assim:
Clique no ícone do Auto DJ na barra lateral para mudar para a visualização Auto DJ da biblioteca.
Clique no botão Ativar Auto DJ.
As primeiras faixas da sua lista serão carregadas nos decks e a reprodução começará.
O Mixxx vai continuar a mixar automaticamente até que a lista de reprodução do Auto DJ esteja vazia.
Clique no botão Desativar Auto DJ para parar a mixagem automática
Dica
You can add a track to the end of the Auto DJ playlist once it is played instead of removing it. Set .
Auto DJ Mix Modes
Auto DJ has several modes it can use to mix tracks:
Full Intro + Outro
Fade At Outro Start
Full Track
Skip Silence
The Full Intro + Outro and Fade At Outro Start modes both use the intro and outro cues but the Full Track and Skip Silence cues do not.
Full Intro + Outro and Fade At Outro Start
The Full Intro + Outro and Fade At Outro start Auto DJ modes use the intro & outro cues to determine how long to crossfade and how to align the tracks in time. In both modes, Auto DJ compares the duration of the outro of the old track and the intro of the new track. Auto DJ picks the time of the shorter section as the crossfade time.
In both modes, if the outro is shorter than the intro, Auto DJ will align the start of the outro with the start of the intro.
Intro and outro start markers aligned by Auto DJ
The two modes work differently when the outro is longer than the intro.
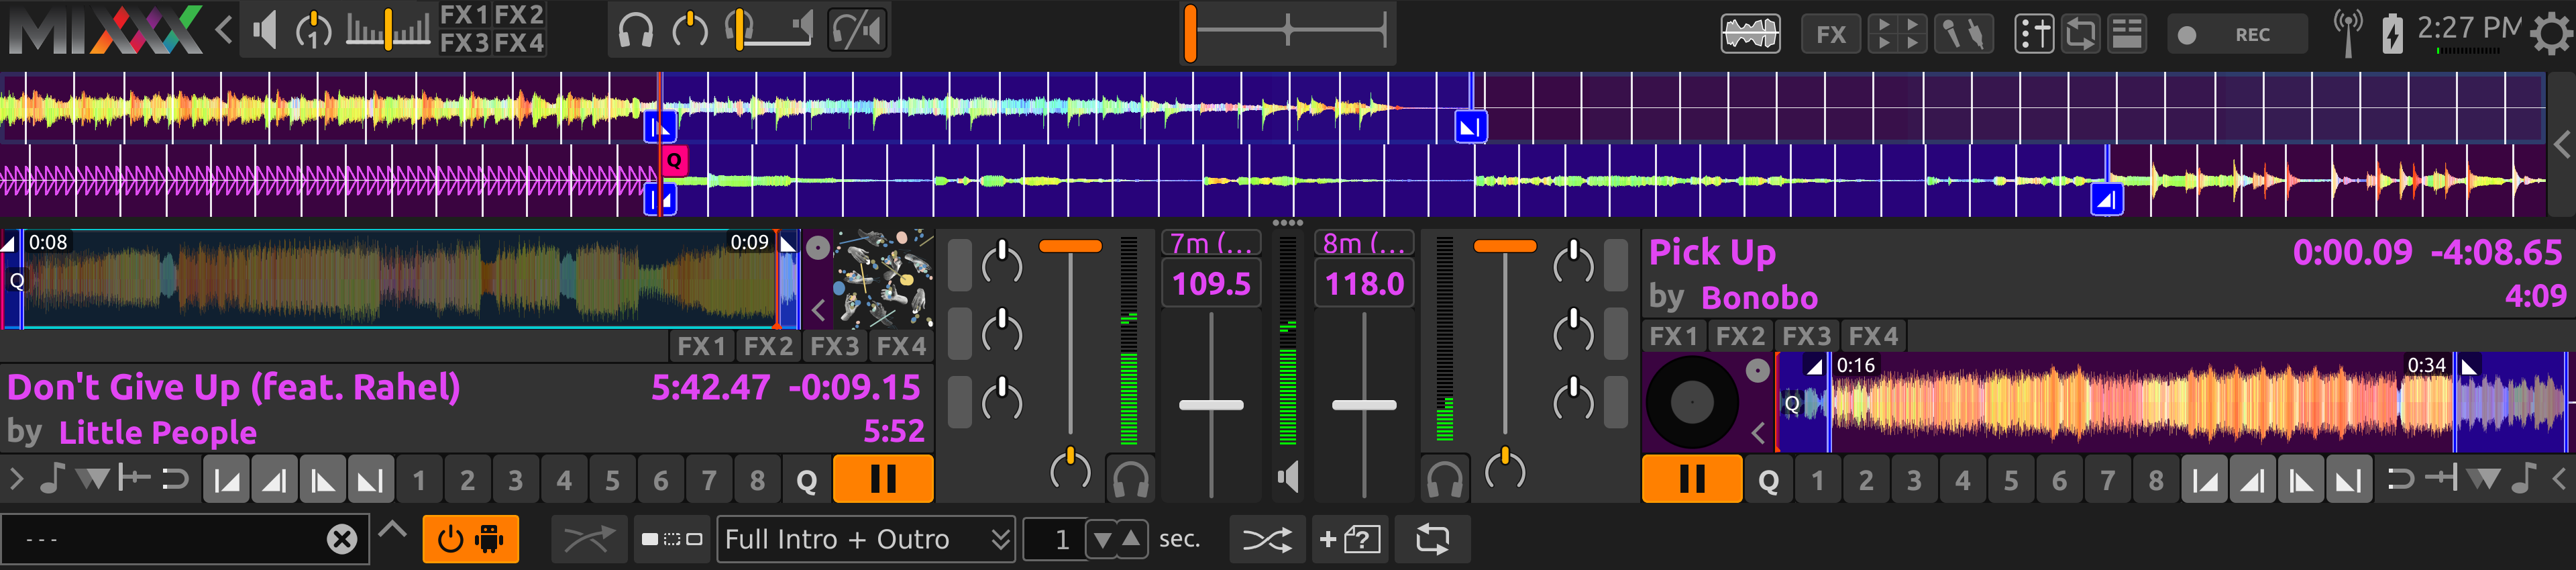
- Full Intro + Outro Mode
The full length of both the intro and the outro are always played. When the outro is longer than the intro, Auto DJ aligns the end of the intro and outro by starting the next track during the outro of the previous track. This mode is the most likely to sound good with the widest variety of tracks. Therefore, it is the default mode.
Intro and outro start cues aligned by Auto DJ in Full Intro + Outro mode
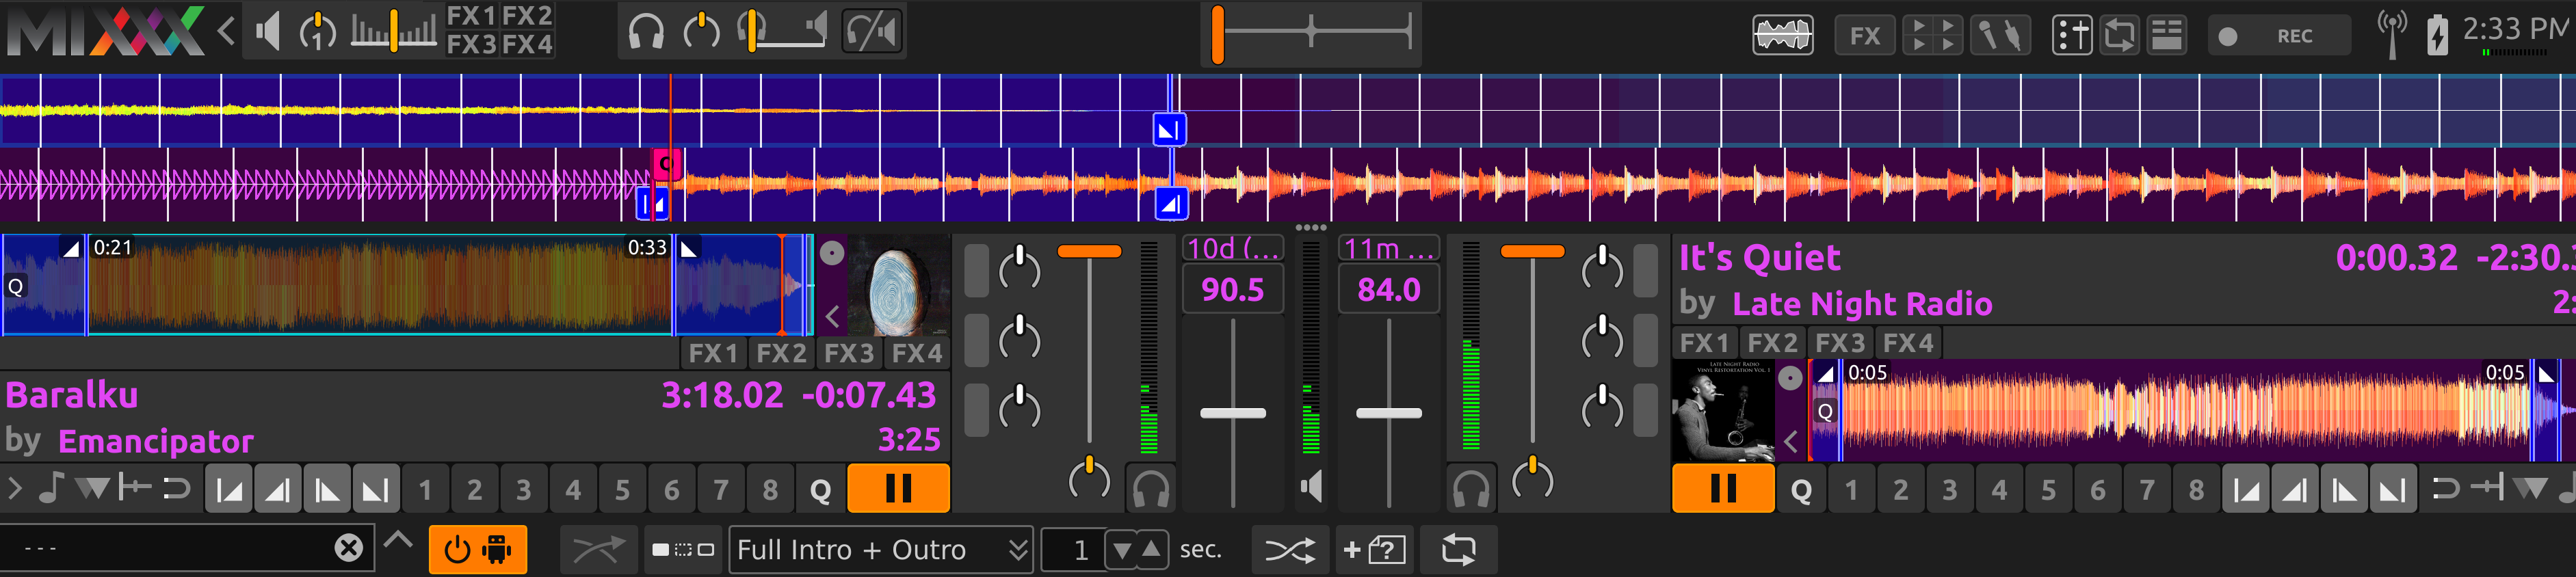
- Fade At Outro Start
Auto DJ always aligns the start of the intro and outro. When the outro is longer than the intro, Auto DJ cuts off the end of the outro. This can be helpful if you want to prevent the energy of the mix from declining during a long outro. However, the transition may sound abrupt if the intro is short.
Intro and outro start cues aligned by Auto DJ in Fade At Outro mode
Full Track and Skip Silence
The Full Track and Skip Silence Auto DJ modes do not use the intro and outro cues. They crossfade tracks over a number of seconds that you specify in the box next to the mode selection menu. The Full Track mode plays the entire length of every file. The Skip Silence mode works the same way but automatically cuts out silence at the beginning and ends of tracks (defined as when the signal first goes above or below -60 dBFS).
Dica
If you still want to use Auto DJ like a normal music player application, use one of these modes with a transition time of 0 seconds.