Numark Mixtrack Platinum
The Numark Mixtrack Platinum is a 2 channel (with 4 channel layering) entry level DJ controller with an integrated audio interface. The stand out feature of the Mixtrack Platinum is the LCD displays integrated into the jog wheels. It is a USB Audio and MIDI Class compliant device and works with Linux, macOS, and Windows.
在 2.2 版本加入.
Audio interface
Configure Mixxx’s Master output for channels 1-2 and Headphones output for Channels 3-4.
The microphone input on this controller is not available to the computer through the controller’s audio interface. It is mixed with the master output in hardware, so this controller’s audio interface is not suitable for broadcasting or recording the inputs. If you want to use the controller for broadcasting or recording, a separate audio interface with a microphone input is suggested.
Configuration Options
Configuration options can be set in the mapping. You will need to edit the values below at the very top of the JavaScript file Numark-Mixtrack-Platinum-scripts.js and save changes. Allowed values
are “true” or “false” unless specified.
EnableWheel: if true, wheel/vinyl mode will be enabled by default (defaults to true)
ShowTimeElapsed: if true, time elapsed will be show by default on the displays, otherwise time remaining will be displayed (defaults to true)
UseManualLoopAsCue: if true, the manual loop controls will behave as hotcues 5-8. When enabled, the normal loop control behavior can be activated using shift+pad mode+mode button and pad mode+mode to use the hotcue behavior (defaults to false)
UseAutoLoopAsCue: if true, the auto loop controls will behave as hotcues 5-8. When enabled, the normal loop control behavior can be activated using shift+pad mode+mode button and pad mode+mode to use the hotcue behavior (defaults to false)
UseCueAsSampler: if true, the hotcues will control sampler slots 5-8 when sampler mode is active. When enabled, the normal hotcue control behavior can be activated using shift+pad mode+sampler while pad mode+sampler will activate the special behavior (defaults to false)
ShiftLoadEjects: if true, pressing shift + load will eject a track (defaults to false)
Mapping
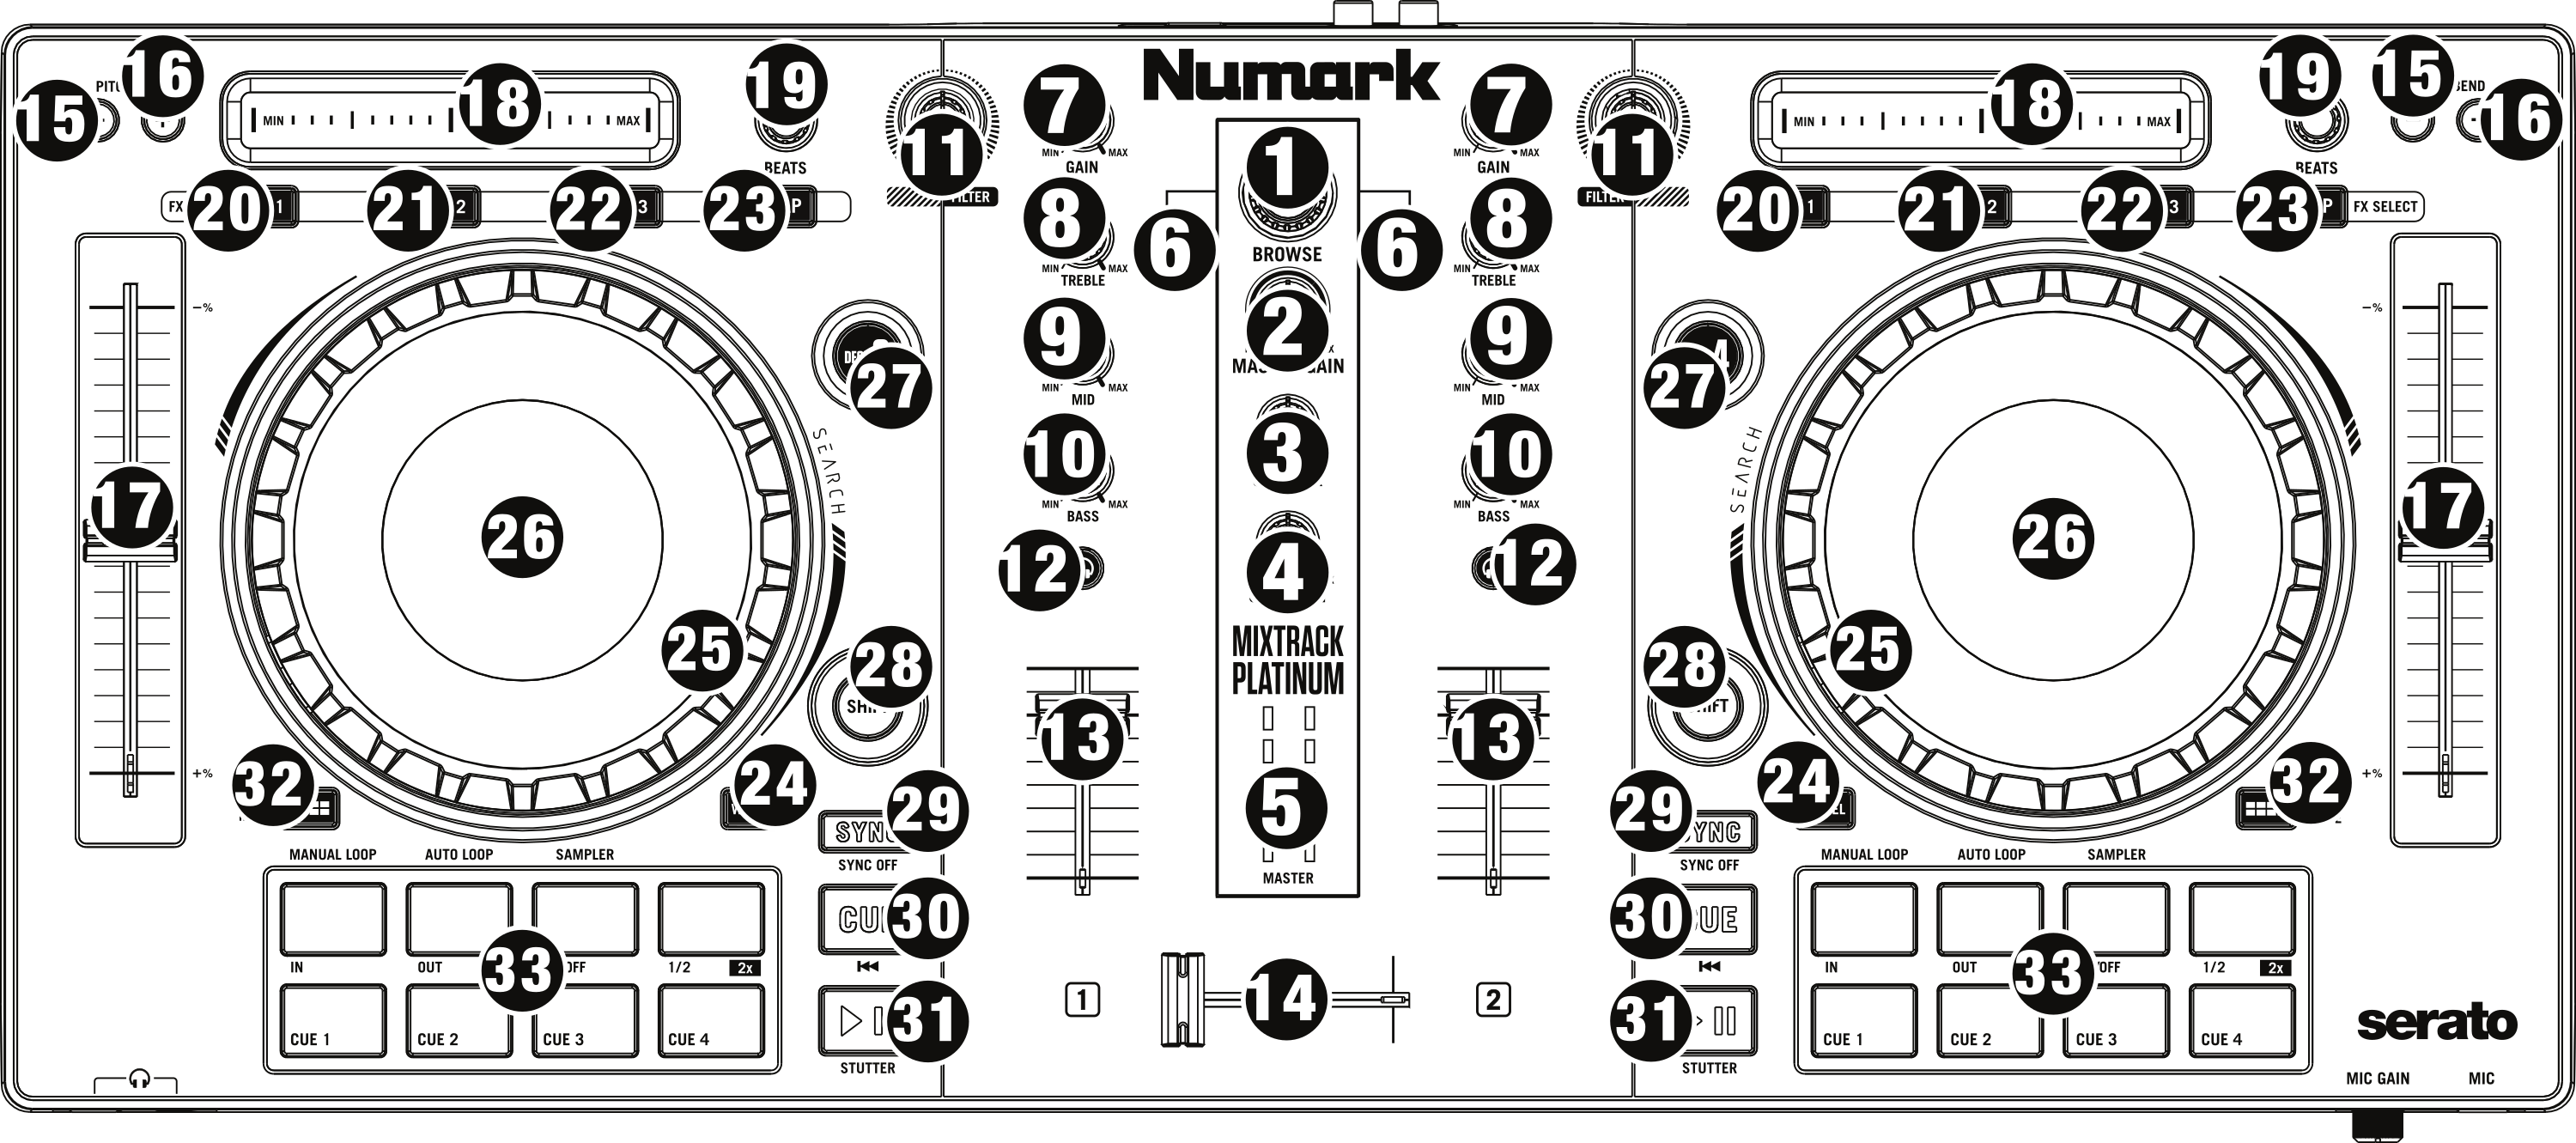
Numark Mixtrack Platinum (schematic view)
Cue Mix: Adjusts the software’s audio output to the headphones, mixing between the cue (PFL) output and the master mix output.
5. VU Meter: Monitor the volume levels of the master output and each channel. When cue/pfl is active on ANY channel, the meter shows the mono levels each channel (left meter shows the deck on the left, right meter for the deck on the right). Otherwise the meter shows the stereo levels of the master output.
12. Cue/PFL/Headphones: Sends pre-fader audio to the headphone output. If any channels have the cue button active, the VU meter will show channel output levels instead of master output levels on all decks.
Volume fader: Adjusts the volume of the deck.
Crossfader: Controls the blend between the two decks.
17. Pitch Fader: Adjust the speed of the music (activate keylock to adjust tempo without affecting pitch). Note that moving the fader down increases speed, as marked by the “+” at the bottom of the fader on the controller. This can be reversed in Mixxx’s preferences under Interface > Speed slider direction.
Beats Knob: Adjusts the Dry/Wet mix of the deck’s Effect Unit.
Deck Switch: Allows switching between decks 1/3 and 2/4.
Shift: Allows alternate options to be activated for various controls.
Performance Pads:
The top row of pads is for controlling loops and samples. To select a mode, hold down the Pad Mode button and press one of the upper pads. An LED under the pad section indicates the currently selected mode. See the subsections below for details about each mode.
Note: the top row can be made to control hotcues 5-8 using shift+pad mode+loop mode (being Auto Loop or Manual Loop). This can also be made the default using a config option (see documentation above and below).
Manual Loop Mode
Hold Pad Mode and press the pad marked Manual Loop (silkscreened above the pad) to assign the upper 4 pads to the functions listed below:
Loop In – Sets the beginning of a loop: When assigned, the Pad LED will light blue
Loop Out – Sets the end point for the loop: When assigned, the Pad LED will light blue
On/Off – (De)activate the loop. If a loop has not been set, this button will have no effect.: When assigned, the Pad LED will light blue
Loop x1/2 – Halve the length of the loop. Press Shift + Loop x1/2 to double the length of the loop. Note that this does not update the beatloop size shown on screen.
If Manual Loop is selected with Shift and Pad Mode held down this will activate control of hotcues 5-8 on the upper row instead of the looping controls. Select Manual Loop again while holding Pad Mode to restore the default behavior. There will be no indication of which mode is selected (beyond the LEDs on the keys themselves, which will vary depending on loop and hotcue status). The UseManualLoopAsCue config option can be set in the mapping file (see above) to swap the default “shadow” mode of the looping controls such that hotcue control will be the default and manual loop control with be selected when Shift is used.
Auto Loop Mode
Auto 2: – Sets and starts playback of a 2-beat autoloop.
Auto 3: – Sets and starts playback of a 4-beat autoloop.
Auto 4: – Sets and starts playback of a 8-beat autoloop. * Shift + Auto 1: – When held, starts a 1/16-beat loop roll.
Shift + Auto 2: – When held, starts a 1/8-beat loop roll.
Shift + Auto 3: – When held, starts a 1/4-beat loop roll.
Shift + Auto 4: – When held, starts a 1/2-beat loop roll.
Note: loop rolls activate slip mode so the play position continues to advance normally, such that when the loop is released, play continues from the place it would have been if no loop had been activated.
If Auto Loop is selected with Shift and Pad Mode held down this will activate control of hotcues 5-8 on the upper row instead of the looping controls. Select Auto Loop again while holding Pad Mode to restore the default behavior. There will be no indication of which mode is selected (beyond the LEDs on the keys themselves, which will vary depending on loop and hotcue status). The UseAutoLoopAsCue config option can be set in the mapping file (see above) to swap the default “shadow” mode of the looping controls such that hotcue control will be the default and auto loop control with be selected when Shift is used.
Sample Mode
Hold Pad Mode and press the pad marked Sampler to enter sampler mode (hold down shift as well to control slots 5-8 using the hotcue buttons). A press of any of the sample buttons will load a sample if the sampler is not loaded. Shift + sample pad will unload a sample if it is not playing. Pressing a pad when a sample is loaded will play the sample, pressing shift + sample pad while a sample is playing will stop it.
Use shift+cue gain to adjust the volume of the sampler. When switching to the pad mode to sampler, hold down shift to control slots 5-8 using the hotcue buttons.
Note: the 8 sample slots on each deck all control the same 8 slots in Mixxx no matter which deck the sampler is active on. This is because the controller sends the same MIDI codes for button presses on each side, so there is no way for Mixxx to tell whether a sampler button was pressed on the left or right side of the controller.