7. Steuerung von Mixxx
Mixxx kann mit einer Tastatur, Maus und MIDI/HID-Controllern sowie TImecode-Vinyl und -CDs gesteuert werden - oder mit einer Kombination daraus. Was am besten passt, hängt vom Budget und dem Stil des Auflegens ab.
7.1. Bedienung mit Maus oder Touchpad
Use your mouse to interact with the controls in the Mixxx User Interface on your computer screen. You can perform actions by pointing and clicking with your mouse.
Single Left Click: Performing a left mouse click on buttons triggers the default action for that control. Moreover if you click on a value in the track list of the Mixxx library, you can change the value. For example the year of a track.
Double Left Click: Double-click on any knob or fader to reset it to its default value. This is especially useful on touchscreens as executing a right-click on them is usually tedious.
Single Right Click: On most buttons, performing a right click triggers a different action than a left click. You can return any knob or fader to its default value by right-clicking that control.
Mouse Drag: Click on a knob or fader, hold the left mouse button and move your cursor to change the value of the control. Use mouse drag to drop tracks from the file list to the decks, crates, playlists, etc.
Mouse Wheel: Just like Mouse Drag, you can change knob and fader values by placing the cursor over the control and moving the mouse wheel.
Hinweis
If you hover with the mouse over a control (e.g. the crossfader) in the Mixxx user interface, the tooltip lists the left- and right-click action respectively.
Hinweis
Auf einem Macbook oder einen Computer mit einem Touchpad, bei dem die Maustasten fehlen, wird eine zwei-Finger-Klick-Geste oft als rechter Mausklick behandelt.
Siehe auch
Mit dem Mausrad/Ziehen auf den Wellenformen können Sie zoomen und Wiedergaberate der Titel anpassen. Weitere Informationen finden Sie unter :ref:`interface-waveform.
7.2. Bedienung mit einer Tastatur

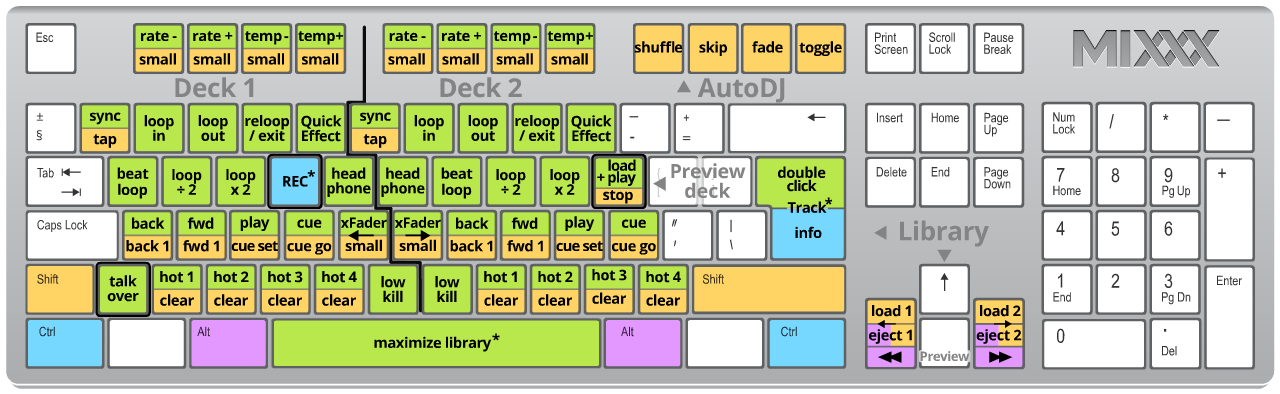
Mixxx Tastenkombinationen (für En-US Tastaturlayout)
Mixxx mit einer Tastatur zu steuern ist praktisch. Die Tastatur ermöglicht im Gegensatz zur Maussteuerung Dinge gleichzeitig zu verwalten. Beispielsweise können Sie einen Titel auf Deck 1 starten und zur gleichen Zeit Deck 2 stoppen.
Die Standardzuordnung für englische Tastaturen ist in der obigen Abbildung dargestellt. Es gliedert sich in einen linken Teil für Deck 1 und rechten teil für Deck 2. Bitte beachten Sie, dass Sie auf diese Funktionen auch über die Mixxx-Benutzeroberfläche zugreifen können.
For some user groups, like those using controllers or vinyl control, it might be useful to enable/disable the keyboard mappings at runtime. You can do so by clicking .
Hinweis
Wenn Sie die Maus über ein Steuerelement (z.B. dem Crossfader) in der Benutzeroberfläche von Mixxx bewegen, zeigt die Kurzinfo neben den Tastenkombinationen eine Beschreibung des Steuerelements.
Siehe auch
For a list of default shortcuts, go to Keyboard mapping table.
Die Tastaturbelegung anpassen
Mixxx ermöglicht die Anpassung der Tastatursteuerung. Weitere Informationen finden Sie auf:
7.3. Mittels MIDI/HID-Controller
Mixxx supports MIDI and HID controllers which are external hardware devices used to control audio applications. Many DJs prefer the hands-on feel of a controller with Mixxx because it can feel similar to using a real mixer and turntables or CDJ.
Loading a controller mapping
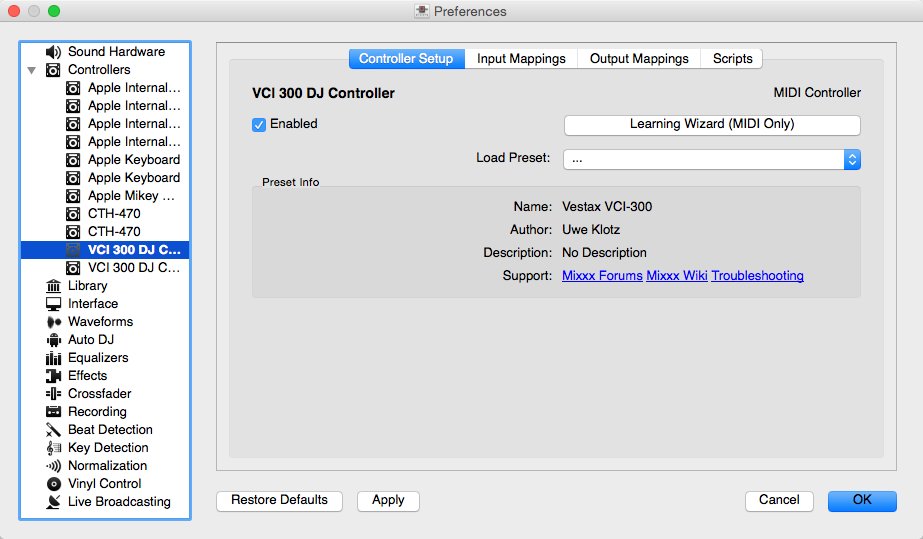
Mixxx Preferences - Loading a controller mapping
Without loading the correct mapping, your controller does not work with Mixxx.
Schliessen Sie einen oder mehrere Controller an Ihren Computer an
Mixxx starten
Go to
Wählen Sie Ihr Gerät aus der Liste der verfügbaren Geräte auf der linken Seite, und der Bereich zur Rechten ändert sich
Select the mapping for your controller from the Load Mapping drop-down menu
Make sure that the Enabled checkbox is ticked
Click Apply and Mixxx can now be controlled by your controller(s).
Wiederholen Sie Schritt 4-7 für jeden der Controller, die Sie verwenden möchten
Hinweis
Wenn Sie ein angeschlossenes Gerät nicht in der Liste finden, stellen Sie sicher, das alle erforderlichen Treiber für dieses Gerät installiert sind.
Unterstützte Controller
Mixxx can use any MIDI/HID controller that is recognized by your OS (some may require drivers), as long as there is a MIDI/HID mapping file to tell Mixxx how to understand it. Mixxx comes bundled with a number of mappings for various devices. There are two levels of controller mappings:
Mixxx Certified Mappings: These mappings are verified by the Mixxx Development Team.
Community Supported Mappings: These mappings are provided and have been verified as working by the Mixxx community, but the Mixxx Development Team is unable to verify their quality because we don’t have the devices ourselves. They might have bugs or rough edges.
If you run into issues with any of these mappings, please file a bug report on our Bug Tracker or tell us about it on our mailing list, forums, or IRC channel. Device support varies for each supported OS, so make sure to consult the documentation of the device.
Hinweis
Additional mappings are available in the Controller mapping forum.
Siehe auch
Before purchasing a controller to use with Mixxx, consult our Hardware Compatibility wiki page. It contains the most up-to-date information about which controllers work with Mixxx and the details of each.
Installing a mapping from the forum
To use a controller mapping that did not come bundled with Mixxx, place the controller mapping in your User Mappings folder. To open it , go to and click the Open User Mapping Folder button. Alternatively, use your OS file browser to navigate there. The locations and more details can be found in The Mixxx Settings Directory.
If the mapping was posted as a .zip file, first extract the .zip
file by right clicking on it in your file browser and selecting the option for
extracting an archive or compressed folder. Copy the .xml file into your
User Mapping folder. If there is a .js file, also copy that to your
User Mapping folder. Restart Mixxx and load the mapping.
Map your own controller
Es gibt keine Zuordnung für Ihren Controller oder Sie möchten eine vorhandene Zuordnung ändern? Sie können Ihren Controller mit dem Controller-Assistenten zuordnen oder die volle Kontrolle mit der MIDI-Scripting-Unterstützung in Mixxx übernehmen.
Siehe auch
Go to Unterstützung für Ihren Midi/HID-Controller hinzufügen for detailed information.
7.4. Using Timecode Vinyl Records and CDs
Vinyl control allows a user to manipulate the playback of a track in Mixxx using a turntable or CDJ as an interface. In effect, it simulates the sound and feel of having your digital music collection on vinyl. Many DJs prefer the tactile feel of vinyl, and vinyl control allows that feel to be preserved while retaining the benefits of using digital audio.
Siehe auch
Go to Vinyl-Steuerung for detailed information.