12. DJing Con Mixxx
Mixxx è stato progettato per essere facile da imparare sia per DJ principianti che esperti.
Questa parte del manuale fornisce indicazioni per utilizzare le funzionalità di Mixxx per creare i propri mix.
12.1. Impostazione dei Livelli Propriamente (Guadagno Staging)

L’impostazione dei livelli correttamente, noto anche come stadio di guadagno, è essenziale per ottenere la migliore qualità audio dall’apparecchiatura in uso. A ogni collegamento della vostra catena di segnali, dai guadagni del canale di Mixxx all’amplificatore di potenza, il livello dovrebbe essere ben al di sopra del rumore di base, ma inferiore al livello massimo prima dei clip di segnale. Il misuratori di livello deve essere per lo più intorno alla cima della loro regione verde. Il misuratore di livello mostrato a sinistra mostra dove i misuratori di livello di Mixxx dovrebbero essere mediati nelle parti più alte di brani. Il livello medio non dovrebbe essere nella regione gialla. Utilizzare la regione gialla per lasciare la testata o il livello disponibile sopra la media prima dei clip del segnale. Le parti più rumorose della musica (i transitori) dovrebbero brevemente entrare nella regione gialla.

Una forma d’onda ad un buon livello. Si noti che le forme d’onda di esempio in questa sezione sono state effettuate regolando il guadagno visivo del display della forma d’onda in Mixxx per illustrare i concetti. La regolazione del guadagno visivo della visualizzazione della forma d’onda non cambia il livello dell’audio.

Se un misuratore di livello si trova nella sua regione rossa, il segnale si riduce e il guadagno deve essere abbassato. Alcune apparecchiature non hanno un misuratore di livello e hanno solo un LED che si accende quando il segnale si blocca. Ritaglio significa che i picchi della forma d’onda sono appiattiti perché l’apparecchiatura ha raggiunto il livello massimo a cui può amplificare il segnale. Ciò distorce il suono in modo sgradevole e può danneggiare l’apparecchiatura guidandola con più energia di quanto non sia progettata per essere gestita. Aumentando il guadagno oltre il punto in cui inizia il ritaglio (più avanti nel rosso su un metro) si distorce maggiormente il segnale. Se si desidera aumentare il volume quando ogni parte della catena del segnale è al massimo senza clipping, utilizzare più altoparlanti o utilizzare altoparlanti più sensibili e convertire l’energia elettrica in energia acustica in modo più efficiente.

Una forma d’onda di ritaglio

D’altro canto, il segnale non dovrebbe essere troppo basso. Questo perché ogni dispositivo audio genera un po “di rumore a un livello indicato come piano del rumore. Inoltre, i segnali analogici assorbono il rumore mentre viaggiano lungo i fili. Il segnale misurato dal misuratore a sinistra è relativamente vicino al rumore. Quando un dispositivo è alzato, il rumore di fondo non sale; solo il segnale. Tuttavia, ogni volta che il segnale viene amplificato dal guadagno di un’altra apparecchiatura, vengono amplificati sia il rumore che il segnale dei precedenti dispositivi nella catena del segnale. Ad esempio, se la tua scheda audio è abbassata e alzi il guadagno del mixer per compensare, il rapporto segnale / rumore (SNR) dell’uscita della scheda audio sarà basso e il guadagno del mixer amplifica il segnale e rumore dalla scheda audio, più il rumore raccolto lungo il filo. Il risultato finale avrà più rumore rispetto a quando l’uscita della scheda audio è stata alzata prima che il segnale raggiungesse il mixer e il guadagno del mixer non dovesse essere aumentato.

Una forma d’onda troppo vicina al rumore
Nota
To adjust the output volume of a sound system while maintaining a high signal-to-noise ratio, the gain should be adjusted as close to the speakers as possible. Refer to the Gain Knob section for details.
12.2. Beatmatching e missaggio
Beatmatching is the process of adjusting the playback rate of a track so that it matches the tempo of another track. Beatmatching also involves adjusting the phase of the beats in a track so that they are aligned with the beats in the other track. Matching the tempo and aligning the beats are the two things a DJ must do to beatmatch.
Mixxx può abbinare il tempo e allineare i battiti per voi, ma questo richiede un valore BPM accuratamente rilevato e una griglia battuta corretta per entrambe le tracce. Per abilitare questa funzione, toccare il tasto SYNC. Per eseguire manualmente il beatmatch, il tempo delle due tracce deve essere sincronizzato regolando i cursori della velocità di riproduzione. È possibile regolare la fase dei battiti facendo clic con il tasto destro e trascinando su entrambi i display della forma d’onda per accelerare temporaneamente o rallentare una delle tracce fino a quando i battiti sono allineati. I pulsanti temporanei di pitch bend possono anche essere utilizzati per regolare momentaneamente la velocità di riproduzione, consentendo di «mischiare» i battiti di una traccia in avanti o all’indietro, in modo che possano essere allineati con un’altra traccia. Vedi il capitolo Sync and Rate Controls.
Due tracce sono beatmatched una volta che i loro tempi sono abbinati e i loro ritmi sono allineati. Un beatmatch «perfetto» è quasi impossibile - ci sarà sempre una piccola differenza nei tassi di riproduzione. Un DJ appassionato terrà le orecchie aperte e ascolterà i battiti che si allontanano dall’allineamento. Questo ha un distinto suono di «contrabbasso» che è spesso preceduto dal calcio che si indebolisce in intensità man mano che i due calci si spostano fuori fase. Quando ciò accade, i battiti possono essere riallineati semplicemente toccando uno dei pulsanti temporanei del pitch bend alcune volte nella direzione appropriata.
12.3. Sync Lock
Sync Lock is an intelligent assistant that allows you to leave the beatmatching to Mixxx so you can focus on track selection, effects manipulation, looping, 4 deck mixing, and other advanced DJing techniques.
To activate Sync Lock on a deck, push and hold (or click and hold) the SYNC button. You’ll know Sync Lock is on because the sync button will remain lit. Changing the rate of any deck that has Sync lit will change the rates of all other decks that also have the Sync button lit. There is no need to set specific decks to be a leader or followers. You can play, stop, eject, load, and queue any track with sync lock and it won’t interrupt the playback of the other decks. However, changing the rate of a stopped deck will change the rate of playing decks.
Sync Lock will also notice if one of your tracks is double the BPM of another track and match them correctly. So if you want to mix a 140 BPM drum & bass track with a 70 bpm dubstep track, Sync Lock will make sure they are lined up properly.
Suggerimento
Usually, Sync Lock will only make sure the rate sliders are set correctly. If you also want to make sure your beats are perfectly in sync, turn on the QUANTIZE button. When activated, Quantize will ensure that the beats are perfectly lined up as well.
12.4. Sync Lock with Dynamic Tempo
If you’re working with dynamic tempo tracks that have a variable BPM beat grid, you have precise control over the sync lock behavior via the following Sync Leader buttons (available in the LateNight and Deere skins only).
 Follower
  Soft Leader
You can create a variable BPM beat grids for single tracks by using the Analyze library context menu and Reanalyze (variable BPM) command. Alternatively you may create variable BPM beat grids for all tracks to be (re)analyzed later on by unchecking Assume constant tempo in the Beat Detection preferences.
When such a track is playing in a Leader deck, the follower decks closely follow the tempo. It’s important to note that the track follows the «detected» leader tempo unconditionally, even if there are sections with unstable tempos during bridges or in the outro regions where the actual played tempo wasn’t detected correctly.
If a soft leader deck stops or is silenced, Mixxx automatically selects the next best deck as Leader. By clicking the Leader button, you can choose between Soft Leader and Follower mode. A Soft Leader is not sticky, and will automatically move if the current leader becomes invalid.
By default the «Sync Lock with Dynamic Tempo» feature is enabled and Mixxx picks the first Sync Lock enabled track as Soft Leader, using the tempo from its outro during the following transition. If you’d like to use the the tempo from the intro of the next track instead, click the Leader (Crown) button of its deck. The deck then becomes the soft leader, and Mixxx will use that deck’s tempo instead.
The only case when a stopped deck can be a Leader is if no other deck is playing. Once a deck starts playing, Mixxx will pick that as the leader instead. If another deck starts playing, then you will be able to pick which one you want to be the leader again.
If you’d prefer a steady tempo during transitions like in Mixxx before Version 2.4, you may select Use steady Tempo for Sync mode in the Decks preferences. In this mode all decks become a follower during a transition and you may pick a dynamic track as a leader by clicking the Leader (Crown) button if desired.
A leader plays always the original recorded tempo changes. A follower changes its tempo matching the leader which may result in a notable pitch change. Engaging keylock helps mitigate this pitch issue.
12.5. Mixaggio armonico
Harmonic mixing is a technique to mix songs with matching melodies and harmonies. To learn more about harmonic mixing you might want to check out the mixshare archive.
Mixxx has two features to help you with harmonic mixing. The first is a key lock. When it is active changing the speed of a track won’t affect the key. To enable key lock, click the key lock button in the Deck Options Button Grid. The second is that Mixxx can automatically detect the key of a track and will display it in the library and the decks. The notation which is used to display a key can be changed in Key Detection Preferences.
12.6. Registrare il tuo mix
With the integrated recording feature you can record your mix as an audio file and listen to it later, distribute it as a Podcast or burn it to CD.
By default, Mixxx records the main output. Alternatively, Mixxx can record the output of an external mixer if you have an audio interface configured for the Record/Broadcast input in . Refer to Recording And Broadcasting With An External Hardware Mixer for details.
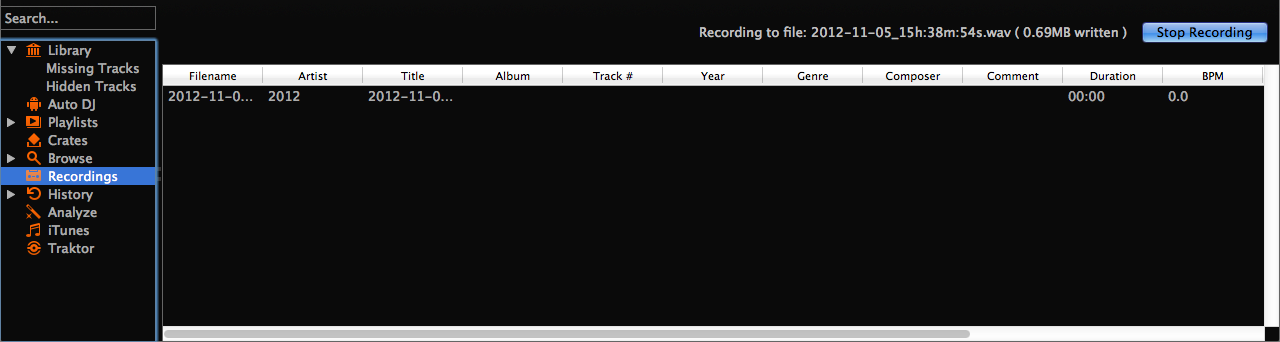
Libreria Mixxx - Vista registrazioni
Mixxx can record your mix in various audio formats and quality settings. You can
split your recordings, generate cue files, choose a custom
recording directory and even set your own metadata. By default, Mixxx
saves your recordings as lossless WAV files to a
Mixxx/Recordings sub-folder in the Mixxx music directory. Before you
start recording, we recommend that you adjust the settings in
.
Se si fa clic sull’icona Registrazioni nella barra laterale della libreria Mixxx, la tabella della traccia a destra mostra il contenuto della directory delle registrazioni. Le nuove registrazioni vengono salvate automaticamente in questa directory e anche nei file CUE se si sceglie di crearli nelle preferenze.
Suggerimento
Registrando i tuoi mix e ascoltandoli in seguito per criticare te stesso è un ottimo strumento per migliorare le tue abilità di DJing. Anche l’invio dei tuoi mix ad altri DJ per un feedback può essere utile.
Registra il tuo mix su disco
Click on the recording icon on top of the application window to start, and stop the recording session. The duration of the running recording is displayed next to the icon.
Nota
The recording widget might not be available in some skins.
Alternatively:
Fare clic sull’icona Registrazioni nella barra laterale per passare alla vista Registrazioni
Fare clic sul pulsante Avvia registrazione o fare clic su nel menu in cima alla finestra dell’applicazione Mixxx.
The display above the track table shows how much data has already been recorded, as well as the duration of the recording.
Esegui il tuo mix
Fai clic sul pulsante Interrompi registrazione per interrompere la registrazione al termine del mix.
Suggerimento
You can instantly play your recording as a track in Mixxx. Simply drag-and-drop the track to a deck.
12.7. Intro and Outro Cues
Intro/Outro cues are used to mix in and out of tracks and they can also be used with Auto DJ to mix in and out at those points. Unlike hotcues, they do not mark only one point. The into and outro are sections and each section is defined by two points.
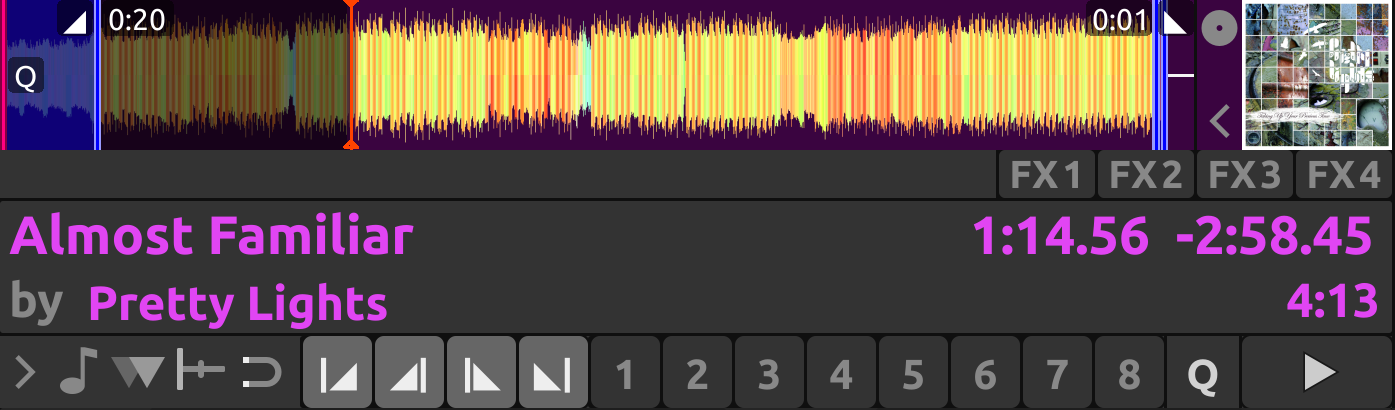
Mixxx detects where the first and last sounds are when analyzing a track making it easy to stop playing silent parts at the beginning and at the end of the track. The analyzer places the intro start point at the first sound and the outro end point at the last sound. The first and last sounds are determined by the first time the signal rises above -60 dBFS and the last time it goes below -60 dBFS.

Intro start and outro end cues placed at the first and last sound of a track respectively by the analyzer
You can decide where to place the intro end and the outro start points. Marking the whole intro and outro allows Mixxx to calculate how long each section is and show it on the overview waveform. This information can help you know when to press play on the next track. Auto DJ can also use this information to line up tracks and determine how long to crossfade.
Intro end and outro start markers placed on the track alongside the intro start and the outro end markers to make sections
Mixing With Intro & Outro Cues
You can line up the ends of the intro and outro so the energy of the new song picks up right as the old track ends.

Intro and outro end markers aligned showing on the waveform
If the intro and outro are short enough to fit on the waveform at the same time, you can simply watch the waveforms and press play when the markers align. Otherwise, you can watch the time remaining on the deck and hover your mouse cursor over the outro end line on the overview waveform. Mixxx will show you how much time is left until that point. When that time equals the length of the intro, press play to precisely line up the end of the intro. If you have changed the tempo of the track, the time remaining scales to show the real time remaining at the adjusted tempo.

Alternatively, you can line up the start of the intro & outro. In this case, watch the scrolling waveform when the outro start point is coming up on the old track. Then, press play on the new track when the old track reaches the outro start.
Nota
There are no rules on which method should be used. The method you decide to use is an artistic judgement based on the musical content of each track, what the vibe of the crowd is at that moment, and what you want to do with the mix.
If you do not have the intro end and outro start points marked when loading a track, you can find and mark these in headphones before you mix in the track. Then seek back to the intro start to get the track ready. If you don’t have time to find the outro end point before mixing in the track, you can use the deck cloning feature to drag and drop to a new deck, then seek ahead on the new deck and listen in headphones to mark the outro start point. If you don’t have time to do that either, you can right click on the overview waveform where you think the outro starts. Then look for how far that is from the end of the track to compare it to the length of the intro of the next track.
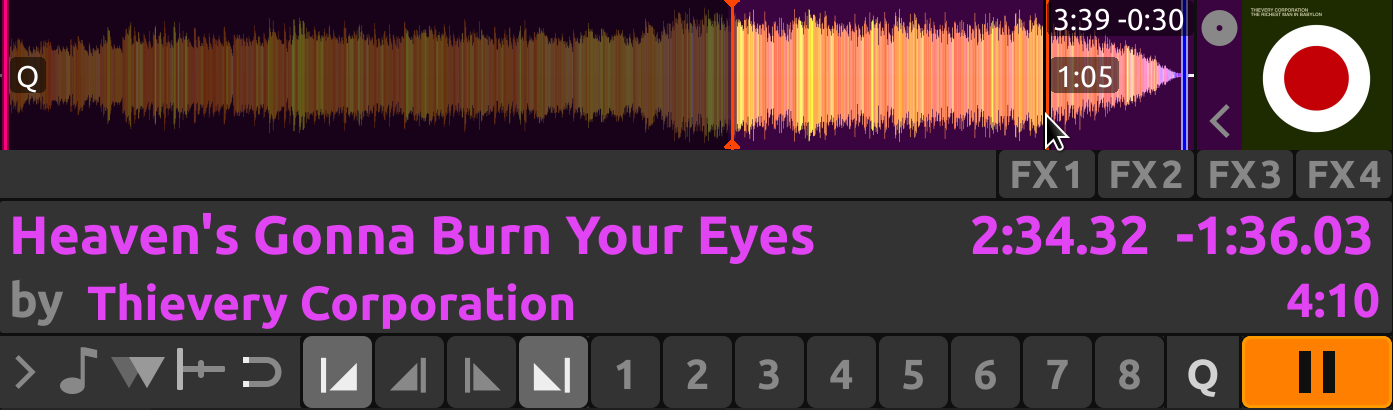
Here the outro is approximately 30 seconds long. However, the analyzer placed the outro end point before the end of the track, so the outro is actually a little bit shorter than 30 seconds. Without marking the outro start point, you would have to do some math in your head to find exactly how long the outro is.
12.8. Auto DJ
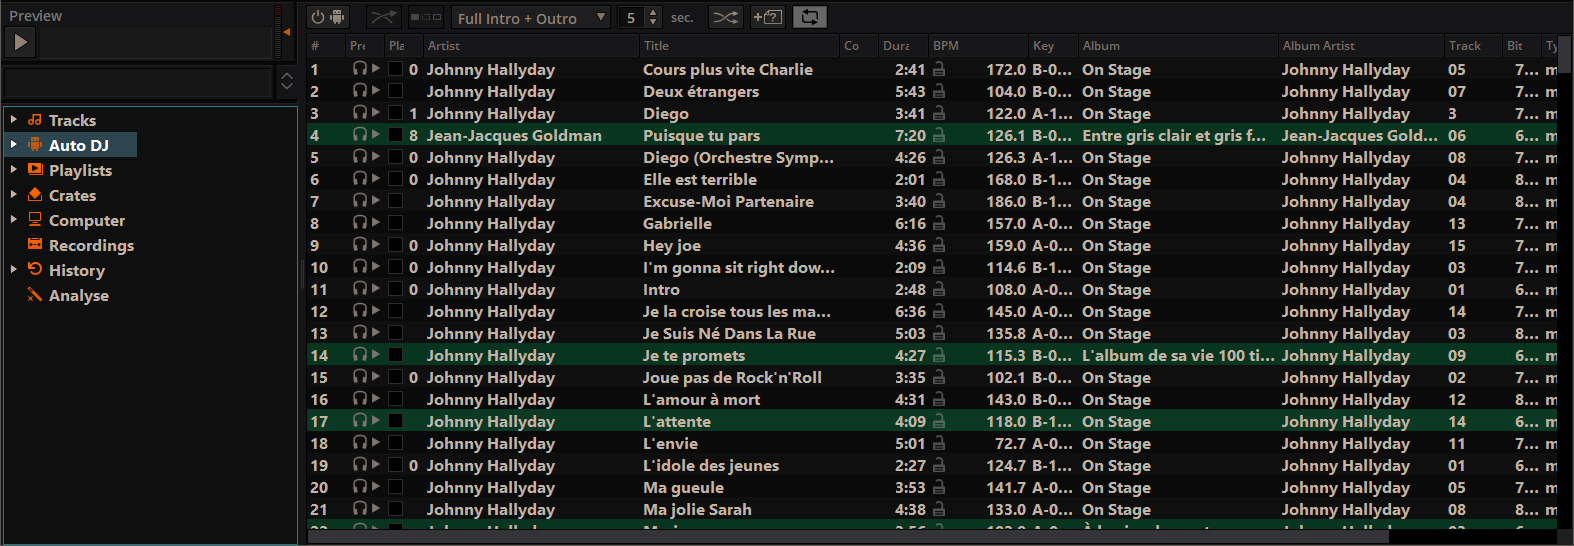
Libreria Mixxx - Vista Auto DJ
Auto DJ automatically loads tracks in the decks and mixes them. Tracks can be manually added to the Auto DJ playlist, or automatically from assigned source crates or from the entire library.
Auto DJ does not take into account the volume of each track, nor the frequency content, nor the rhythms, so it’s not intended to be a replacement for a human DJ. However, it is good enough to give a human DJ a break without a major disruption to the mix.
For mixing, Auto DJ takes control of the crossfader. Auto DJ requires at least one deck to be assigned to the left and right side of the crossfader. This can be done with the deck orientation switches next to the crossfader. If a deck’s orientation is centered, the crossfader can’t affect it. Note that in the official Tango skin, these switches are in the decks” transport controls row, and in Shade skin they don’t exist because decks are statically assigned to the left and right side (bus).
When Auto DJ is toggled on, it will use the first two opposing decks it finds. With default settings these would be decks 1 and 2, but depending on how the orientation switches are set, this could be any configuration, for example deck 4 on the left and deck 1 on the right. If no opposing decks are found Auto DJ won’t start.
Nota
Note that Auto DJ is currently not aware which decks are currently visible, i.e. it might pick currently hidden decks 3 and/or 4. Refer to the skin settings for how to toggle 4 decks.
When you toggle Auto DJ off, the crossfader will stay on its last position.
Each official Mixxx skin has an Auto DJ indicator icon, located either in the top toolbar or in the mixer. In some skins the crossfader is highlighted, too.
Caricamento di tracce in Auto DJ
Per riprodurre automaticamente le tracce, devono prima essere caricate nella playlist Auto DJ. La playlist Auto DJ è vuota per impostazione predefinita.
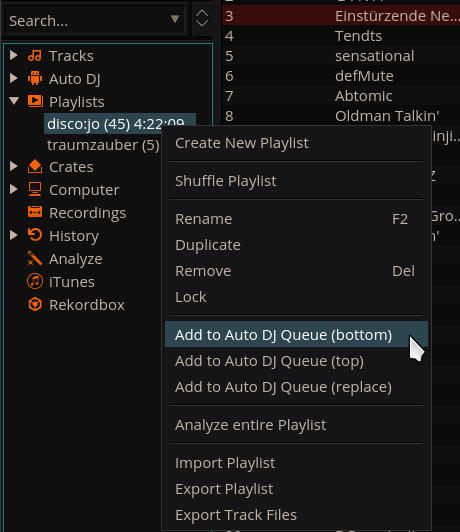
Libreria Mixxx - Aggiunta di una playlist a Auto DJ
Esistono diversi modi per caricare le tracce nella playlist Auto DJ:
Seleziona una o più tracce dalla libreria, una playlist normale o una cassa e trascinali sull’icona Auto DJ sulla sinistra.
Seleziona una playlist o una cassa normale, fai clic con il pulsante destro del mouse e seleziona Aggiungi a Auto DJ dal menu del mouse. Questo aggiunge tutte le tracce ad Auto DJ.
Nella vista Auto DJ della libreria, trascina le tracce da file manager esterni all’icona Auto DJ nella barra laterale o alla tabella delle tracce Auto DJ sulla destra.
Automatically adding tracks from crates
Instead of inserting the contents of the crates directly into the Auto DJ playlist, Auto DJ crates are associated crates that become a source of random track selections.
Add a crate to the Auto DJ track sources: Expand the Auto DJ item in the sidebar, and right-click on the Crates sub-item. Select one of the existing crates from the list. This makes the content of the crate available for random selection into the Auto DJ queue for automatic mixing. The name of the crate is now listed as sub-item below.
If you do not have any crates available for selection in the list, go and create a crate first and add some tracks, see Crates - Organizing tracks into collections.
Manually add tracks from track sources to Auto DJ: Click the Auto DJ item in the sidebar and switch to the Auto DJ view of the library. Click the Add random button to add one track at the time from Auto DJ track sources to the bottom of the Auto DJ playlist.
Nota
If you did not set any crates as an Auto DJ track source, clicking the Add Random button will add a randomly selected track from the whole library instead.
Automatically add tracks from track sources to Auto DJ: Mixxx can randomly add tracks to the Auto DJ playlist from track sources as soon as a specified minimum number of tracks remain. Select . Set to change the minimum number of tracks after which random tracks may be added.
Nota
If you did not set any crates as an Auto DJ track source, tracks are selected from the whole library instead.
Remove a crate from the Auto DJ track sources: Expand the Auto DJ item in the sidebar, and right-click on one of the crates listed below the Crates sub-item. Select Remove Crate as Track Source to remove the crate from the Auto DJ track sources.
Riproduzione di tracce in Auto DJ
Ora che hai caricato brani nella playlist Auto DJ, puoi attivare Auto DJ come segue:
Fare clic sull’icona Auto DJ nella barra laterale per passare alla vista Auto DJ della libreria.
Fai clic sul pulsante Attiva Auto DJ.
Le prime tracce della tua lista vengono caricate nei deck e la riproduzione inizia.
Mixxx continuerà a mixare automaticamente fino a quando la playlist Auto DJ è vuota.
Fare clic sul pulsante Disabilita Auto DJ per interrompere il missaggio automatico
Suggerimento
You can add a track to the end of the Auto DJ playlist once it is played instead of removing it. Set .
Auto DJ Mix Modes
Auto DJ has several modes it can use to mix tracks:
Full Intro + Outro
Fade At Outro Start
Full Track
Skip Silence
The Full Intro + Outro and Fade At Outro Start modes both use the intro and outro cues but the Full Track and Skip Silence cues do not.
Full Intro + Outro and Fade At Outro Start
The Full Intro + Outro and Fade At Outro start Auto DJ modes use the intro & outro cues to determine how long to crossfade and how to align the tracks in time. In both modes, Auto DJ compares the duration of the outro of the old track and the intro of the new track. Auto DJ picks the time of the shorter section as the crossfade time.
In both modes, if the outro is shorter than the intro, Auto DJ will align the start of the outro with the start of the intro.
Intro and outro start markers aligned by Auto DJ
The two modes work differently when the outro is longer than the intro.
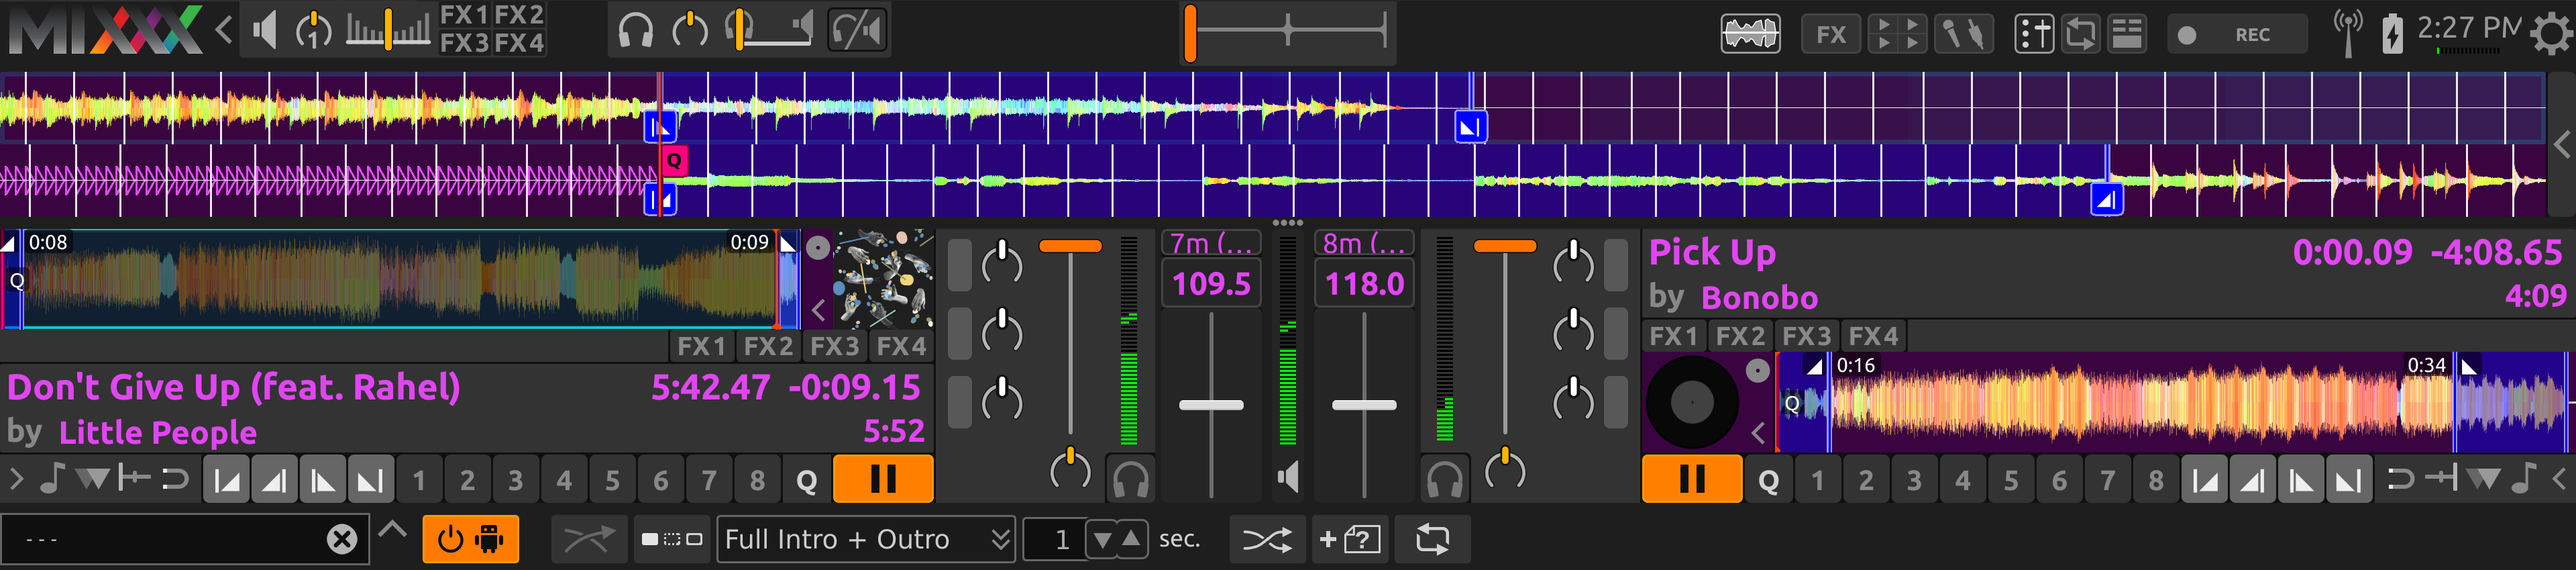
- Full Intro + Outro Mode
The full length of both the intro and the outro are always played. When the outro is longer than the intro, Auto DJ aligns the end of the intro and outro by starting the next track during the outro of the previous track. This mode is the most likely to sound good with the widest variety of tracks. Therefore, it is the default mode.
Intro and outro start cues aligned by Auto DJ in Full Intro + Outro mode
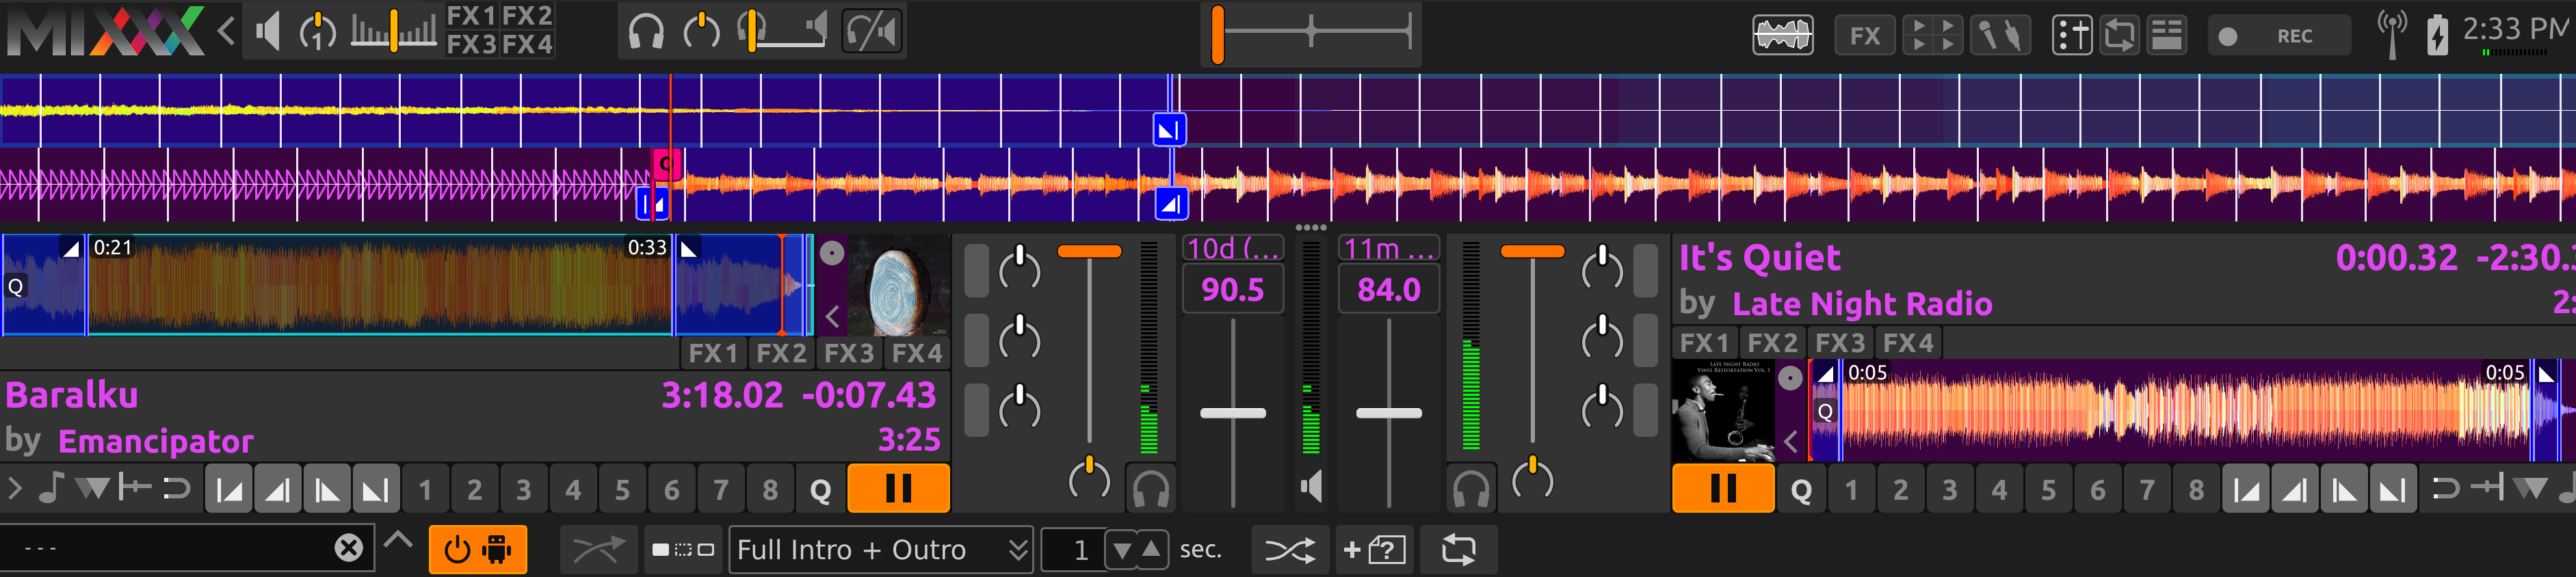
- Fade At Outro Start
Auto DJ always aligns the start of the intro and outro. When the outro is longer than the intro, Auto DJ cuts off the end of the outro. This can be helpful if you want to prevent the energy of the mix from declining during a long outro. However, the transition may sound abrupt if the intro is short.
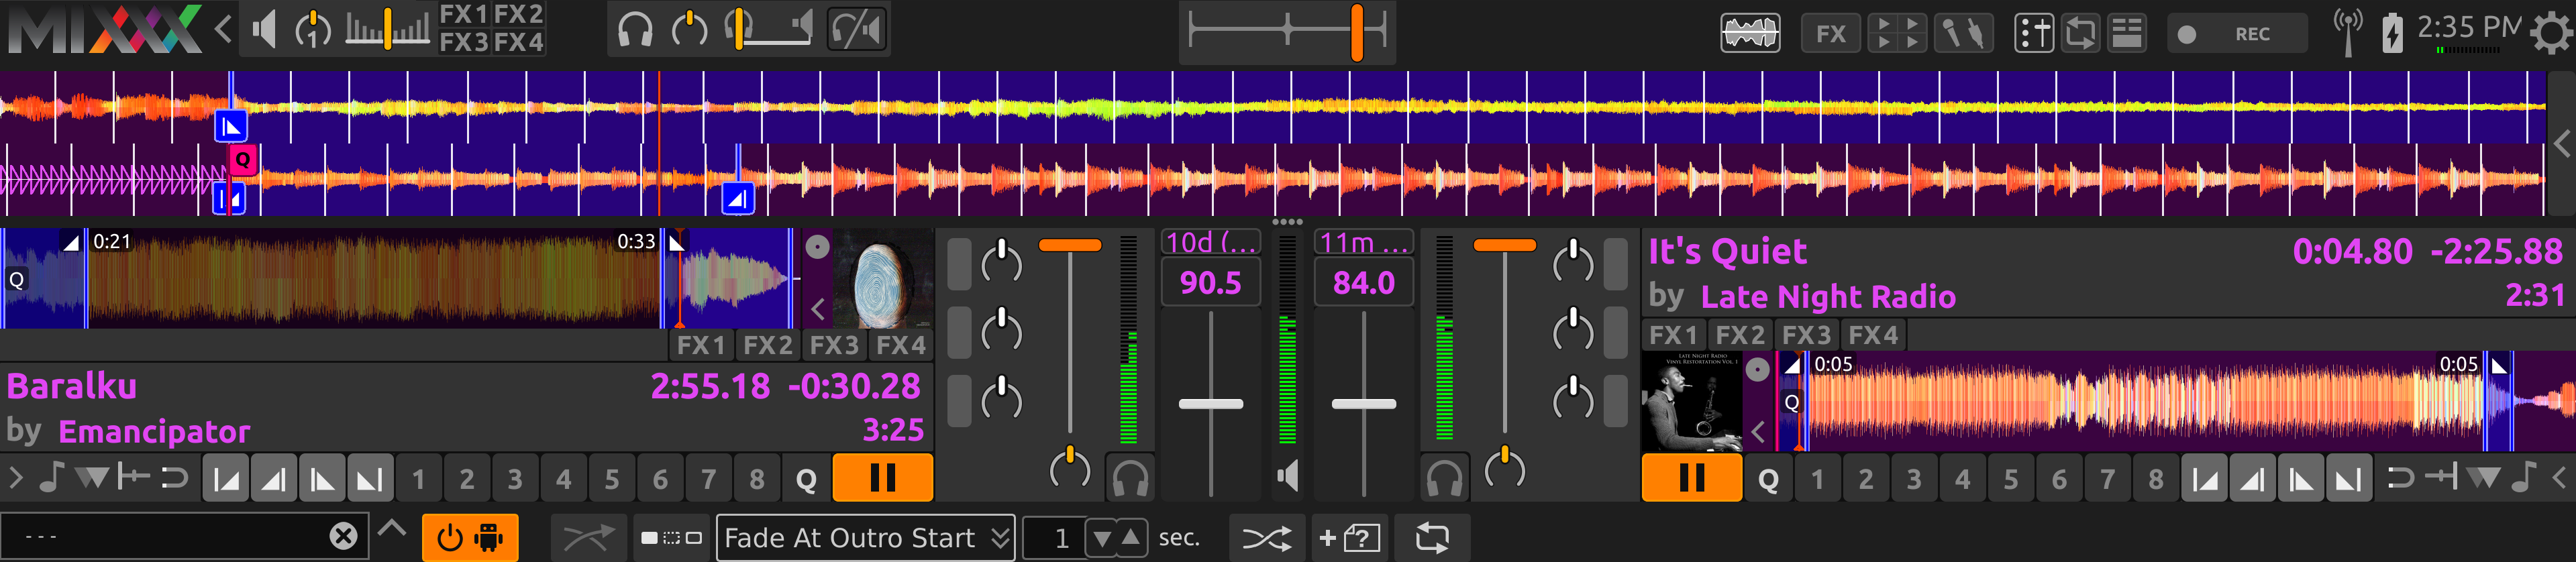
Intro and outro start cues aligned by Auto DJ in Fade At Outro mode
Full Track and Skip Silence
The Full Track and Skip Silence Auto DJ modes do not use the intro and outro cues. They crossfade tracks over a number of seconds that you specify in the box next to the mode selection menu. The Full Track mode plays the entire length of every file. The Skip Silence mode works the same way but automatically cuts out silence at the beginning and ends of tracks (defined as when the signal first goes above or below -60 dBFS).
Suggerimento
If you still want to use Auto DJ like a normal music player application, use one of these modes with a transition time of 0 seconds.