7. Mixxxの制御
Mixxxは、キーボード、マウス、MIDIコントローラ、HIDコントローラ、タイムコードレコードやCD、またはこれらの組み合わせによって制御できます。どれを選ぶかは予算やDJのスタイルによります。
7.1. マウスとタッチパッドを使う
コンピュータ画面上のMixxxユーザインタフェースのコントロール類はマウスによって操作します。マウスでポイント、クリックすることで操作できます。
左クリック:ボタン上で1回左クリックするとデフォルトの機能が発動します。さらにトラックリストのライブラリの値をクリックすると、値を変えることができます。例えば、トラックの年など。
Double Left Click: Double-click on any knob or fader to reset it to its default value. This is especially useful on touchscreens as executing a right-click on them is usually tedious.
右クリック:多くの場合、右クリックすると左クリックとは異なる効果を生じます。どのつまみやフェーダーも右クリックすることでデフォルト値に戻すことができます。
マウスドラッグ:つまみやフェーダーを左クリックしたままドラッグし値を変えます。ファイルリストからトラックをデッキやプレイリストにドラッグ・ドロップできます。
マウスホイール:ドラッグと同じように、つまみやフェーダーの値をカーソルをその上に置き、ホイールを動かし、変化させることができます。
ヒント
If you hover with the mouse over a control (e.g. the crossfader) in the Mixxx user interface, the tooltip lists the left- and right-click action respectively.
ヒント
On a Macbook or a computer with a touchpad that lacks mouse buttons, a two-finger click gesture is often treated as a right click.
参考
Using the Mouse drag/wheel on the waveforms you can adjust zoom and playback rate of the tracks. For more information, go to Waveform Displays.
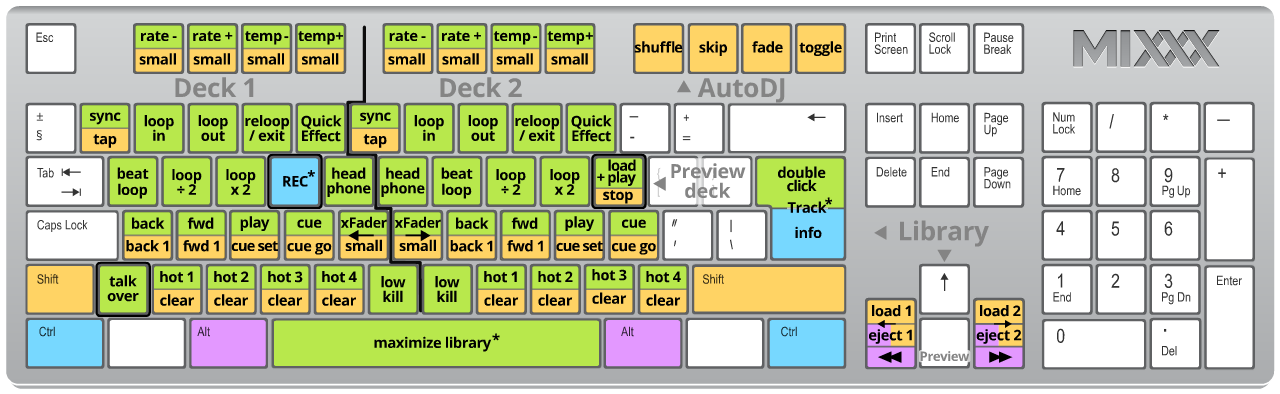
7.2. Using a Keyboard

Mixxx Keyboard shortcuts (for en-us keyboard layout)
Controlling Mixxx with a keyboard is handy. Unlike mouse control, the keyboard allows you to manage things simultaneously. For example, you can start playing a track on deck 1 whilst stopping deck 2 at the same time.
The default mapping for English keyboards is depicted in the figure above. It is divided into a left-hand side for deck 1 and right-hand side for deck 2. Please note that you can also access the functions through Mixxx's interface.
For some user groups, like those using controllers or vinyl control, it might be useful to enable/disable the keyboard mappings at runtime. You can do so by clicking .
ヒント
If you hover with the mouse over a control (e.g. the crossfader) in the Mixxx user interface, the tooltip lists the keyboard shortcuts of the control among a description of the control.
参考
For a list of default shortcuts, go to Keyboard mapping table.
Customizing the keyboard mapping
Mixxx allows you to customize the keyboard control. For more information, go to:
7.3. Using MIDI/HID Controllers
Mixxx supports MIDI and HID controllers which are external hardware devices used to control audio applications. Many DJs prefer the hands-on feel of a controller with Mixxx because it can feel similar to using a real mixer and turntables or CDJ.
Loading a controller mapping
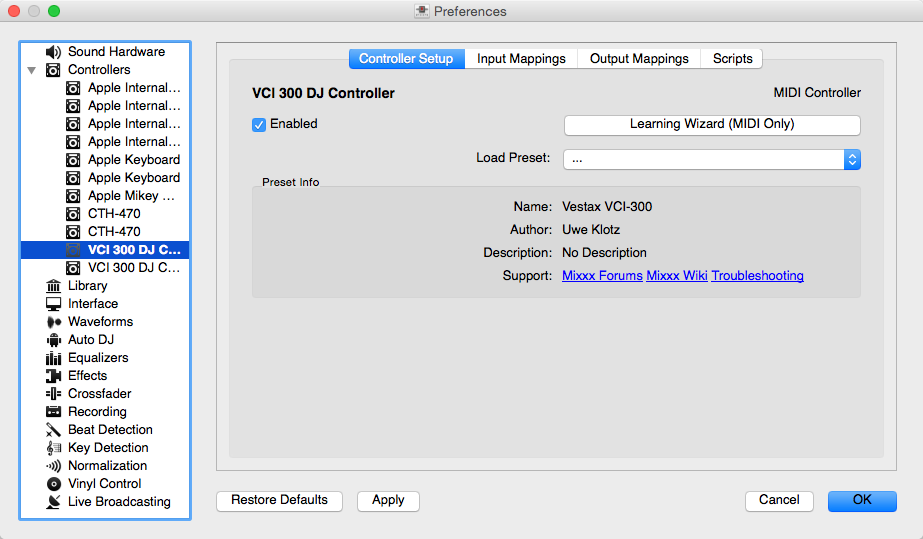
Mixxx Preferences - Loading a controller mapping
Without loading the correct mapping, your controller does not work with Mixxx.
コントローラーをコンピュータに接続してください。
Mixxxを起動してください。
に移動してください。
左の利用できるデバイスリストから選択すると、右の表示が変わります。
Select the mapping for your controller from the Load Mapping drop-down menu
Make sure that the Enabled checkbox is ticked
Click Apply and Mixxx can now be controlled by your controller(s).
Repeat step 4-7 for any of the controllers you want to use
ヒント
If you do not find a connected device in the list, make sure to install any necessary drivers for that device.
Supported controllers
Mixxx can use any MIDI/HID controller that is recognized by your OS (some may require drivers), as long as there is a MIDI/HID mapping file to tell Mixxx how to understand it. Mixxx comes bundled with a number of mappings for various devices. There are two levels of controller mappings:
Mixxx Certified Mappings: These mappings are verified by the Mixxx Development Team.
Community Supported Mappings: These mappings are provided and have been verified as working by the Mixxx community, but the Mixxx Development Team is unable to verify their quality because we don't have the devices ourselves. They might have bugs or rough edges.
If you run into issues with any of these mappings, please file a bug report on our Bug Tracker or tell us about it on our mailing list, forums, or IRC channel. Device support varies for each supported OS, so make sure to consult the documentation of the device.
ヒント
Additional mappings are available in the Controller mapping forum.
参考
Before purchasing a controller to use with Mixxx, consult our Hardware Compatibility wiki page. It contains the most up-to-date information about which controllers work with Mixxx and the details of each.
Installing a mapping from the forum
To use a controller mapping that did not come bundled with Mixxx, place the controller mapping in your User Mappings folder. To open it , go to and click the Open User Mapping Folder button. Alternatively, use your OS file browser to navigate there. The locations and more details can be found in The Mixxx Settings Directory.
If the mapping was posted as a .zip file, first extract the .zip
file by right clicking on it in your file browser and selecting the option for
extracting an archive or compressed folder. Copy the .xml file into your
User Mapping folder. If there is a .js file, also copy that to your
User Mapping folder. Restart Mixxx and load the mapping.
Map your own controller
There is no mapping available for your controller or you want to change an existing mapping? You can map your controller by using the Controller Wizard or take full control with the MIDI Scripting support in Mixxx.
参考
Go to MIDI/HID コントローラー対応サポートの追加 for detailed information.
7.4. Using Timecode Vinyl Records and CDs
Vinyl control allows a user to manipulate the playback of a track in Mixxx using a turntable or CDJ as an interface. In effect, it simulates the sound and feel of having your digital music collection on vinyl. Many DJs prefer the tactile feel of vinyl, and vinyl control allows that feel to be preserved while retaining the benefits of using digital audio.
参考
Go to Vinyl Control for detailed information.