Numark Mixtrack Pro
This is the same as the Numark Mixtrack with the addition of an integrated sound card. This product has been discontinued and succeeded by the Numark Mixtrack Pro 3.
1.8.2 sürümünde geldi.
Mapping Description
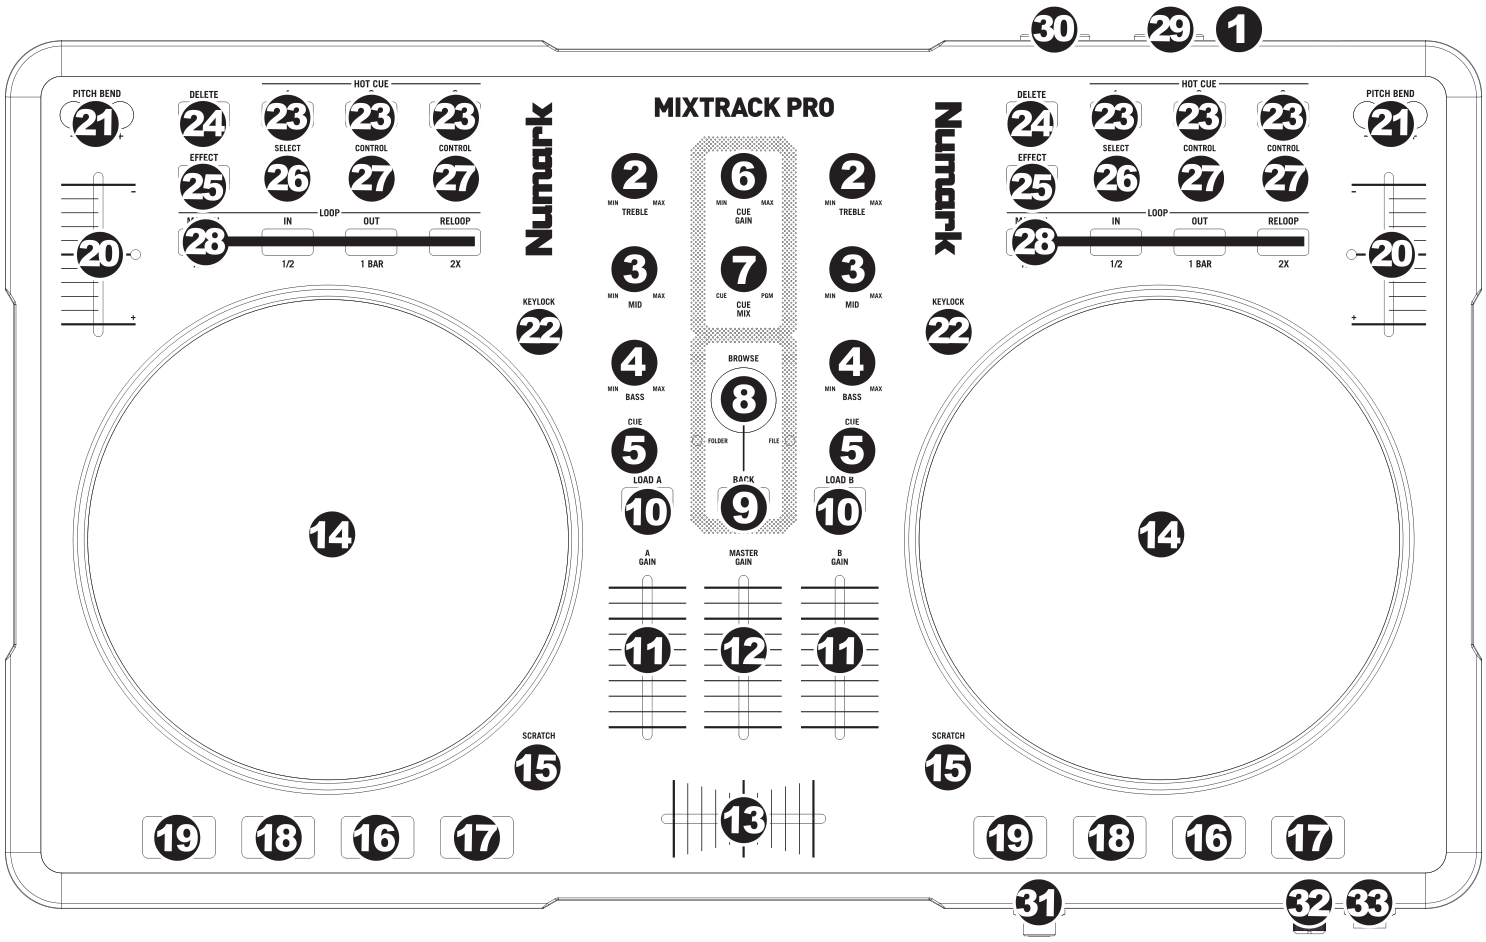
Numark Mixtrack Pro (schematic view)
USB: This USB connection sends and receives control information to/from a connected computer.
CHANNEL TREBLE: Adjusts the high (treble) frequencies of the corresponding channel.
CHANNEL MID: Adjusts the mid-range frequencies of the corresponding channel.
CHANNEL BASS: Adjusts the low (bass) frequencies of the corresponding channel.
CUE: Sends pre-fader audio to the Cue Channel for headphone monitoring.
CUE GAIN: Adjusts the audio level of the Cue channel.
CUE MIX: Turn to mix between Cue and Program in the Headphone channel. When all the way to the left, only channels routed to CUE will be heard. When all the way right, only the Program mix will be heard.
BROWSE KNOB: Turn this knob to scroll through lists of tracks / library. When a file is selected, press the knob to load the currently highlighted song into the first stopped deck.
BACK: This button will switch the Browse Knob to scroll into the track list (FILE LED will illuminate) or into the library section (FOLDER LED will illuminate).
LOAD A / LOAD B: Press one of these buttons while a track is selected to assign it to Deck A or Deck B, respectively. *Only if the track is paused. Put the pitch in 0% at load(without mattering where the slider is).
CHANNEL FADER: Adjusts the audio level on the corresponding channel.
MASTER FADER: Adjusts the output volume of the Program mix.
CROSSFADER: Blends audio playing between Decks A and B. Sliding this to the left plays Deck A and sliding to the right plays Deck B.
JOG WHEEL: When the deck is playing, the JOG WHEEL will bend the track’s pitch. When the SCRATCH button is on, touching the top of the JOG WHEEL will scratch the selected track (can do backspin effect), and touching the border of the JOG WHEEL will bend the track’s pitch. When the deck is not playing, rotating the JOG WHEEL will scan through the track.
SCRATCH: Turns Scratch Mode on or off. If Scratch Mode is on, the button will light up and the JOG WHEEL will scratch like a turntable when you spin it.
PLAY / PAUSE: Starts or resumes playback if the Deck is paused. Pauses playback if the Deck is playing. LED ON when playing. LED OFF when stopped.
STUTTER: Adjust BeatGrid in the correct place (useful to sync well). *LED Blink at each Beatof the grid.
CUE: The CUE button will return and pause the track at the last set cue point. For temporary play of the cue point, you can hold down the CUE button. The track will play for as long as the button is held down and will return to the cue point once it has been released (Until it has been pressed PLAY before release CUE, then playback will continue). LED ON when stopped. LED OFF when playing. *LED Blink at each Beat in the last 30 seconds of song. *Don’t set Cue accidentally at the end of the song (return to the latest cue).
SYNC: Automatically matches the corresponding Deck’s tempo and phase with the other Deck. *If the other deck is stopped, only sync tempo (not phase). *LED Blink at Clip Gain(Peak indicator). ***Pressing DELETE**before SYNC: Set Pitch to 0%.
PITCH FADER: Controls the track’s playback speed. An LED next to the fader will light up when set at 0%. * Pitch slide are inverted, to match with the screen(Up: +, Down: -, otherwise is very confusing). *** Soft-takeover to prevent sudden wide parameter changes**when the on-screen control diverges from a hardware control. The control will have no effect until the position is close to that of the software, at which point it will take over and operate as usual.
PITCH BEND ( + / – ): Press or hold down either of these buttons to temporarily adjust the track’s playback speed. When released, the track playback will return to the speed designated by the PITCH FADER.
KEYLOCK: This feature allows you to change the speed of the song without changing the key.
HOT CUE BUTTONS (1-3): Assigns a Cue Point or returns the track to that Cue Point. When a HOT CUE BUTTON is unlit, you can assign a Cue Point by pressing it at the desired point in your track. Once it is assigned, the HOT CUE BUTTON will light. To return to that Cue Point, simply press it. *Pressing DELETE before HOT CUE: Clear Hotcue.
DELETE: Press this to enable second functions to some buttons (LED on). On having pressed another button, it is deactivated and LED turn off. Combinations: Delete + EFFECT: Brake Effect (maintain pressed). Flanger Delay (Left. EFFECT CONTROL): Adjust the speed of Brake. Delete + HOTCUE: Clear Hotcue. Delete + RELOOP: Clear Loop. Delete + MANUAL: Set Quantize ON (for best manual loop) or OFF. Delete + SYNC: Set Pitch to 0%.
EFFECT: Activate / deactivate Flanger. SELECT modify the Depth and LEFT. EFFECT CONTROL change the Delay. *Pressing DELETE before EFFECT: Brake (maintain pressed). Adjust Speed with Flanger Delay (Left. EFFECT CONTROL).
EFFECT SELECT: Modify the Depth of Flanger effect, which will be displayed in the software.
LEFT EFFECT CONTROL: Modify the Depth of Flanger effect, which will be displayed in the software. *Used for change the speed of Brake effect too. RIGHT EFFECT CONTROL: Gain control of the deck (up to clip).
MODE: Press this to switch between Autoloop Mode and Manual Mode, which changes the functions of the LOOP CONTROL buttons. *Pressing DELETE before MODE: Set Quantize ON (for best manual loop), or OFF. Autoloop Mode (LED ON): • 1/2 X: Press this to halve the length of the loop. • 1 BAR: Press this to set a 4 beat loop automatically and enable it (LED ON). Press again to exit loop. • 2 X: Press this to double the length of the loop. Manual Mode (LED OFF): • IN: Press this to set a “Loop In” point where your loop will begin (LED ON). • OUT: Press this to set a “Loop Out” point where your loop will end, and enable it (LED ON). • RELOOP: If the Deck is already looping when you press it (LED ON), exit loop. If not, jump to the start of the loop and enable it. (If no loop is set, nothing will happen.) *Pressing DELETE before RELOOP: Clear Loop.
OUTPUT 1 (RCA): This stereo RCA connection will output the main mix from your computer. Please use a stereo RCA cable to connect this output to a powered speaker or amplifier system.
OUTPUT 2 (RCA): This stereo RCA connection will output the Cue Channel from your computer for monitoring purposes. Please note that the Cue Channel is also output through the HEADPHONES output on the front panel.
HEADPHONES: This stereo 1/4” output will output the signal being routed to the Cue Channel.
MIC GAIN: This knob controls the microphone level being sent to the main mix.
MIC THROUGH: This is a 1/4” microphone input. The signal from this input will be sent directly to the main mix.
Known problems
The pitch on the controller has a very short run. Thus, having it configured as a +10/-10 (or more) is tricky because you will get a very low pitch precision. Configuring it as +8/-8 (Mk2 style) is highly recommended.
Each slide/knob needs to be moved on Mixxx startup to match levels with the Mixxx UI.