12. Mixer avec Mixxx
Mixxx a été conçu pour être facile à appréhender à la fois par les novices et par les DJ expérimentés.
Cette partie du manuel vous fournit un mode d’emploi pour utiliser les fonctionnalités de Mixxx afin de créer vos propres mix.
12.1. Régler correctement les niveaux (Gain Staging)

Un réglage correct de vos niveaux, aussi connu sous le nom de gain staging, est essentiel pour tirer la meilleure qualité sonore du matériel que vous utilisez. À chaque maillon de votre chaîne de signal, depuis les gains des canaux de Mixxx jusqu’à l’amplificateur de puissance, le niveau devrait être bien au-dessus du bruit de fond, mais en-dessous du niveau maximum avant que le signal n’écrête. Les vues-mètre devraient la plupart du temps être autour du haut de leur zone verte. Le vue-mètre affiché à gauche montre à quel niveau moyen les vues-mètre de Mixxx devraient se trouver dans les parties les plus fortes des pistes. Le niveau moyen ne devrait pas se trouver dans la zone jaune. Utiliser la zone jaune pour laisser une marge, c’est-à-dire le niveau disponible au-dessus du niveau moyen avant que le signal n’écrête. Les parties les plus fortes de la musique (les transitoires) peuvent aller brièvement dans la zone jaune.

Une forme d’onde à un bon niveau. Notez que l’exemple de forme d’onde dans cette section a été fait en ajustant le gain visuel de l’affichage de forme d’onde dans Mixxx pour illustrer les concepts. Ajuster le gain visuel de l’affichage de forme d’onde ne change pas le niveau de l’audio.

Si un vue-mètre est dans sa zone rouge, le signal écrête et le gain devrait être baissé. Certains équipements n’ont pas de vue-mètre mais seulement une DEL qui s’allume lorsque le signal clippe. L’écrêtage signifie que les pics de la forme d’onde sont aplatis parce que l’équipement a atteint le niveau maximum auquel il peut amplifier le signal. Cela distord le son d’une façon déplaisante et peut abîmer le matériel en l’alimentant avec plus de puissance qu’il n’est conçu pour en recevoir. Augmenter le gain au-delà du point où l’écrêtage commence (plus loin dans le rouge du vue-mètre) distordra encore plus le signal. Si vous voulez que le son soit plus fort, sans écrêter, quand chaque maillon de la chaîne est à son maximum, utiliser plus d’enceintes ou des enceintes plus sensibles et qui convertissent plus efficacement l’énergie électrique en énergie acoustique.

Une forme d’onde écrêtée

D’autre part, le signal ne doit pas être trop bas, parce que chaque matériel audio génère un peu de bruit à un niveau appelé bruit de fond. De plus, les signaux analogiques ramassent du bruit en parcourant des câbles. Le signal mesuré par le vue-mètre à gauche est relativement proche du bruit de fond. Quand un matériel est monté, le bruit de fond n’augmente pas; seulement le signal augmente. Cependant, à chaque fois que le signal est amplifié par le gain d’un autre équipement, à la fois le bruit et le signal des équipements précédents sont amplifiés. Par exemple, si votre carte son est baissée et que vous montez le gain de votre table de mixage pour compenser, le ratio signal-bruit (SNR) de la sortie de la carte son sera bas et le gain de la table de mixage va amplifier le signal et le bruit de la carte son, plus le bruit ramassé dans le câble. Le résultat sera d’avoir plus de bruit que si la sortie de la carte son était montée avant que le signal n’atteigne la table de mixage et que le gain de la table de mixage n’ait pas eu à être monté.

Une forme d’onde trop proche du bruit de fond
Note
Pour ajuster le volume de sortie d’un système son tout en maintenant un ratio signal-bruit haut, le gain doit être ajusté aussi près des enceintes que possible. Référez-vous à la section Potentiomètre principal pour plus de détails.
12.2. Le beatmatching et le mix
Beatmatching est le processus d’ajustement de la vitesse de lecture d’une piste afin qu’elle corresponde au tempo d’une autre piste. Le Beatmatching implique également d’ajuster la phase des battements d’une piste afin qu’ils soient alignés avec les battements de l’autre piste. Faire correspondre le tempo et aligner les battements sont les deux choses qu’un DJ doit faire pour le beatmatching.
Mixxx peut faire correspondre le tempo et aligner les battements pour vous mais ceci nécessite une valeur de BPM précisément détectée et une grille rythmique correcte pour les deux pistes. Pour activer cette fonctionnalité, cliquez sur le bouton SYNC. Pour faire le beatmatch manuellement, le tempo des deux pistes doit être synchronisé en ajustant les curseurs de vitesse de lecture. Vous pouvez ajuster la phase des battements en faisant un clic-droit et faisant glisser l’une des formes d’onde pour accélérer ou ralentir temporairement une des pistes jusqu’à ce que les battements soient alignés. Les boutons temporaire de distorsion de hauteur tonale peuvent aussi être utilisés pour ajuster momentanément la vitesse de lecture, vous permettant de “déplacer” les battements dans une piste vers l’avant ou l’arrière, afin qu’ils puissent être alignés avec l’autre piste. Voir le chapitre Contrôles de vitesse et de synchronisation.
Deux pistes sont « beatmatchées » une fois que leurs tempos correspondent et que leurs battements sont alignés. Un beatmatch “perfect” est presque impossible - il y aura toujours une infime différence entre les vitesses de lecture. Un DJ affuté gardera ses oreilles ouvertes et écoutera si les battements se décalent de leur alignement. Ceci produit un son distinct de “double grosse caisse” qui est souvent précédé par une grosse caisse qui s’affaiblit en intensité alors que les deux grosses caisses se décalent hors phase. Quand ceci arrive, les battements peuvent être réalignés en tapant simplement quelques fois un des boutons temporaire de distorsion de hauteur tonale dans la direction adéquate.
12.3. Verrouillage de synchronisation
Verrouillage de synchronisation est un assistant intelligent qui vous permet de laisser le beatmatching à Mixxx afin que vous puissiez vous concentrer sur la sélection des pistes, la manipulation des effets, le bouclage, le mixage à 4 platines et d’autres techniques de DJé avancées.
Pour activer le verrouillage de synchronisation sur une platine, appuyer et maintenir (ou cliquer et maintenir) le bouton SYNC. Vous saurez que le verrouillage de synchronisation est activé car le bouton de synchronisation restera allumé. Changer le taux de n’importe quelle platine sur laquelle Sync est allumé modifiera le taux de toutes les autres platines dont le bouton Sync est également allumé. Il n’est pas nécessaire de définir des platines spécifiques pour être un leader ou un follower. Vous pouvez lire, arrêter, éjecter, charger et mettre en file d’attente n’importe quelle piste avec verrouillage de synchronisation sans interrompre la lecture des autres platines. Cependant, changer le taux d’une platine à l’arrêt modifiera la taux de lecture des platines.
Le verrouillage de synchronisation remarquera également si l’une de vos pistes est le double du BPM d’une autre piste et les fera correspondre correctement. Donc, si vous souhaitez mixer une piste de batterie et basse à 140 BPM avec une piste dubstep à 70 bpm, Le verrouillage de synchronisation s’assurera qu’elles sont correctement alignées.
Indication
Habituellement, le verrouillage de synchronisation garantira uniquement que les curseurs de taux sont correctement définis. Si vous souhaitez également vous assurer que vos battements sont parfaitement synchronisés, activer le bouton QUANTIFICATION. Lorsqu’il est activé, Quantification (Quantize) garantira que les battements sont également parfaitement alignés.
12.4. Verrouillage de synchronisation avec tempo dynamique
Si vous travaillez avec des pistes à tempo dynamique dotées d’une grille de battements BPM variable, vous disposez d’un contrôle précis sur le comportement du verrouillage de synchronisation via les boutons verrouillage de synchronisation suivants (disponibles dans les thèmes LateNight et Deere uniquement).
 Follower
  Soft Leader
Vous pouvez créer une grille rythmique avec BPM variable pour des pistes uniques en utilisant le menu contextuel de la bibliothèque Analyser et la commande Reanalyser (BPM variable). Alternativement, vous pouvez créer des grilles rythmiques avec BPM variables pour toutes les pistes à (re)analyser ultérieurement en décochant Supposé le tempo constant dans les préférences Detection de battement.
Lorsqu’une telle piste est jouée dans une platine Leader, les platines follower suivent de près le tempo. Il est important de noter que la piste suit inconditionnellement le tempo leader « détecté », même s’il y a des sections avec des tempos instables pendant les ponts ou dans les régions outro où le tempo réel joué n’a pas été détecté correctement.
Si une platine Soft-Leader s’arrête ou est réduit au silence, Mixxx sélectionne automatiquement la meilleur platine suivante comme Leader. En cliquant sur le bouton Leader, vous pouvez choisir entre les modes Soft-Leader et Follower. Un Soft-Leader n’est pas fixer et se déplacera automatiquement si le Leader actuel devient invalide.
Par défaut, la fonction « Verrouillage de synchronisation avec tempo dynamique » est activée et Mixxx sélectionne la première piste avec le verrouillage de synchronisation activée comme Soft-Leader, en utilisant le tempo de son outro lors de la transition suivante. Si vous souhaitez plutôt utiliser le tempo de l’intro du morceau suivant, cliquer sur le bouton Leader (Couronne) de sa platine. La platine devient alors le Soft-Leader et Mixxx utilisera à la place le tempo de cette platine.
Le seul cas où une platine à l’arrêt peut être un Leader est lorsque aucune autre platine n’est en train de jouer. Une fois qu’une platine commence à jouer, Mixxx la choisira comme Leader. Si une autre platine commence à jouer, vous pourrez alors choisir celle que vous souhaitez redevenir Leader.
Si vous préférez un tempo constant pendant les transitions comme dans Mixxx avant la version 2.4, vous pouvez sélectionner Utiliser un tempo constant pour Mode de synchronisation dans les préférences Platines. Dans ce mode, toutes les platines deviennent Follower lors d’une transition et vous pouvez choisir une piste dynamique comme Leader en cliquant sur le bouton Leader (Couronne) si vous le souhaitez.
Le Leader joue toujours les changements de tempo enregistrés d’origine. Un Follower change son tempo en fonction du Leader, ce qui peut entrainer un changement de hauteur tonale (picth) notable. L’activation du verrouillage des touches permet d’atténuer ce problème de hauteur tonale (pitch).
12.5. Mixage harmonique
Le mixage harmonique est une technique pour mixer des chansons en faisant correspondre les mélodies et les harmonies. Pour en apprendre plus à propos du mixage harmonique, vous pouvez visiter l’archive mixshare.
Mixxx possède deux fonctions pour vous aider avec le mixage harmonique. La première est le verrouillage de tonalité. Quand elle est active, changer le vitesse d’une piste n’affectera pas la tonalité. Pour activer le verrouillage de tonalité, cliquer sur le bouton verrouillage de tonalité dans la Boîte de boutons d’options de platine. La seconde, Mixxx peut automatiquement détecter la tonalité d’une piste et l’afficher dans la bibliothèque et dans les platines. La notation utilisée pour afficher une tonalité peut être changée dans les Préférences de détection de tonalité.
12.6. Enregistrer votre mix
Avec la fonction d’enregistrement intégrée, vous pouvez enregistrer votre mix sous forme de fichier audio et l’écouter plus tard, le distribuer sous forme de Podcast ou le gravez sur CD.
Par défaut, Mixxx enregistre la sortie principale. Alternativement, Mixxx peut enregistrer la sortie d’un mixeur externe si vous disposez d’une interface audio configurée pour l’entrée Enregistrer/Diffuser dans . Voir Enregistrement et diffusion avec une table de mixage matériel externe pour plus de détails.

Bibliothèque de Mixxx - Vue Enregistrements
Mixxx peut enregistrer votre mix dans différents formats audio et paramètres de qualité. Vous pouvez diviser vos enregistrements, générer des cue files, choisir un répertoire d’enregistrement personnalisé et définir même votre propre metadata. Par défaut, Mixxx enregistre vos enregistrements sous forme de fichiers WAV sans perte dans un sous-répertoire Mixxx/Recordings dans le répertoire de musique Mixxx. Avant de commencer l’enregistrement, nous vous recommandons d’ajuster les paramètres dans .
Si vous cliquez sur l’icône Enregistrements dans la barre latérale de la bibliothèque de Mixxx, le tableau des pistes sur la droite affiche le contenu de votre répertoire d’enregistrements. Les nouveaux enregistrements sont automatiquement enregistrés dans ce répertoire ainsi que les fichiers CUE si vous choisissez de les créer dans les préférences.
Indication
Enregistrer vos mixes et les ré-écouter plus tard pour faire une auto-critique est un bon outil pour améliorer vos talents de DJ. Envoyer vos mixes à d’autres DJs pour avoir des retours peut aussi vous aider.
Enregistrer votre mix sur le disque
Cliquer sur l’icône d’enregistrement en haut de la fenêtre de l’application pour démarrer et arrêter la session d’enregistrement. La durée de l’enregistrement en cours est affichée à côté de l’icône.
Note
Le widget d’enregistrement peut ne pas être disponible dans certains thèmes.
Alternativement:
Cliquer sur l’icône Enregistrements dans la barre latérale pour basculer en vue Enregistrements
Cliquer sur le bouton Démarrer l’enregistrement ou sur dans le menu en haut de la fenêtre de Mixxx.
L’affichage au dessus du tableau des pistes montre combien de données ont déjà été enregistrées, ainsi que la durée de l’enregistrement.
Exécuter votre mix
Cliquez sur le bouton Arrêter l’enregistrement pour arrêter l’enregistrement quand le mix est terminé.
Indication
Vous pouvez instantanément lire vos enregistrements comme une piste dans Mixxx. Glisser-déposer simplement la piste dans une platine.
12.7. Repères Intro et Outro
Les repères Intro/Outro sont utilisés pour mélanger les entrées et sorties des pistes et ils peuvent également être utilisés avec Auto DJ pour mélanger les entrées et les sorties à ces points. Contrairement aux repères rapides, ils ne marquent pas un seul point. L’entrée et la sortie sont des sections et chaque section est définie par deux points.
Mixxx détecte où se trouvent le premier et le dernier son lors de l’analyse d’une piste, ce qui permet de stopper facilement la lecture de parties silencieuses au début et à la fin de la piste. L’analyseur place le point de départ de Intro au premier son et le point de fin de Outro au dernier son. Le premier et le dernier son sont déterminés par la première fois où le signal dépasse -60 dBFS et la dernière fois où il descend en dessous de -60 dBFS.
Repères de début de Intro et de fin de Outro placés respectivement au premier et au dernier son d’une piste par l’analyseur
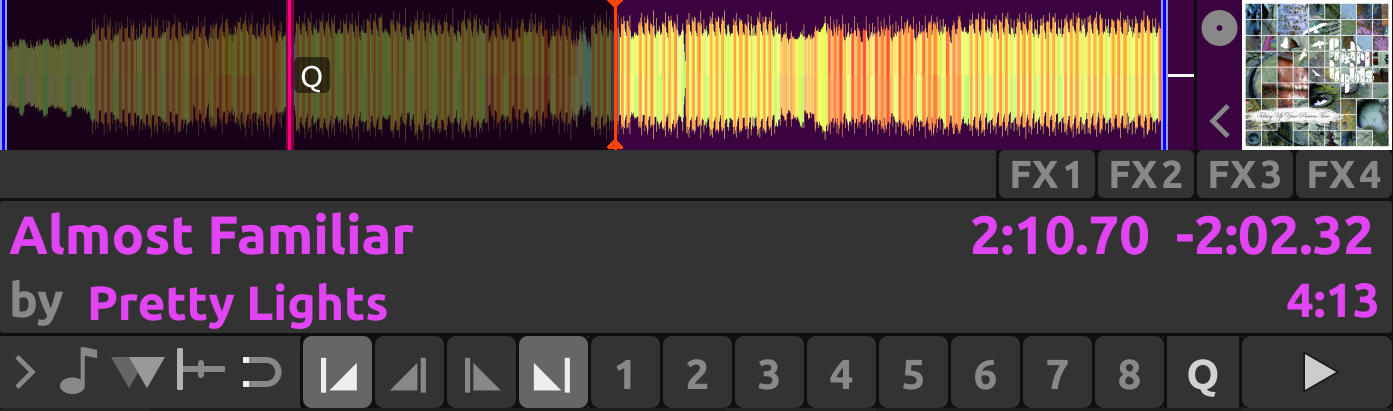
Vous pouvez décider où placer les points de fin de Intro et de début de Outro. Marquer l’intégralité de Intro et de Outro permet à Mixxx de calculer la durée de chaque section et de l’afficher sur l’aperçu de la forme d’onde. Ces informations peuvent vous aider à savoir quand appuyer sur lecture sur la piste suivante. Auto DJ peut également utiliser ces informations pour aligner les pistes et déterminer la durée du fondu enchainé.
Marqueurs de fin de Intro et de début de Outro placés sur la piste à côté des marqueurs de début de Intro et de fin de Outro, pour créer des sections
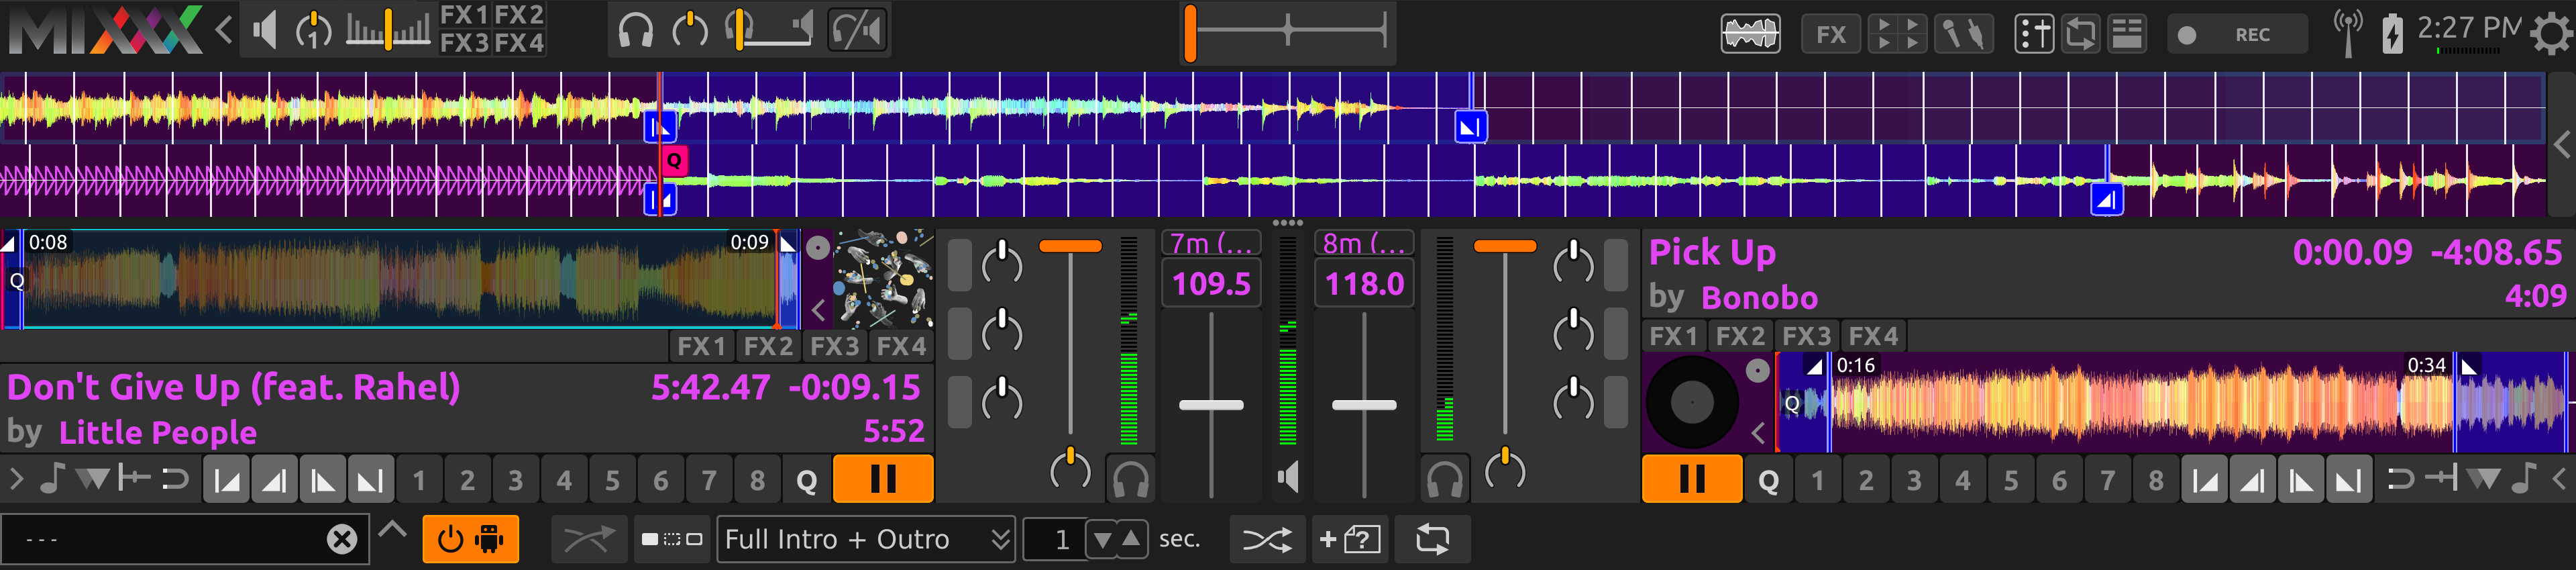
Mixage avec repères de Intro et de Outro
Vous pouvez aligner les fins de Intro et de Outro afin que l’énergie de la nouvelle chanson reprenne exactement à la fin de l’ancienne piste.

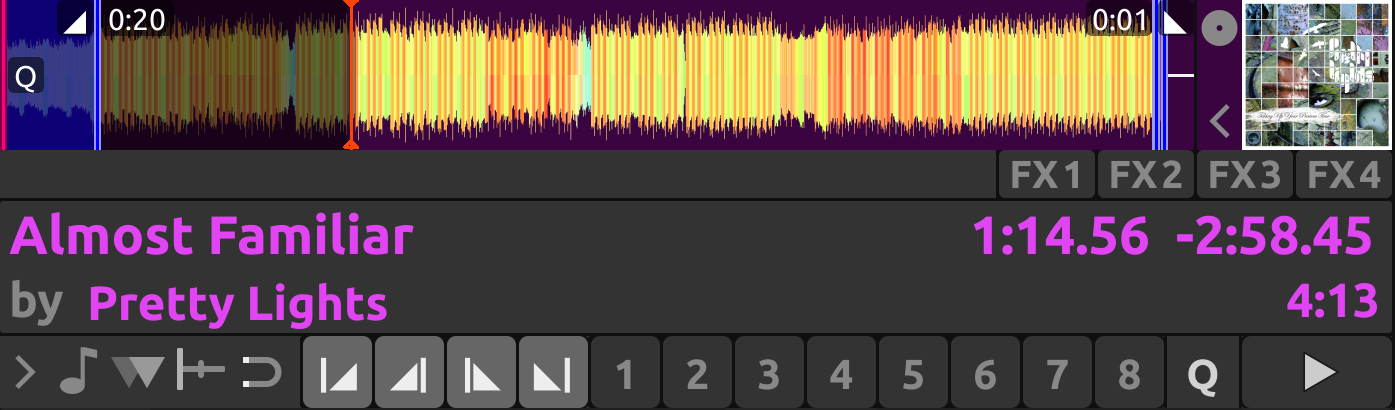
Marqueurs de fin de Intro et de Outro alignés et affichés sur la forme d’onde
Si Intro et Outro sont suffisamment courtes pour tenir sur la forme d’onde en même temps, vous pouvez simplement regarder les formes d’onde et appuyer sur Lecture lorsque les marqueurs s’alignent. Sinon, vous pouvez regarder le temps restant sur la platine et passer le curseur de votre souris sur la ligne de fin de Outro sur l’aperçu de la forme d’onde. Mixxx vous montrera combien de temps il reste jusqu’à ce point. Lorsque ce temps est égal à la durée de Intro, appuyer sur Lecture pour aligner précisément la fin de Intro. Si vous avez modifié le tempo de la piste, le temps restant évolue pour afficher le temps réel restant au tempo ajusté.

Vous pouvez également aligner les débuts de Intro et Outro. Dans ce cas, observer la forme d’onde défilante lorsque le point de départ de Outro arrive sur l’ancienne piste. Ensuite, appuyer sur Lecture sur la nouvelle piste lorsque l’ancienne piste atteint le début de Outro.
Note
Il n’y a pas de règles sur la méthode à utiliser. La méthode que vous décidez d’utiliser est un jugement artistique basé sur le contenu musical de chaque piste, l’ambiance de la foule à ce moment-là et ce que vous voulez faire du mix.
Si vous n’avez pas marqué les points de fin de Intro et de début de Outro lors du chargement d’une piste, vous pouvez les trouver et les marquer au casque avant de mixer la piste. Revenez ensuite au début de Intro pour préparer la piste. Si vous n’avez pas le temps de trouver le point final de Outro avant de mixer la piste, vous pouvez utiliser la fonction de clonage de platine pour faire glisser et déposer sur une nouvelle platine, puis rechercher à l’avance sur la nouvelle platine et écouter au casque pour marquer le point de départ de Outro. Si vous n’avez pas le temps de le faire non plus, vous pouvez faire clic-droit sur l’aperçu de la forme d’onde à l’endroit où vous pensez que le Outro commence. Rechercher ensuite à quelle distance se trouve la fin du titre pour la comparer à la longueur de Intro du titre suivant.

Ici, Outro dure environ 30 secondes. Cependant, l’analyseur a placé le point final de Outro avant la fin de la piste, donc Outro dure en fait un peu moins de 30 secondes. Sans marquer le point de départ de Outro, vous devrez faire quelques calculs dans votre tête pour déterminer exactement la durée de Outro.
12.8. Auto DJ
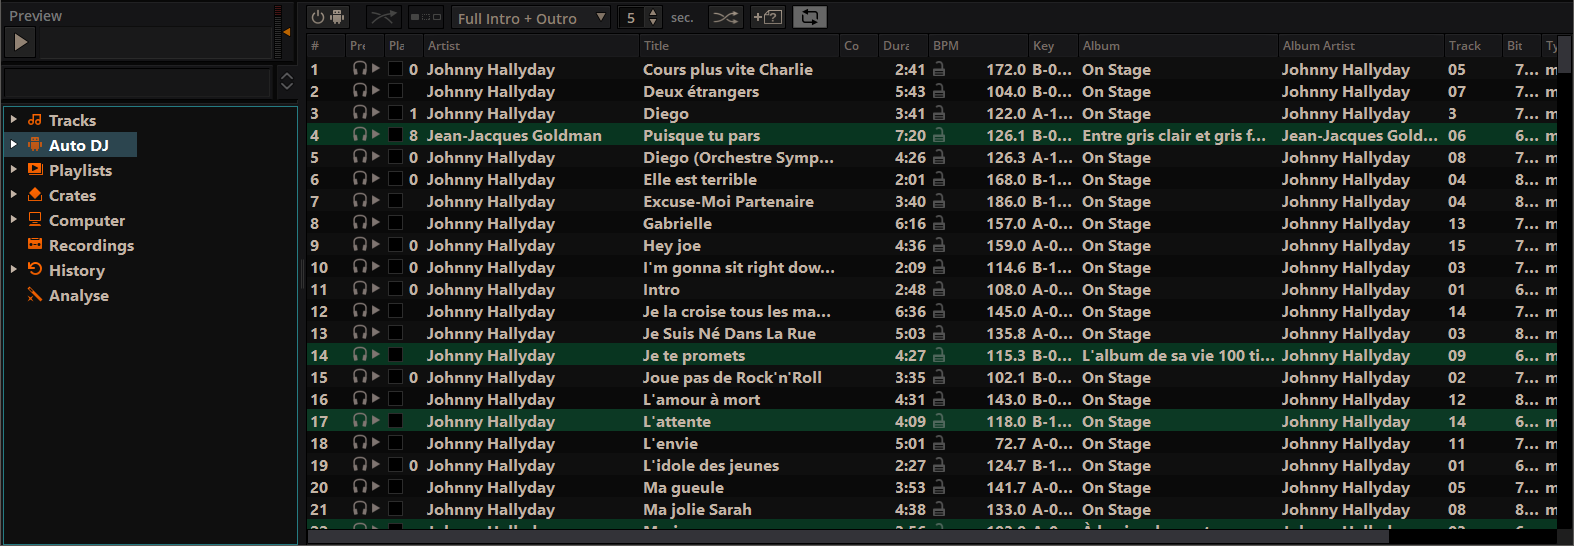
Bibliothèque de Mixxx - Vue Auto DJ
Auto DJ automatically loads tracks in the decks and mixes them. Tracks can be manually added to the Auto DJ playlist, or automatically from assigned source crates or from the entire library.
Auto DJ ne prend pas en compte le volume de chaque piste, ni le contenu des fréquences, ni les rythmes, il n’est donc pas destiné à remplacer un DJ humain. Cependant, c’est suffisant pour donner une pause à un DJ humain sans perturber significativement le mix.
For mixing, Auto DJ takes control of the crossfader. Auto DJ requires at least one deck to be assigned to the left and right side of the crossfader. This can be done with the deck orientation switches next to the crossfader. If a deck’s orientation is centered, the crossfader can’t affect it. Note that in the official Tango skin, these switches are in the decks” transport controls row, and in Shade skin they don’t exist because decks are statically assigned to the left and right side (bus).
When Auto DJ is toggled on, it will use the first two opposing decks it finds. With default settings these would be decks 1 and 2, but depending on how the orientation switches are set, this could be any configuration, for example deck 4 on the left and deck 1 on the right. If no opposing decks are found Auto DJ won’t start.
Note
Note that Auto DJ is currently not aware which decks are currently visible, i.e. it might pick currently hidden decks 3 and/or 4. Refer to the skin settings for how to toggle 4 decks.
When you toggle Auto DJ off, the crossfader will stay on its last position.
Each official Mixxx skin has an Auto DJ indicator icon, located either in the top toolbar or in the mixer. In some skins the crossfader is highlighted, too.
Charger des pistes vers l’Auto DJ
Pour jouer des pistes automatiquement, elles doivent tout d’abord être chargées dans la liste de lecture Auto DJ. La liste de lecture Auto DJ est vide par défaut.
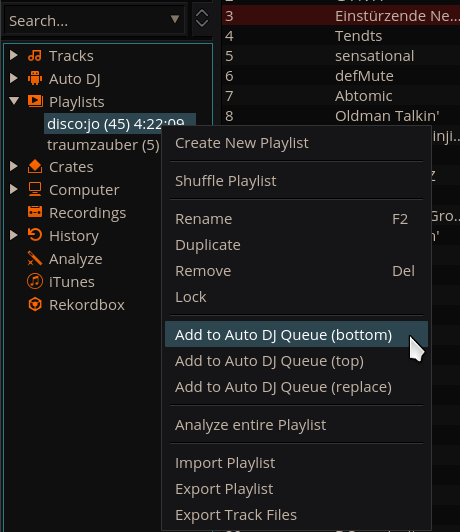
Bibliothèque de Mixxx - Ajouter une liste de lecture à l’Auto DJ
Il y a plusieurs manières de charger des pistes dans la liste de lecture Auto DJ :
Sélectionner une ou plusieurs pistes depuis la bibliothèque, une liste de lecture classique ou un bac et faites-les glisser dans l’icône Auto DJ sur la gauche.
Sélectionner une liste de lecture classique ou un bac, faites un clic-droit avec la souris et sélectionner Ajouter à la file Auto DJ depuis le menu de la souris. Ceci ajoute toutes les pistes à l’Auto DJ.
En vue Auto DJ de la bibliothèque, faites glisser des pistes depuis un gestionnaire de fichiers externe vers l’icône Auto DJ dans la barre latérale ou dans le tableau des pistes Auto DJ sur la droite.
Ajout automatique de pistes à partir des bacs
Au lieu d’insérer le contenu des bacs directement dans la liste de lecture Auto DJ, les bacs Auto DJ sont des bacs associées qui deviennent une source de sélections aléatoires de pistes.
Ajouter à Auto DJ un bac de sources de pistes: Développer l’élément Auto DJ dans la barre latérale, et cliquer-droit sur le sous-élément Bacs. Sélectionner l’un des bacs existantes dans la liste. Cela rend le contenu du bac disponible pour une sélection aléatoire dans la file d’attente Auto DJ pour le mix automatique. Le nom du bac est maintenant répertorié dessous comme sous-élément.
Si vous n’avez pas de bacs disponibles pour la sélection dans la liste, créer d’abord un bac et ajouter y quelques pistes, voir Bacs - Organiser les pistes en collections.
Ajouter manuellement des pistes à Auto DJ, à partir des sources de pistes: Cliquer sur l’élément Auto DJ dans la barre latérale et passer à la vue Auto DJ de la bibliothèque. Cliquer sur le bouton Ajouter aléatoirement pour ajouter une piste à la fois à partir des sources de piste Auto DJ, à la fin de la liste de lecture Auto DJ.
Note
Si vous n’avez pas défini de bac comme une source de piste Auto DJ, cliquer sur le bouton Ajouter aléatoirement va ajouter une piste sélectionnée au hasard dans toute la bibliothèque.
Ajouter automatiquement à Auto DJ des pistes à partir des sources de piste: Mixxx peut ajouter au hasard des pistes à la liste de lecture Auto DJ à partir des sources de piste dès qu’il reste un nombre minimum de pistes spécifié. Sélectionner . Régler pour changer le nombre minimum de pistes après lequel des pistes aléatoires seront ajoutées.
Note
Si vous n’avez défini aucun bac comme source de piste Auto DJ, les pistes sont sélectionnées à partir de toute la bibliothèque.
Supprimer de Auto DJ un bac des sources de piste: Développer l’élément Auto DJ dans la barre latérale, et cliquer-droit sur l’un des bacs répertoriées sous le sous-élément Bacs. Sélectionner Supprimer le bac comme source de piste pour supprimer le bac des sources de piste Auto DJ.
Lire des pistes en Auto DJ
Maintenant que vous avez chargé des pistes dans la liste de lecture Auto DJ, vous pouvez activer l’Auto DJ comme suit :
Cliquer sur l’icône Auto DJ dans la barre latérale pour basculer en vue Auto DJ de la bibliothèque.
Cliquer sur le bouton Activer Auto DJ
Les premières pistes de votre liste sont chargées dans les platines et la lecture commence.
Mixxx va continuer à mixer automatiquement jusqu’à ce que la liste de lecture Auto DJ soit vide.
Cliquez sur le bouton Arrêter Auto DJ pour arrêter le mixage automatique
Indication
Vous pouvez ajouter une piste à la fin de la liste de lecture Auto DJ une fois qu’elle a été lue au lieu de la supprimer. A définir dans
Modes des mixage Auto DJ
Auto DJ dispose de plusieurs modes qu’il peut utiliser pour mixer des pistes :
Intro + Outro complet
Fondu au début de Outro
Piste entière
Passer les silences
Les modes « Intro + Outro complet » et « Fondu au début de Outro » utilisent tous deux les repères de Intro et de Outro, mais pas les modes « Piste entière » et « Passer les silences ».
Intro + Outro complet et Fondu au début de Outro
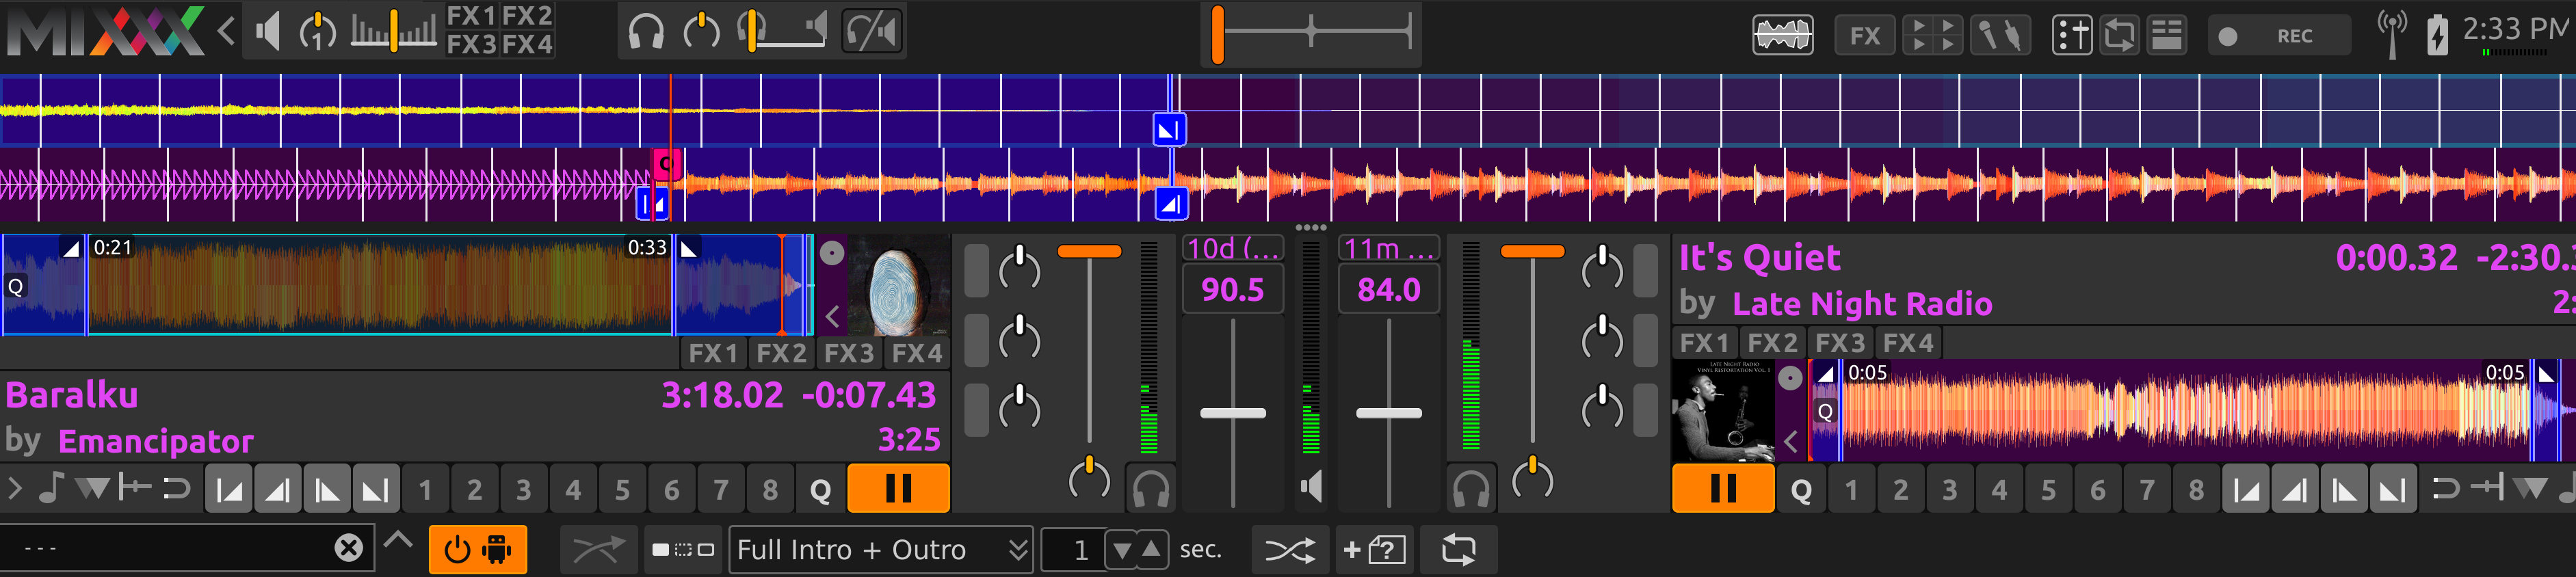
Les modes Auto DJ « Intro + Outro complet » et « Fondu au début de Outro » utilisent les repères Intro & Outro pour déterminer la durée du fondu enchainé et comment aligner les pistes dans le temps. Dans les deux modes, Auto DJ compare la durée de Outro de l’ancienne piste avec Intro de la nouvelle piste. Auto DJ choisit le temps de la section la plus courte comme temps de fondu enchainé.
Dans les deux modes, si Outro est plus courte que Intro, Auto DJ alignera le début de Outro avec le début de Intro.
Marqueurs de début Intro et de Outro alignés par Auto DJ
Les deux modes fonctionnent différemment lorsque Outro est plus long que Intro.
- Mode Intro + Outro complet
La longueur complète de Intro et de Outro est toujours jouée. Lorsque Outro est plus long que Intro, Auto DJ aligne la fin de Intro et de Outro en commençant la piste suivante pendant Outro de la piste précédente. Ce mode est le plus susceptible de donner un bon son avec la plus grande variété de pistes. Il s’agit donc du mode par défaut.
Repère de début Intro et Outro alignées par Auto DJ en mode Intro + Outro complet
- Fondu au début de Outro
Auto DJ aligne toujours le début de Intro et de Outro. Lorsque Outro est plus longue que Intro, Auto DJ coupe la fin de Outro. Cela peut être utile si vous souhaitez éviter que l’énergie du mix ne décline au cours d’un long Outro. Cependant, la transition peut paraitre abrupte si Intro est court.
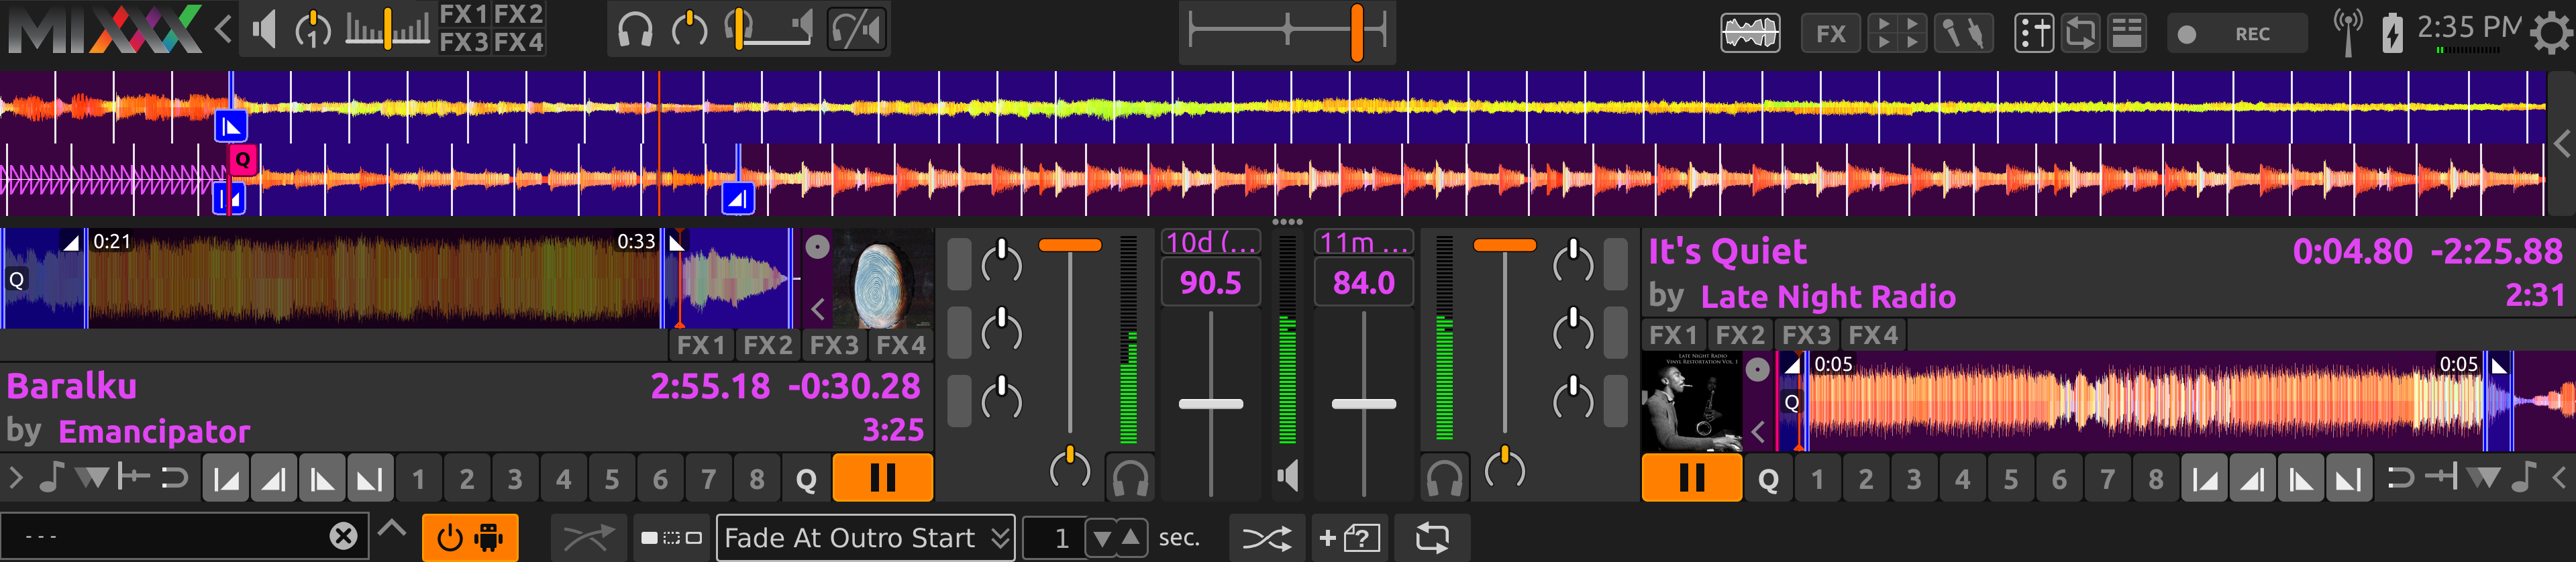
Repères de début Intro et Outro alignées par Auto DJ en mode « Fondu Outro »
Piste entière et Passer les silences
Les modes Auto DJ « Piste entière » et « Passer les silences » n’utilisent pas les signaux Intro et Outro. Ils effectuent un fondu enchainé des pistes pendant un nombre de secondes que vous spécifiez dans la case à côté du menu de sélection de mode. Le mode « Piste entière » lit toute la longueur de chaque fichier. Le mode « Passer les silences » fonctionne de la même manière mais coupe automatiquement le silence au début et à la fin des pistes (défini comme lorsque le signal passe pour la première fois au-dessus ou en dessous de -60 dBFS).
Indication
Si vous souhaitez toujours utiliser Auto DJ comme une application de lecture de musique normale, utilisez l’un de ces modes avec une durée de transition de 0 seconde.