Stanton SCS.3d “DaScratch”
1.7 sürümünde geldi.
2.0 sürümünde geldi: Alternate mapping with many more visual effects (flashing lights) and different behavior.
Default Mapping
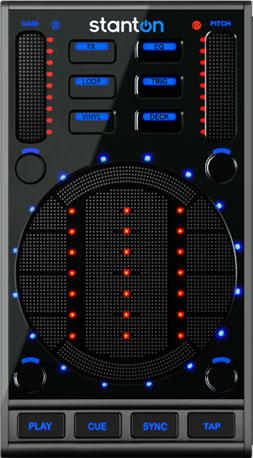
Stanton SCS.3d (layout). Images courtesy of Stanton Magnetics, Inc.
Easy customization: We have provided the following customization variables at the top of the script you can set to your liking:
pitchRanges - Set the pitch slider range when the Pitch LED is off, blue, purple and red (in decimal values. E.g. 0.08 = 8%, 0.5 = 50%)
fastDeckChange - If set to true, changes decks instantly by skipping the flashing lights. Useful for beat juggling on one unit.
spinningPlatter - If set to true, uses the circle LEDs to accurately (no sticker drift!) show the track position in record revolutions, also useful for juggling.
spinningPlatterOnlyVinyl - If set to true, only shows the spinning platter LED in vinyl modes. Otherwise shows in all modes except Loop, Instant Pitch Change and TRIG (because they’re used for other things in those modes.)
spinningLights - The number of lights used for the spinning platter effect, 1 or 2. (1 is best for juggling.)
VUMeters - If set to true, shows a VU meter in the circular area for the currently selected deck when in vinyl mode. (Left for deck 1, right for deck 2.)
markHotCues - Set to
"blue"or"red"(with quotes) to choose which LEDs mark the stored positions in TRIG & LOOP modesjogOnLoad - If true, the unit will automatically change to Vinyl (jog) mode after loading a track (from Track Select mode)
globalMode - If true, the unit will stay in the current mode on deck changes (instead of switching to the mode you were in the last time you controlled that deck.)
singleDeck - If you’ve got more than one MIDI controller, set this to true to have the SCS.3d stay on one deck and make Deck mode non-temporary. More on this here.
deckChangeWait - Time in milliseconds to hold the DECK button down to avoid changing decks
pitchAdjustment - Adjusts the coarseness of the pitch slider (1=coarse, 3=normal, 5=fine)
finePitchAdjustment - Adjusts the coarseness of the pitch slider in fine mode (1=coarser, 3=normal, 5=finer)
finePitchDefault - If true, swaps normal and fine pitch modes so you can use fine pitch mode unshifted
Just open the controllers/Stanton-SCS3d-scripts.js file in your favorite
text editor and you’ll see these variables right near the top. Edit & save.
Mode buttons
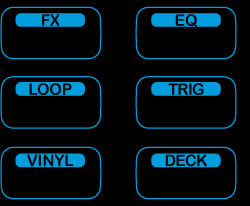
Stanton SCS.3d (mode buttons)
FX - Adjust & toggle Flanger effect, toggle reverse effect
EQ - Adjust channel EQ parameters
Loop - Loop controls and Instant pitch changes
Trig - Hot cues
Vinyl - Toggle between pitch bend, vinyl manipulation & scratching, and track selection
Deck - Adjust global controls and switch to another virtual deck
Common to all modes:
(except where noted)
Gain slider (S1) adjusts deck volume
Pitch slider (S2) adjusts deck pitch control
B11 toggles headphone cue
B12 toggles pitch range (black=8%, blue=12%, purple=50%, red=100%)
B13 Rewind (REW)
B14 Fast Forward (FFWD)
PLAY starts or pauses track playback.
CUE will jump to the cue point or set it, depending on your settings and whether the track is playing.
SYNC synchronizes the tempo of the current deck to another. Holding SYNC for more than 1/3 of a second will enable Sync lock. (Press SYNC again to disable it.)
Pressing TAP repeatedly will change the speed of the current deck to match your tap tempo (useful for synchronizing with an external music source.)
While holding down the current mode button:
Gain slider (S1) adjusts pre-fader gain
Pitch slider (S2) finely adjusts pitch control
B11 resets pre-fader gain to center
B12 resets pitch to center 0%
SYNC toggles the Quantize function (where Cue and Loop points snap to the nearest beat and triggering them happens in time with the beat.)
FX Modes
These modes let you adjust the effect unit parameters. The FX button will be red when adjusting effect unit 1, purple for unit 2, and black for unit 3. (In Mixxx versions below 2.0.1, there is only one mode that adjusts the Flanger effect.)
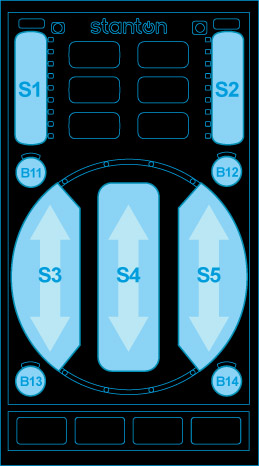
Stanton SCS.3d (slider mode)
Left slider (S3) adjusts the first effect parameter
Center slider (S4) adjusts the second effect parameter
Right slider (S5) adjusts the third effect parameter
B11 performs a reverse-roll (censor) while held down
B12 toggles this effect on the current deck
Hold the FX button down and touch any slider to reset it to center.
EQ Mode
Stanton SCS.3d (slider mode)
Left slider (S3) adjusts low frequency equalizer
Center slider (S4) adjusts mid frequency equalizer
Right slider (S5) adjusts high frequency equalizer
Hold the EQ button down and touch any slider to reset it to center.
Loop mode (red)
The surface is configured as 11 buttons:
Left |
Middle |
Right |
|---|---|---|
1/8-beat loop |
Loop In |
2-beat loop |
1/4-beat loop |
Reloop/Exit |
4-beat loop |
1/2-beat loop |
Reloop/Exit |
8-beat loop |
1-beat loop |
Loop Out |
16-beat loop |
Mixxx v2.0.1 and above have the left column flipped so you can adjust the loop size sequentially when moving along the circle:
Left |
Middle |
Right |
|---|---|---|
1-beat loop |
Loop In |
2-beat loop |
1/2-beat loop |
Reloop/Exit |
4-beat loop |
1/4-beat loop |
Reloop/Exit |
8-beat loop |
1/8-beat loop |
Loop Out |
16-beat loop |
The Reloop/Exit button lights up when a loop is active. If it happens to be an exact number of beats, the corresponding beat loop button will light up as well.
Also:
B11 (under the Gain slider) halves the length of the current loop
B12 (under the Pitch slider) doubles the length of the current loop
You can exit any loop by pressing Reloop/Exit (or a lit beat loop button.)
Vinyl Modes
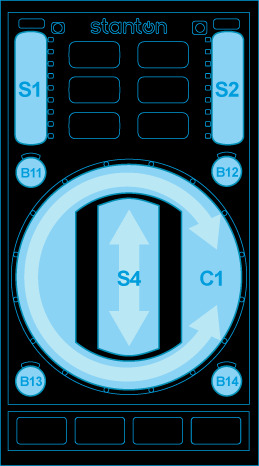
Stanton SCS.3d (circle mode)
Vinyl mode (red)
Outer circle (C1) and Center slider (S4) allow you to bend the song’s pitch, akin to dragging your finger on the record
Vinyl2 Mode (purple)
Outer circle (C1) allows you to “scratch” the song and perform juggles
Center slider (S4) allows you to “scratch” the song
Scratch & cue toggle: Hold the VINYL button and press CUE when in Vinyl2 mode to toggle recalling the cue point when you touch either C1 or S4. This makes juggling really easy since you don’t have to back-cue.
Track Select Mode (black)
Outer circle (C1) allows you to scroll through your Library
Center button (anywhere on S4) loads the currently highlighted song into the current deck, as long as it’s not live (playing to the main output.)
B11 selects backward between Library, Playlist, Browse, etc. views
B12 selects forward between Library, Playlist, Browse, etc. views
B13 moves the highlight up one item
B14 moves the highlight down one item
Deck Mode
Stanton SCS.3d (slider mode)
You are in this mode only while holding down the Deck button, unless the controller is in single-deck mode:
Gain slider (S1) adjusts main volume
Pitch slider (S2) adjusts main balance (pan)
B11 resets main volume knob to the middle
B12 resets main balance to center
Left slider (S3) adjusts the cue/main headphone mix
Center slider (S4) adjusts the cross-fader
Right slider (S5) adjusts the headphone volume
TAP resets cross-fader to center position (only in multi-deck mode)
Press Deck + Sync together to toggle between multi- and single-deck modes
In single-deck mode:
Hold the Deck button down and touch any slider to reset it to its default value
Press Deck + Play together to change the active deck
General controls
Stanton SCS.3d (slider mode)
Unless otherwise noted, the following controls have the same function in all modes.
S1 controls volume of currently active deck.
S2 changes rate or pitch depending on current mode, see VINYL-mode for discussion.
PLAY starts or pauses the track. When a track is ready to play the button blinks.
CUE will jump to the cue point or set it, depending on your settings and whether the track is playing.
SYNC syncs the active deck to another deck. Holding SYNC for more than one second will enable SYNC lock.
Pressing TAP repeatedly will adjust track BPM.
The currently active deck/channel is shown by lighting one of B11 through B14 red (except for FX-mode where the selected FX chain is shown). B11 lights red for deck 1, B12 for deck 2, B13 for deck 3 and B14 for deck 4. See DECK and FX modes on how to control this.
A light spinning around the circle shows the track is playing. When the track nears its end (at -30 seconds), a blinking light will detach and run slower. When the spinning light reaches the blinking light, the track ends.
By touching one of the six mode buttons, you switch to that mode. Some modes have alternate overlays, you can switch to those by touching the mode again. The first overlay is red, the second blue, the third is purple. The following mode-overlays are available:
Stanton SCS.3d (mode buttons)
FX: (red) Control effect device; (blue) Control deck superknob
EQ: (red) Control deck EQ
LOOP: (red) Set/release beat-loops; (blue) Rolling-loops
TRIG: (red) cue points 1 through 5; (blue) cue points 6 through 10; (pink) cue points 11 through 15;
VINYL: (red) jog wheel; (blue) scratch
DECK: (red) library scan & load
Modes are remembered per-deck. When you switch the deck, the mode last active for that deck will be selected.
By holding a mode button, a mode is enabled temporarily in hold-mode. When the button is released again, the device switches back to the previously selected mode. Some hold-modes enable alternative, often disruptive functionality. Most of the time you won’t want to use the hold-modes on live decks (e.g. needledrop in VINYL) or you must be very cautious (assigning effect chains with FX).
Each mode will be explained in detail below.
FX mode
Stanton SCS.3d (slider mode)
FX mode allows you to control effects. Slider S2 controls the wet/dry mix of the current effect. Sliders S3, S4, and S5 control the first three effect knobs on the effect unit. (Specifically, the first effect of one of the four effect chains is controlled.)
The device remembers the selected effect per deck, so if you switch decks you also switch to the previously selected effect on that deck. Initially, effect slot 1 is selected for deck 1, slot 2 for deck 2 and so on.
To control another effect, buttons B11 through B14 allow you to switch. The currently active effect is shown in red where button B11 lights red when the first effect chain is selected, B12 for the second chain, B13 for chain 3, and B14 for chain 4. The buttons turn blue when the active deck is assigned to this effect chain. If the active effect is assigned to the current deck, the corresponding button will appear purple. If you don’t see purple it means that the effect you’re controlling is not assigned to the current deck.
For example, if the controller is on deck 2, has effect slot 2 selected, and effects 2 and 3 assigned, the four buttons would be lit as follows:
B11: black
B12: purple
B13: blue
B14: black
Holding FX
By holding FX, you can toggle assignment of the current deck to effect chains with buttons B11 through B14. B11 assigns effect chain 1, B12 assigns effect chain 2, B13 assigns chain 3, and B14 assigns chain 4 to the active deck. The effects that have the current deck assigned are shown in blue. While FX is held, S2 can be used to scroll through different effects. To load the next effect, touch top half of the slider and touch the bottom half to load the previous effect into the currently active effect slot.
When FX is held, the button for the active deck is shown in red. So if you want to assign the active effect to the active deck, press the button that is red. If the button is purple, pressing it would deactivate the active effect on the active deck.
Example on how to load an echo effect into chain 3 and assign it to channel 2:
Press DECK-B12 to switch to deck 2
Press FX to switch to FX mode
Press B13 to select effect chain 3
Slide S2 to the bottom to bypass chain 3 (precautionary measure)
Hold FX and touch S2 above the middle to select the next effect (will select echo if no effect was selected previously)
Hold FX and press B13 to assign effect chain 3 to deck 2
Adjust echo parameters with sliders S3, S4, S5
Slide S2 upwards to bring the effect in
EQ mode
In EQ mode, the central sliders S3, S4, S5 control low/mid/high EQs. Hold EQ to control pre-gain on S1 instead of volume. The other controls (low/mid/high/pitch) are reset to center when the control is touched while EQ is held.
LOOP mode
Stanton SCS.3d (circle mode)
By touching the circle you activate a loop over a certain number of beats. Touching on the right side will activate a beat-loop over 1, 2, 4, 8 etc beats, starting from the top. On the left side you get fractions 1/2, 1/4, 1/8 etc loops starting from the top. To leave the loop, touch center.
By touching the LOOP mode button again, the ‘rolling’ overlay comes on and the LOOP button turns blue. In rolling mode, the loop will be released as soon as you take your finger off the circle and the track will resume where it would have been without looping.
TRIG mode
You can set hotcues and jump to hotcues in this mode. The circle is split into five fields (1: top left, 2: bottom left, 3: top right, 4: bottom right, 5: center) where touching the area will either set the hotcue if it was unset, or trigger the hotcue if it was set. When a hotcue is set, the blue lights next to it will light.
To clear a hotcue, hold TRIG and touch the corresponding field.
The first TRIG overlay (red light) controls hotcues 1 to 5, touching TRIG will switch to overlay two, controlling hotcues 6 to 10 (blue light), then overlay three, for cue points 11 to 15 (purple light).
VINYL mode
Stanton SCS.3d (circle mode)
The circle C1 functions as a jog-wheel, slide clockwise to speed-up the track. The center slider S4 can be used to raise and lower speed by holding it above or below center, respectively.
B11 jumps back one beat, B12 jumps forward. B13 and B14 control fast-reverse, fast-forward.
While VINYL is held, B11 through B14 set the pitch slider mode. The currently active mode lights blue. The different pitch slider modes are:
B11 Absolute rate: The pitch slider directly sets the rate in a wide range
B12 Discrete Pitch: Change pitch up or down by touching upper or lower part of slider
B13 Rate: Change the rate up or down by holding the slider off-center. The further from the center you hold the slider, the faster the rate changes.
B14 Relative pitch: slide to change pitch up or down
When VINYL is held, the SYNC button adjusts the beatgrid. When the track is not playing, the beatgrid is moved to the current track position. When the track is playing, the beatgrid is aligned with the other track’s beatgrid.
A second overlay to VINYL (blue) enables scratching on the pad. Both the circle and the center slider (S4) can be used to scratch.
DECK mode
This mode is used to load tracks. When the current deck is not playing, an arrow pattern indicates that the currently selected track can be loaded into the deck by pressing the central field S4. Sliding on the circle C1 will scroll through the library.
B11 and B13 allow you to switch up and down between the library categories, while B12, B14 allow stepping through the library list one-by-one (the slider allows only coarse control).
When holding DECK, you can switch channels.
B11: deck 1; B12: deck 2
B13: deck 3; B14: deck 4
The corresponding button turns red. The active deck is shown on the buttons in all modes except FX.
The controller keeps its mode per deck. So when changing deck, the mode will switch to the mode previously used on that deck.
Note that the active deck is synced with the Stanton SCS.3m, so when switching between decks 1 and 3, or 2 and 4 the other device changes as well.