14. Erweiterte Themen
14.1. Unterstützung für Ihren Midi/HID-Controller hinzufügen
With several dozens of DJ controllers supported out-of-the-box, Mixxx gives you comprehensive hardware control for your DJ mixes, see Mittels MIDI/HID-Controller.
Support for additional devices can be added to Mixxx by creating a new mapping file. This file tells Mixxx how to translate, or map, MIDI/HID messages from a controller into commands that Mixxx understands.
You can download and share custom controller mappings in the Mixxx User Controller Mapping forums.
For a list of controls that can be used in a controller mapping, see Mixxx Controls.
Controller-Assistent

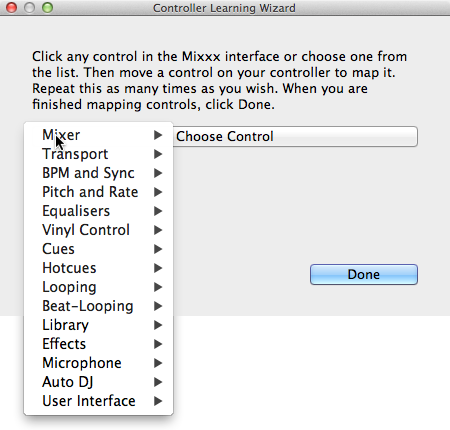
Mixxx-Controller-Assistent - Ein Steuerelement zuweisen
By far, the easiest way to create a new MIDI mapping is by using the Controller Wizard.
Schliessen Sie die Controller an Ihren Computer an
Mixxx starten
Go to
Wählen Sie Ihr Gerät aus der Liste der verfügbaren Geräte auf der linken Seite, und der Bereich zur Rechten ändert sich
Activate the Enabled checkbox
Click on Learning Wizard to open the selection dialog
Click any control in the Mixxx GUI
Alternatively, click the Choose Control button and choose one from the selection list
Push Learn and then move a control or push a button on your controller to map it. You can also move a control without pushing the Learn button if you are learning many controls.
If you are learning a button, just push it once. If you are learning a knob or a slider, try to move it throughout its range.
After Mixxx detects the control, you may click Learn Another or you can click on another button in the Mixxx GUI to learn another control.
When you are finished mapping controls, click Done
There are also some advanced options in the Midi Wizard you may need to use:
Soft Takeover: Use this option for knobs or sliders to avoid sudden jumps in when the knob in the GUI doesn’t match the physical knob. If you select this option, you won’t be able to perform super-fast motions as easily. (Recommended off)
Invert: Use this option for controls that you want to work backwards from how they were detected.
Switch Mode: Use this option on controllers that have controls that act like switches and emit one value on the first press, and a different value on the next press. (Think an actual hardware toggle switch, or a button that lights up on the first press and turns off on the second press).
Jog Wheel / Select Knob: Use this for knobs that don’t have a beginning or an end, but spin continuously.
The Controller wizard saves the new mapping to the controllers directory in
the user settings directory, see The Mixxx Settings Directory.
You can then modify the XML file it creates (or any of the ones that ship with Mixxx) if you’d like to fine-tune it or add more mappings. For more information, go to https://github.com/mixxxdj/mixxx/wiki/MIDI-Controller-Mapping-File-Format.
The Controller Wizard works only for MIDI devices. Currently you can’t map modifier (shift) keys and platter rotations. Use MIDI Scripting instead.
MIDI-Scripting
In order to support the advanced features of many MIDI/HID controllers, Mixxx offers what we call MIDI Scripting.
It enables MIDI controls to be mapped to QtScript (aka Javascript/EMCAScript) functions stored in function library files, freeing Mixxx from a one-to-one MIDI mapping ideology. These user-created functions can then do anything desired with the MIDI event such as have a single controller button simultaneously affect two or more Mixxx properties (“controls”), adjust incoming control values to work better with Mixxx (scratching), display a complex LED sequence, or even send messages to text displays on the controller.
For more information, go to https://github.com/mixxxdj/mixxx/wiki/Midi-Scripting and https://github.com/mixxxdj/mixxx/wiki/Hid-Mapping , as well as the Comonents-JS library which greatly simplifies mapping, for example effect units and complex behaviour like switching deck layers or pad grid modes. Note that this is the preferred way of mapping if intended your mapping to be included in Mixxx since Components-JS significantly reduces effort for both mapping and reviewing Pull Requests.
14.2. Eine benutzerdefinierte Tastaturbelegung erstellen
The default keyboard mappings are defined in a text file which can be found at the following location:
Linux:
/usr/local/share/mixxx/keyboard/en_US.kbd.cfgmacOS:
/Applications/Mixxx.app/Contents/Resources/keyboard/en_US.kbd.cfgWindows:
<Mixxx installation directory>\keyboard\en_US.kbd.cfg
Depending on your system’s language settings, Mixxx might use a different
file as default, e.g. de_DE.kbd.cfg for German or es_ES.kbd.cfg
for Spanish.
It is not recommended that you modify the system-wide keyboard mapping file because all your changes may be lost if you uninstall or upgrade Mixxx. Instead, copy the default mapping file to the following location:
Linux:
~/.mixxx/Custom.kbd.cfgmacOS:
~/Library/Containers/org.mixxx.mixxx/Data/Library/Application Support/Mixxx/Custom.kbd.cfgWindows:
%LOCALAPPDATA%\Mixxx\Custom.kbd.cfg
Then edit this file and save the changes. On the next startup, Mixxx will check
if Custom.kbd.cfg is present and load that file instead of the default
mapping file. This has the advantage that you can always revert back to the
default mapping by deleting Custom.kbd.cfg.
For a list of controls that can be used in a keyboard mapping, see Mixxx Controls.
You can download and share custom keyboard mappings in the Mixxx User Keyboard Mapping forums.
14.3. Zusätzliche Effekte über den externen Mixer Modus
Mixxx comes with a set of native effects. Additionally, using the external mixer mode you can route each deck directly to 3rd party effect hosts.
The following examples are only intended to encourage experimentation, they are not definitive guidance.
Effects via AU Lab on macOS

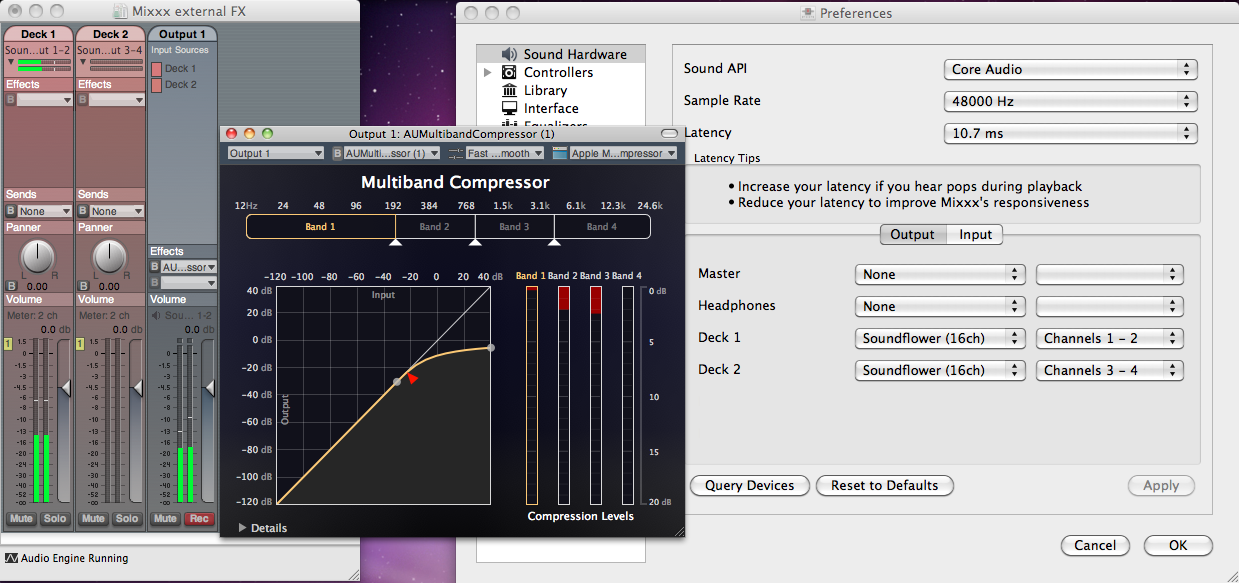
The Au Lab routing for external effects on macOS
On macOS there is a simple and free way to give Mixxx access to the collection of AU/VST/MAS plugins that are installed on your system.
Install the free SoundflowerBed, a system extension for inter-application audio routing.
Install the free digital audio mixing application AU Lab.
Hinweis
macOS 10.15 (Catalina) introduces additional restrictions on running non-Apple software. Make sure to grant permission in System Preferences –> Security & Privacy –> Microphone –> AU Lab.
Alternatively, try Blackhole, a modern virtual audio driver that allows applications to pass audio to other applications with zero additional latency, and Hosting AU, a free micro-sized DAW that hosts Audio Unit instruments and effect plugins.
In Mixxx
Go to
Select for Deck 1 the Soundflower 16 device with Channel 1-2
Select for Deck 2 the Soundflower 16 device with Channel 3-4
Click the Apply button
In AU Lab
Click on the + button to create a new configuration
Add 2 stereo input tracks in the Audio Input Tab
Add 2 stereo output tracks in the Audio Output Tab
Click OK
Change the audio input device to Soundflower 16
Change the audio output device for example to Built-in Output
Click Create document
In the Output 1 channel, select an effect from the drop-down menu, for example
The effect should now react if you play a track in Mixxx.
Effects via JACK Rack on GNU/Linux

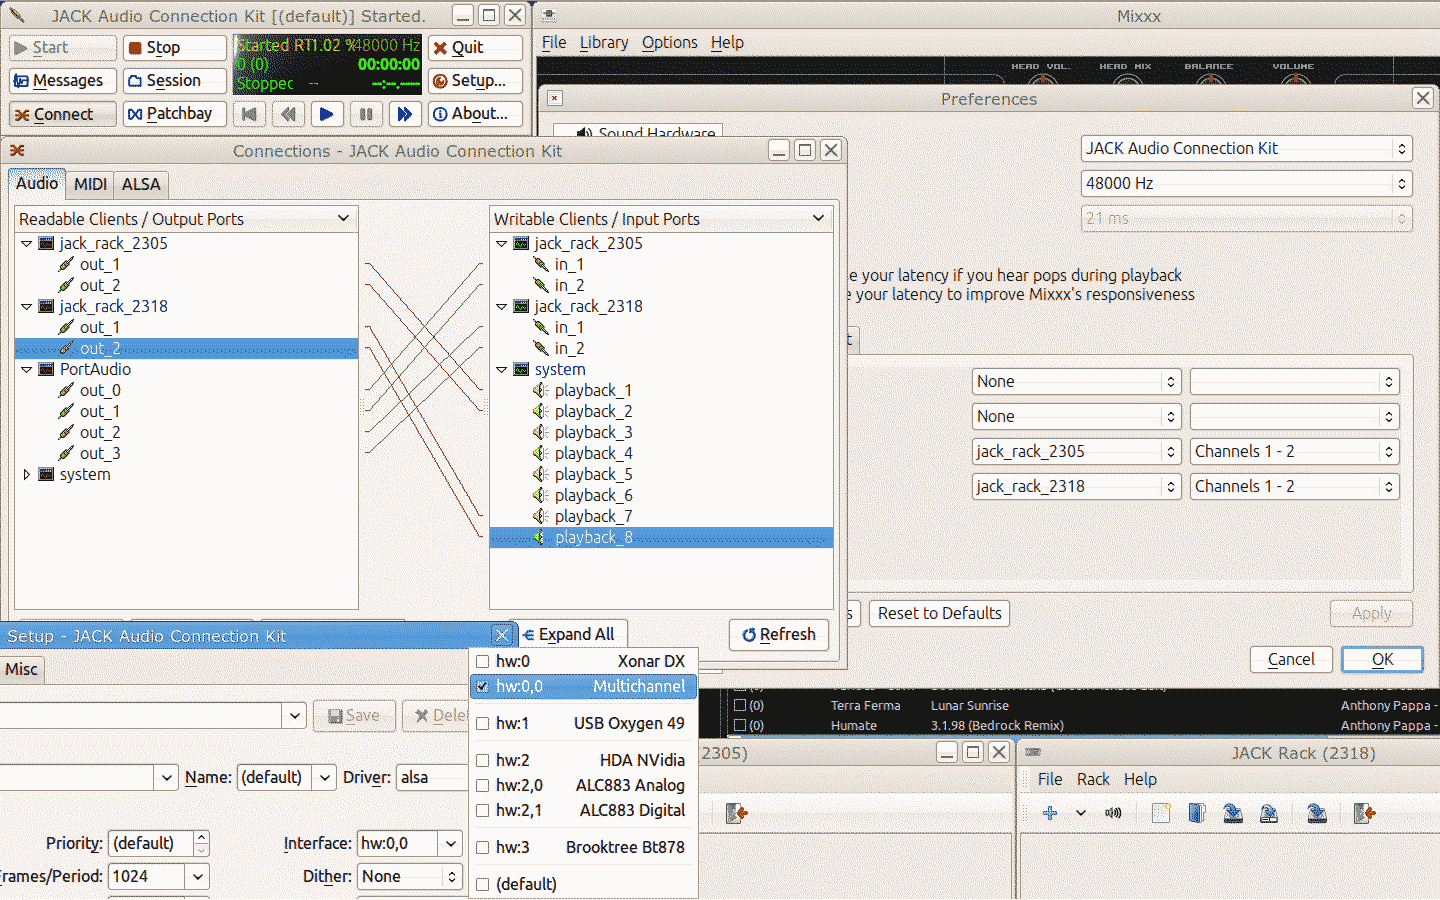
The Jack routing for external effects on GNU/Linux
Use Jack to route each deck directly through JACK Rack effect racks, or for more control you can use Ardour (or another DAW) using sends for effects. This gives Mixxx access to the extensive collection of LADSPA plugins.
Make sure the correct multichannel audio interface has been selected in Jack (Jack settings visible bottom left). Note that Mixxx possibly labels its Jack ports as Portaudio.
14.4. Migrate your Mixxx library and settings to a new computer
If you move to a new computer, or to another operating system on the same computer, you can take your existing Mixxx setup with you. This includes your track library, settings, controller mappings and broadcast profiles.
You don’t necessarily need to be able to run your previous Mixxx installation, all you need is your settings directory and the music directories you imported into your Mixxx library via .
Preparation
If you still have access to your Mixxx installation open Mixxx, go to and uncheck Rescan on startup. If you are not able to start Mixxx anymore, e.g. if you only managed to recover your settings directory, you can do this manually in the settings file: open
mixxx.cfgwith a text editor, delete the line withRescanOnStartupand save the file.Make a copy of both the Mixxx settings directory and your music directories. Put all in a save place. Do not restructure your music directories!
Install your new operating system, get your new PC ready.
Get the current stable Mixxx version from the official download page.
Install Mixxx, though don’t run it, yet!
Migration
Copy your Mixxx settings directory to the appropriate location, see The Mixxx Settings Directory. In case you already started Mixxx previously, make sure to rename or delete your existing settings directory in order to avoid any file conflicts.
Copy your music directories to the new computer.
Start Mixxx.
If you’ve put the settings directory in the correct location Mixxx should not ask you for your music directories and all your settings should be as before.
Go to and Relink each of your music directories as described in Changing music directories.
Now, all your music files should be available, all your playlists, crates and your session histories be restored. A library rescan is not required. Configure a sound output and test if you can play all tracks as before. Note that this will obviously not include your external libraries (iTunes, Traktor etc.), you need to configure those again.
Known issues
If you migrated to another operating system, operating system version or another Mixxx version, the used audio decoders may have changed which may cause beatgrids and cue points to appear shifted, i.e. they are set off from the desired points in the audio stream. Unfortunately, there is no automatic fix available, yet. As of now you need to shift cues for each track individually with the cue shift buttons in the beatgrid editing controls section, see Wellenformanzeigen.