Dobrodošli v vmesniku programa Mixxx. Tu se dogaja čarovnija. Ker je to glavni način za uspešno rabo programa, ga boste želeli karseda dobro spoznati. V tem poglavju je predstavljen privzeti vmesnik Mixxx, opisani so njegovi elementi, regulatorji in drsniki.
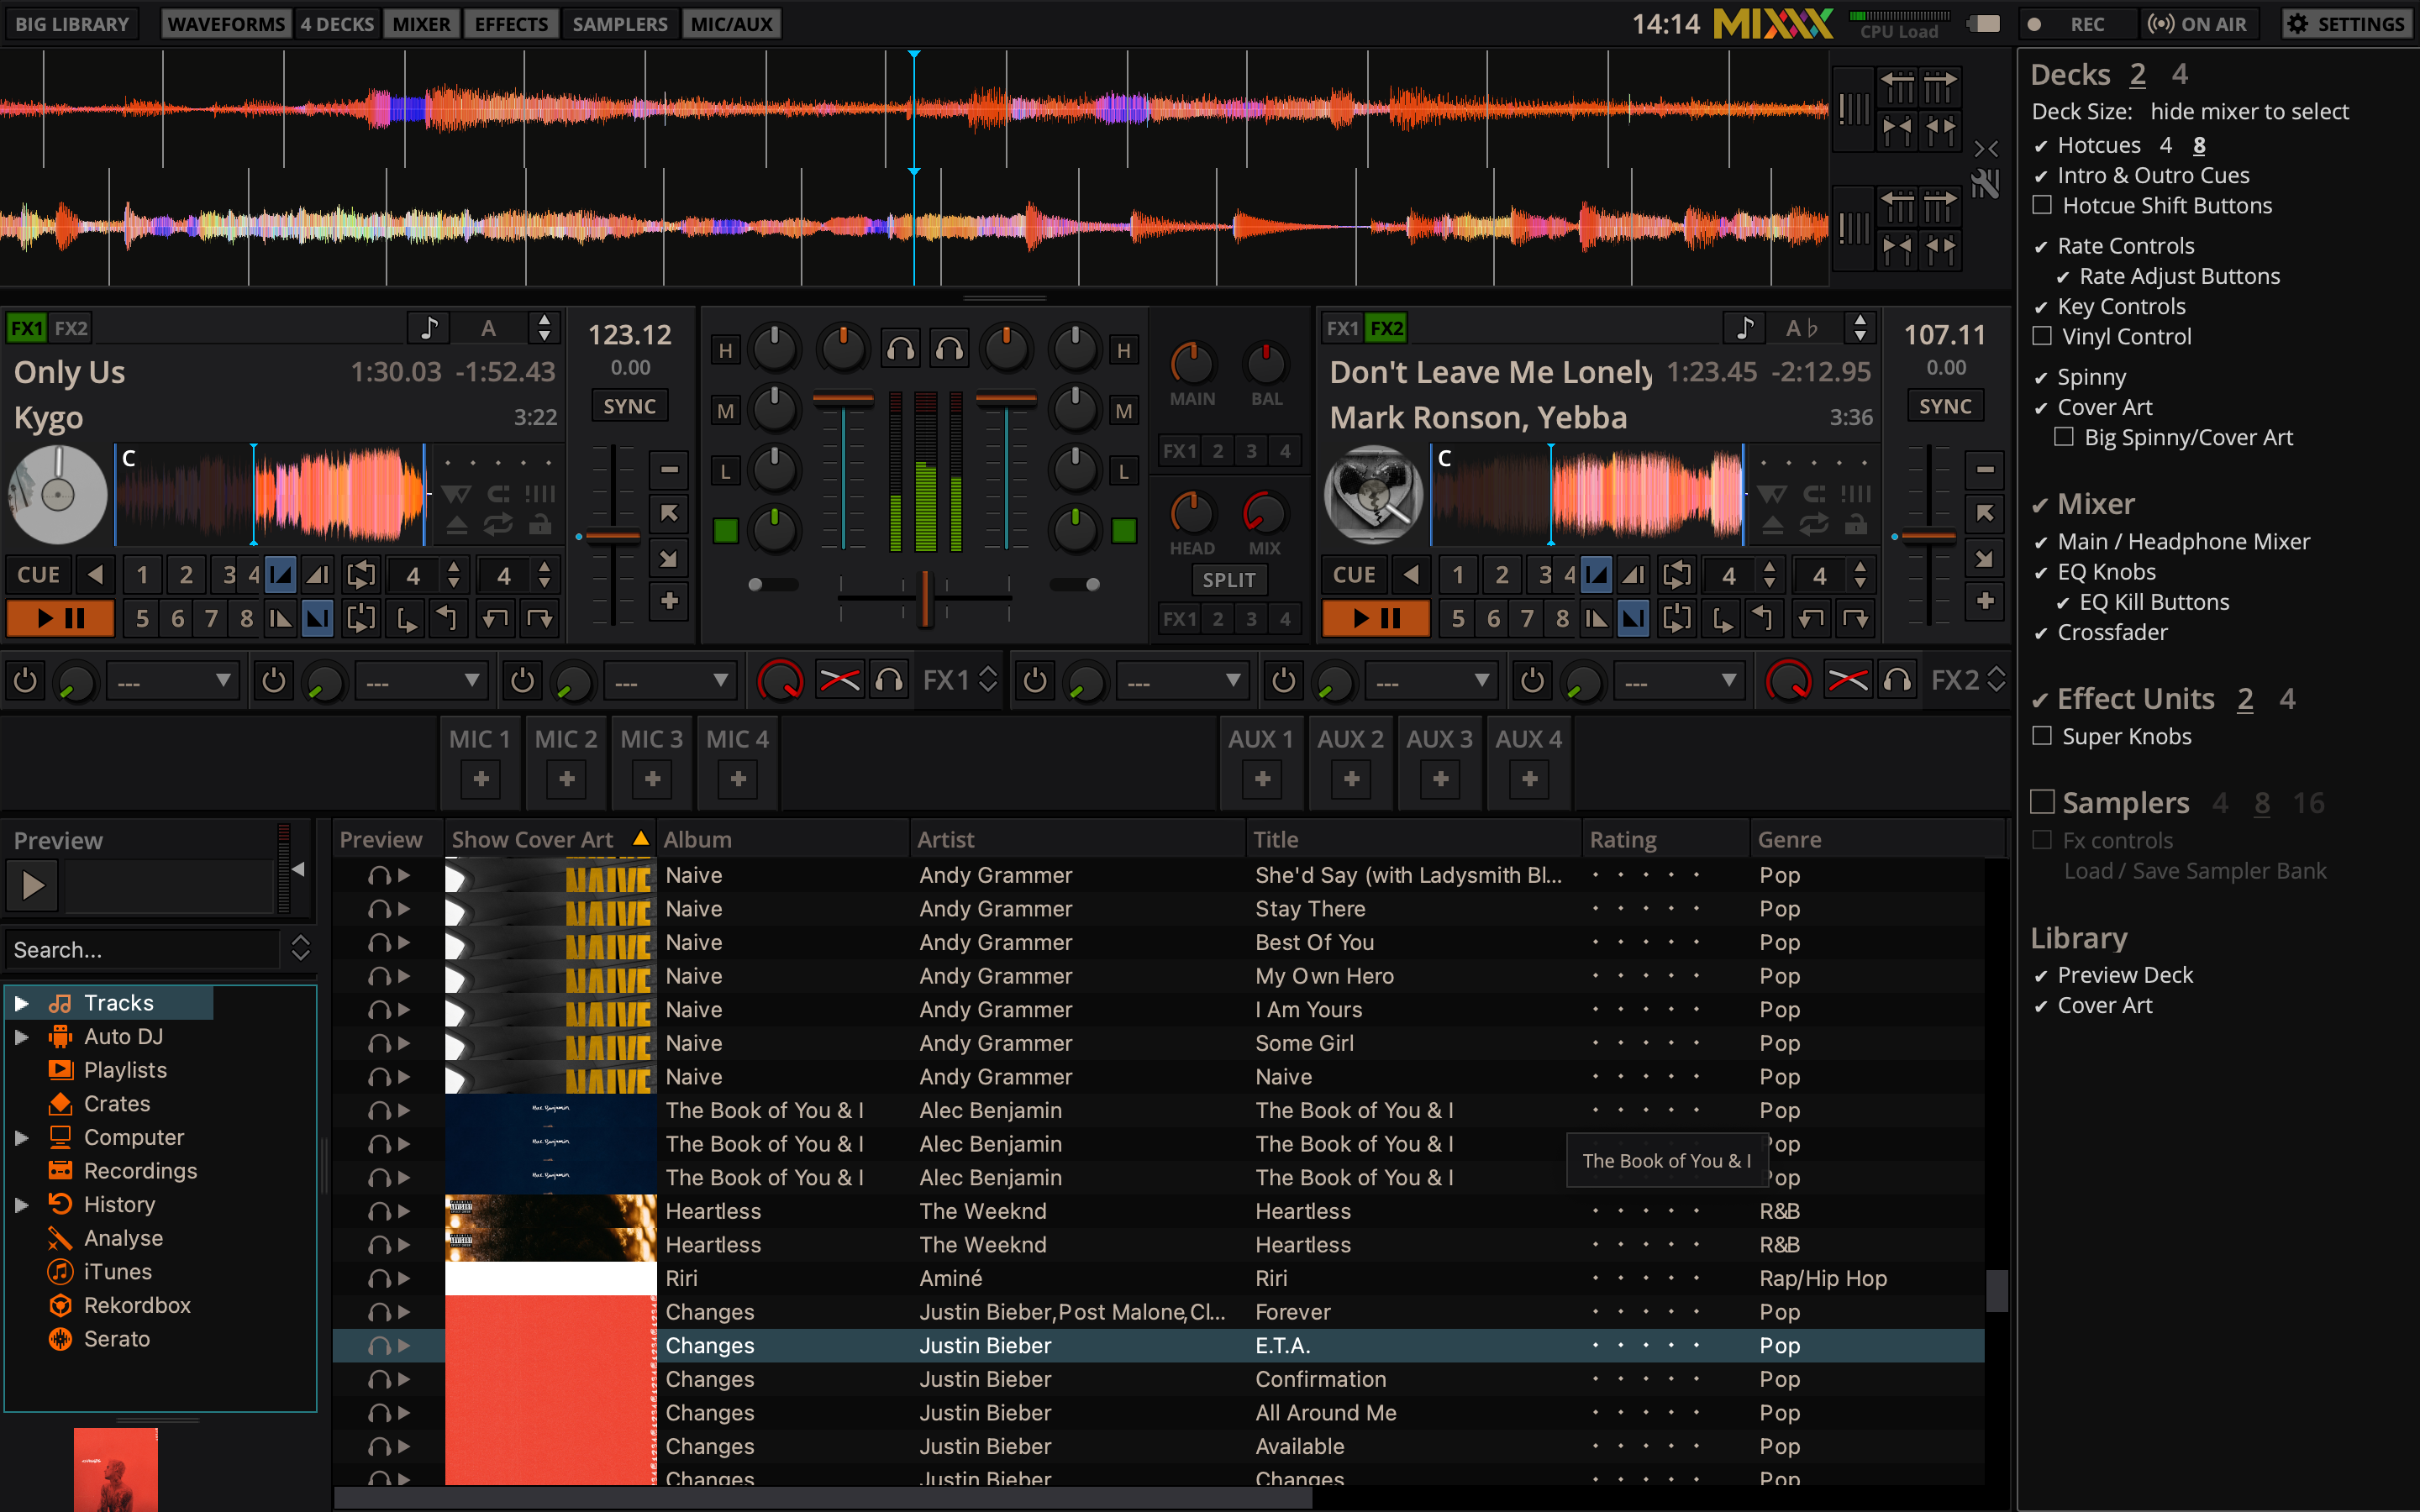
This is the LateNight skin, PaleMoon color theme. It is the default skin supplied with Mixxx 2.3. There
are a variety of other skins included with Mixxx. You should explore them all
to figure out which one you prefer. This section will focus on LateNight only, though all Mixxx skins provide most of the controls described here.
Click the SETTINGS button or gear icon (depending on the skin) to open the skin settings menu. This provides common basic controls as well as some skin-specific options.
The deck section comes in three sizes: Full, Compact and Mini.
You can switch between any of the three sizes by clicking on the Settings button or the gear icon. Under the Decks section, click on „hide mixer to select“.
This will automatically select the Compact deck (underlined and bolded). If you wish to change to a different deck size, you can choose FULL or Mini.
The Compact deck has a reduced set of controls for when you don’t need all of them on screen, for example when they’re also accessible from your controller. Reverse is removed from the Playback/Cue Controls, and the Hotcue Controls, Intro/Outro Markers, Kontrola zank and rate adjust buttons are not shown.
The mini deck is of a much smaller size and shows only the waveform and the Prikaz informaciji o skladbi. You can also use minimal decks with the maximized library.
Nasvet
Hiding the mixer will by default switch to the compact decks.
Razdelek s predvajalnikom omogoča kontrolo vsega, kar je povezano z virtualnim gramofonskim :term:`predvajalnik`om. Opise funkciji in dela z njimi bomo razdelili v sekcije.
Razdelek z informacijami o skladbi v predvajalniku
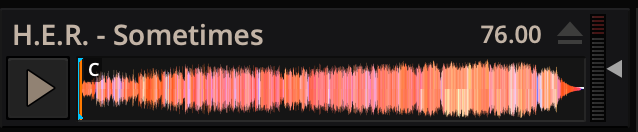
Naslov skladbe
The title of the track that was loaded into a deck is displayed on top. This
is the same as the title listed under the Title column heading in the Mixxx library. This information is initially loaded from the track’s
metadata. If the metadata is missing, the title and artist are guessed
from the filename.
Izvajalec skladbe
The artist of the track is listed below. It is the same as listed under the
Artist column heading in the Mixxx library.
Nasvet
Double-click any track text label to open the Properties editor
where you can edit all track metadata.
Time Elapsed/Remaining/Both
By default it displays the total elapsed time in the track up to the
millisecond. Clicking on the display switches to the Time Remaining view,
which indicates how much time is left before the track reaches the end.
Clicking the display again, both the elapsed and remaining time are shown
simultaneously in the format elapsed time / remaining time.
You can change the default in Preferences ‣ Decks ‣ Deck options.
BPM (Tempo)
Število na desni zgoraj je efektvno število udarcev na minuto v BPM skladbe. To je prepoznani BPM sklabe, prilagojen na želeno hitrost predvajalanja skladbe. Če ima skladba denimo 100 BPM in jo predvajamo s +5% je efektivni BPM, ki bo prikazan, 105 BPM.
Nasvet
You can use a keyboard shortcut and tap with the beat to set the BPM
to the speed you are tapping, go to Uporaba tipkovnice for more
information.
The key displays the current musical key of the loaded track after pitch shifting. The key is displayed below the BPM (Tempo). This is the same as the key that is shown under the Key column heading in the Mixxx library.
Clicking the key will expand it to reveal more options:
Pitch Control: This changes the track pitch independent of the tempo. Left-clicking the - button decreases the pitch by one semitone. Right-clicking it decreases the pitch by 10 cents. Left-clicking the + button increases the pitch by one semitone. Right-clicking it increases the pitch by 10 cents.
Sync and Reset Key: Left-clicking the MATCH button sets the key to a pitch that allows harmonic transition from the other track. It requires a detected key on both involved decks. Right-clicking it resets the key to the original track key.
Cover Art
The cover art of the track loaded into the deck is displayed on the left side of the track. This is the same as the cover art that is shown under the Cover Art column heading in the Mixxx library.
In Deere skin you can choose to enable or disable the cover art by clicking the gear icon in the upper right corner, then toggling the Decks ‣ Cover Art option. Clicking on the cover art will expand it into a full blown image.
The cover art is also shown in the Vinyl Widget next to the parallel waveforms.
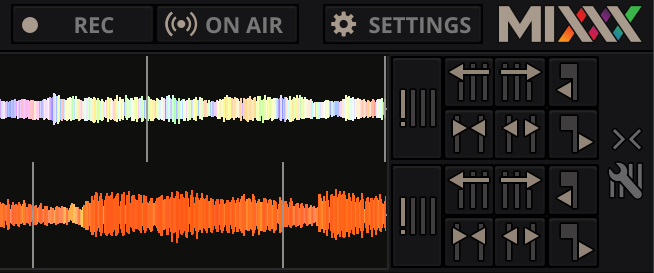
Razdelek s prikazom valovne oblike v predvajalniku, omogoča vizualizacijo sprememb zvoka, ki se dodaja skozi skladbo. V bistvu omogoča, da lahko svojo glasbo tako rekoč “vidite”.
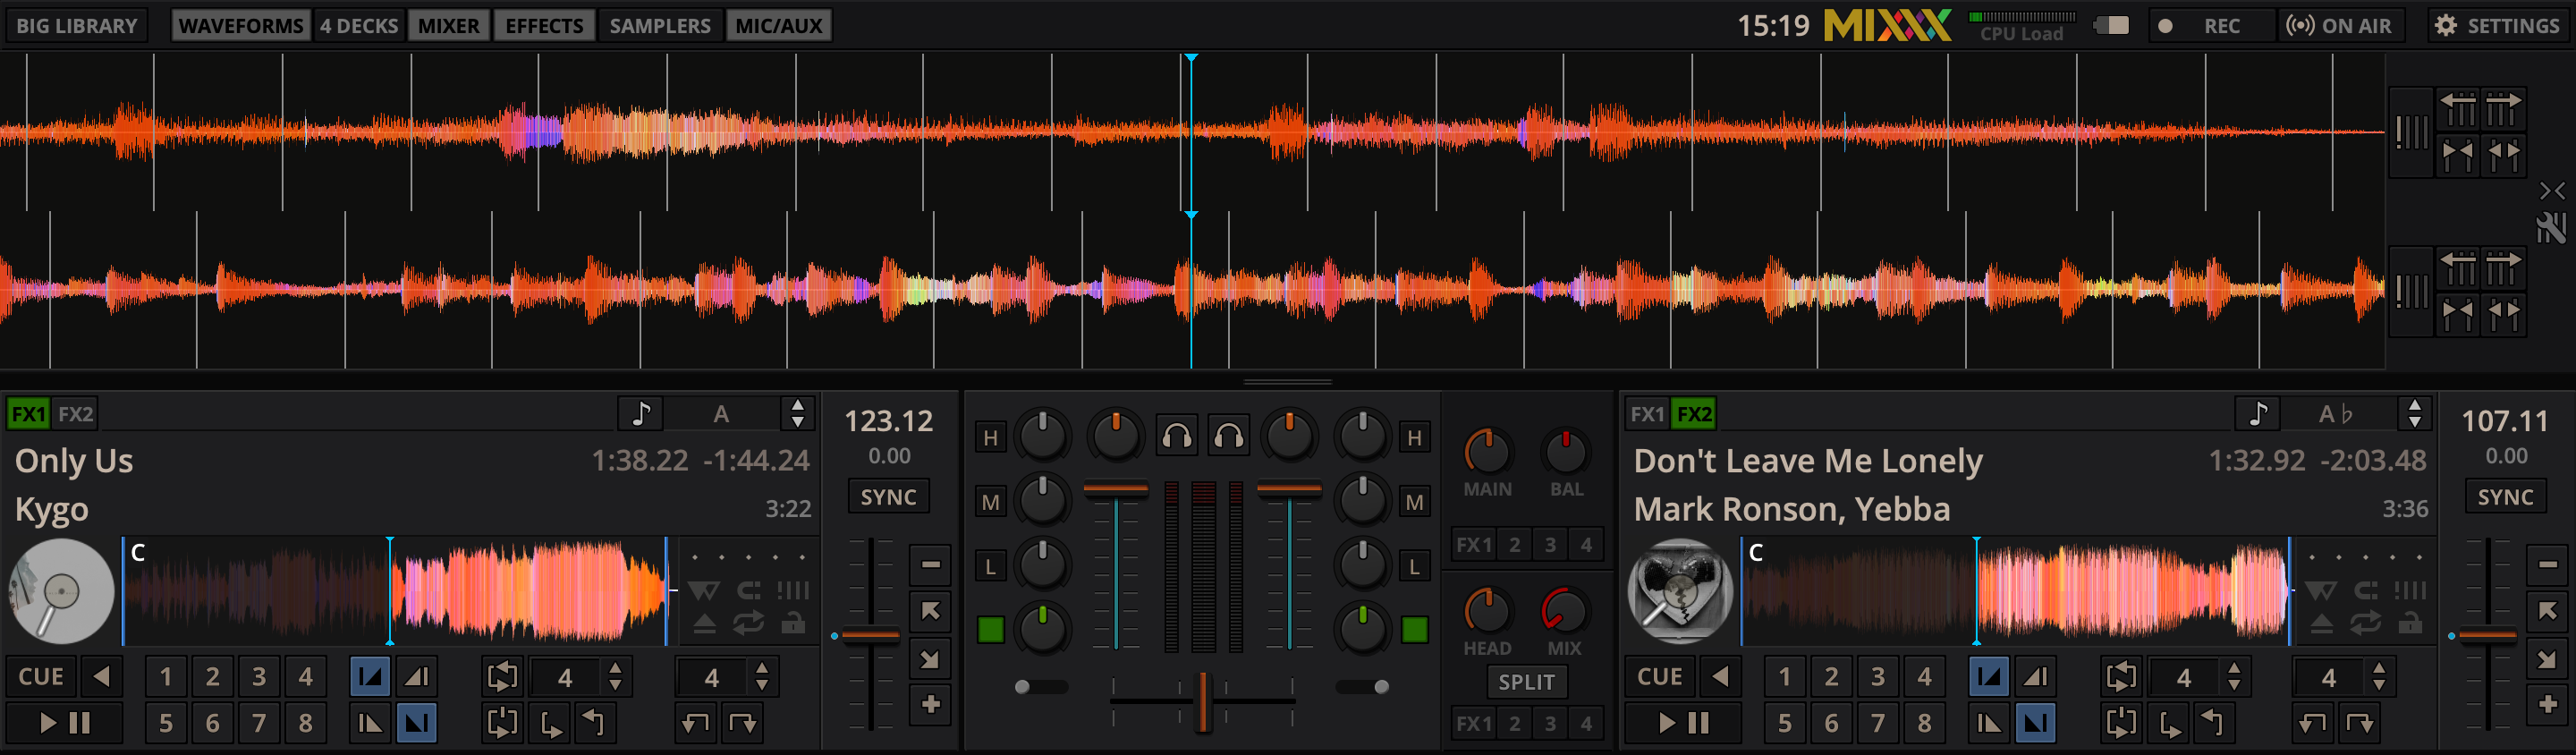
By default the waveform displays are aligned parallel to each other in
order to make beatmatching easier, as it is possible to beatmatch
visually by aligning the beats that appear in each waveform.
Parallel waveforms in the default Mixxx skin (LateNight, PaleMoon theme)
Depending on the skin, Mixxx displays either parallel waveforms (default) or
separate waveforms. LateNight and Tango skins only have resizable parallel waveforms while
Shade skin provides only separate waveforms.
In Deere skin you can select your preferred appearance by clicking the gear icon in the upper right corner,
then toggling the Skin Settings ‣ Parallel Waveforms option.
Opozorilo
If you have a slower computer and notice performance issues with
Mixxx, try lowering the frame rate or changing the waveform type
in Preferences ‣ Waveforms.
Povzetek valovne oblike
Veliki prikaza povzetka podobe valovne oblike prikazuje obliko skladbe blizu trenutne pozicije predvajanja in se osvežuje v realnem času. Na prikazu valovne oblike lahko s pomočjo miške zaustavimo predvajanje, praskamo in drgnemo, zavrtimo zvok nazaj ali vrzemo skladbe. Desni klik na prikaz valovne oblike omogoča vlecenje z miško, da bi ustvarili trenutne spremembe višine in hitrosti.
Nasvet
You can select from different types of displays for the waveform,
which differ primarily in the level of detail shown in the
waveform, in Preferences ‣ Waveforms ‣ Waveform type.
Right next to the waveform view there are controls to adjust the beatgrid.
You may stretch, compress or shift the beatgrid in case it was not detected
correctly (see Beat Detection). There are also controls to shift
cue points in case they are set off after decoder changes, for example when you migrated
your Mixxx library to another compouter or operating system. These controls are
hidden by default and need to be enabled in the skin settings menu.
Beatgrid editing controls in the default Mixxx skin (LateNight, PaleMoon theme)
In Deere skin, these controls are located in the expandable BPM section inside
the decks.
Pregled valovne oblike
The smaller, zoomed-out version of the waveform shows the various markers
within the track as well as the waveform envelope of the entire track. This is
useful because they allow DJs to see breakdowns far in advance. As visual aid,
the part of the track that has already been played is darkened.
Clicking somewhere on the waveform allows you to jump to an arbitrary position
in the track. Like with the Waveform summary, you can select from different
types of displays for the overview in
Preferences ‣ Waveforms ‣ Overview type.
Virtualni gramofon
Črta virtualnega gramofona se vrti, ko se skladba premika, podobno kot oznaka pozicije na ploščah za drgnjenje. Na virtualnem gramofonu lahko z miško zaustavite, drgnete, zavrtite nazaj ali vržete skladbo - tako kot na pravih ploščah. Če izvajate kotaleče se zanke ali desno kliknete na ploščo med predvajanjem, se bo pojavila “duh” oznaka, ki označuje mesto, kjer se bo predvajanje nadaljevalo. Virtualni gramofon je v osnovi skrit in ga je potrebno vključiti v Mreža gumbov z opcijami predvajalnika.
If vinyl control is enabled, it can optionally display the time-coded
vinyl signal quality. Activate the option in Preferences ‣
Vinyl Control ‣ Show Signal Quality in Skin.
Povečava prikaza valovne oblike
Using the mouse-wheel everywhere in the waveform summary will zoom the
waveform in or out. You can choose whether to synchronize the zoom level
between the decks in Preferences ‣ Waveforms.
Oznake na prikazu valovne oblike
Med miskanjem se lahko na prikazu valovne oblike pojavijo dodatne oznake:
Position marker: The static vertical line in the center of the waveform
summary indicates the playback point of the deck. The waveform overview
includes a vertical line to show the current position within the track.
Ritmična oznaka: Bele črte na prikazu valovne oblike prikazujejo lokacije dob v zvoku, ki jih imenujemo tudi ritmična mreža.
Oznaka cue iztočnice: Prikazuje pozicijo cue iztočnice.
Oznaka hotcue iztočnice: Prikazuje pozicijo in številko hotcue iztočnice, če je ta določena.
Oznaki za vhod in izhod iz zanke: Prikazuje začetek in konec zanke.
Prekrivalo zanke: Je grafični prikaz med začetkom in koncem zanke in spremeni barvo glede na to ali je zanka aktivna ali ne.
Obvestilo o koncu skladbe: Če prikaz valovne oblike utripa rdeče, je ostalo le še 30 sekund do konca skladbe.
The six buttons at the bottom right below the waveform allow you to configure
the deck. Starting from the top row (left to right) and the bottom row (left to right), the buttons are as
follows:
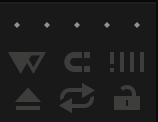
Slip Mode Toggle
When active, the playback continues muted in the background during a loop, reverse, scratch, etc.
Once disabled, the audible playback will resume where the track would have been.
Vklop/izklop kvantizacije
Če je kvantizacija vklopljena, bodo vse cue in hotcue iztočnice, zanke in ritmične zanke samodejno kvantizirane, tako da se bodo začele na dobi.
Gumb za prilagajanje ritmične mreže
Clicking this button adjusts the track beat-grid so that the current position
is marked as a beat. This is useful if Mixxx was able to accurately detect the
track’s BPM but failed to align the beat markers on the beats. For
more information, go to the chapter Beat Detection.
Izvrzi skladbo
Klik na ta gumb bo izvrgel skladbo iz predvajalnika. Namesto tega je mogoče uporabiti bližnjico na tipkovnici. Pojdtie na poglavje Uporaba tipkovnice za več informacij.
Preklopi ponavljanje
Ko je ponavljanje vključeno, se bo po koncu skladbe predvajanje začelo ponovno od začetka.
Zakleni/odkleni tonaliteto
Key lock locks the track’s pitch so that adjustments to its
tempo via the rate slider do not affect its pitch. This is useful if you would
like to speed up or slow down a track and avoid the “chipmunk” effect that
speeding up vocals has.
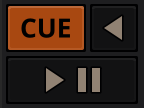
Clicking the Play/Pause button starts and pauses the playback.
Poglej Tudi
The actual behavior of the Play/Pause button depends on the
selected Cue mode.
Cue Button
If the button is pressed while the track is playing, the play position jumps to
the Cue point on the track and the track is paused. Once the track
is paused at the Cue point, you can preview it by holding the Cue Button. If you
have not moved the Cue point yet, the default point is at the track’s beginning.
Poglej Tudi
The actual behavior of the Cue button depends on the
selected Cue mode.
Gumb vzvratno
Press and hold this button to temporarily play the track backwards during regular playback.
Right-click and hold for ‚Censor‘ mode. This reverses the track while the playback continues
muted in the background. On release playback is resumed where the track would have been
if it had not been reversed.
Mixxx supports various Cue modes that adapt to fit other devices in your setup
or your personal preferences. The actual behavior of the Play, Pause, and Cue
buttons depends on the selected Cue mode. To change the Cue mode, go to
Preferences ‣ Decks ‣ Cue mode.
Mixxx mode (default)
While paused at Cue point (Cue button lit):
Hold down the Cue button to play the track from the Cue point,
as long as the button is pressed. After releasing the Cue button, the track
jumps back to the Cue point and pauses again.
Press Play/Pause before releasing the Cue button to continue playback normally.
While paused not at Cue point (Cue button flashing):
Tap the Cue button to store the current position as new Cue point.
While playing:
Tap the Cue button to jump to the Cue point and pause playback.
Mixxx mode (no blinking)
Same as the default Mixxx mode, but without blinking indicators.
Pioneer mode
Same as Mixxx mode, but the buttons are more flashy matching a Pioneer CDJ player.
The Play/Pause button flashes once per second when a track is paused.
The Cue button flashes twice a second when the next push will move the Cue point.
Denon mode
While paused at Cue point (Cue button lit) - same as Mixxx mode:
Hold down the Cue button to play the track from the Cue point,
as long as the button is pressed. After releasing the Cue button, the track
jumps back to the Cue point and pauses again.
Press Play/Pause before releasing the Cue button to continue playback normally.
While paused not at Cue point (Play button flashing):
Tap the Cue button to move the track back to Cue point.
Tap the Play/Pause button to move the Cue point to the current
position and start playback.
While playing - same as Mixxx mode:
Tap the Cue button to jump to the Cue point and pause playback.
Numark mode
Same as Denon mode, but without a flashing Play/Pause button.
This mode is useful if you want to implement a custom skin with 3-button decks,
featuring a Cue button, a dedicated Pause button, and a Play/Stutter button.
CUP (Cue + Play) mode
Press the Cue button to jump to the Cue point and pause,
continuing playback only when either the Cue button is released or Play/Pause
is pressed.
If the Cue button is pressed while paused, the Cue point is
first moved to the current position.
Nasvet
Use the Hotcue Controls to place more reference points on a
track.
Poglej Tudi
You can also use keyboard shortcuts for Cueing. Go to
Uporaba tipkovnice for more information.
You can use the Intro/Outro Markers with Auto DJ to mix in and out of points but unlike hotcues, they do not mark only one point.
The intro and outro are sections and each section is defined by two points. See Auto DJ - Automate your mix.
Intro Start/End Markers
The analyzer places the intro start point at the first sound of a track and you can decide where to place the intro end point.
Left-clicking on the marker when it is set jumps to the marker. When it is not set, clicking sets the marker to the current play position.
Right-clicking on the marker when it is set clears the marker.
Outro Start/End Markers
The analyzer places the outro end point at the last sound of a track and you can decide where to place the outro start point.
Left-clicking on the marker when it is set jumps to the marker. When it is not set, clicking sets the marker to the current play position.
Right-clicking on the marker when it is set clears the marker.
Opomba
If quantization is enabled, left-clicking on any of the markers snaps to the nearest beat.
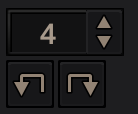
You can type, use the arrow keys or scroll vertically in the input box to select the number of beats to jump or move, with the Beatjump Forward/ Backward buttons.
Beatjump Backward button
Clicking this while the loop is inactive will make the track jump backward by the set number of beats (left click) or by one beat (right click).
Clicking this while the loop is active will move the loop backward by the set number of beats (left click) or by one beat (right click).
Beatjump Forward button
Clicking this while the loop is inactive will make the track jump forward by the set number of beats (left click) or by one beat (right click).
Clicking this while the loop is active will move the loop forward by the set number of beats (left click) or by one beat (right click).
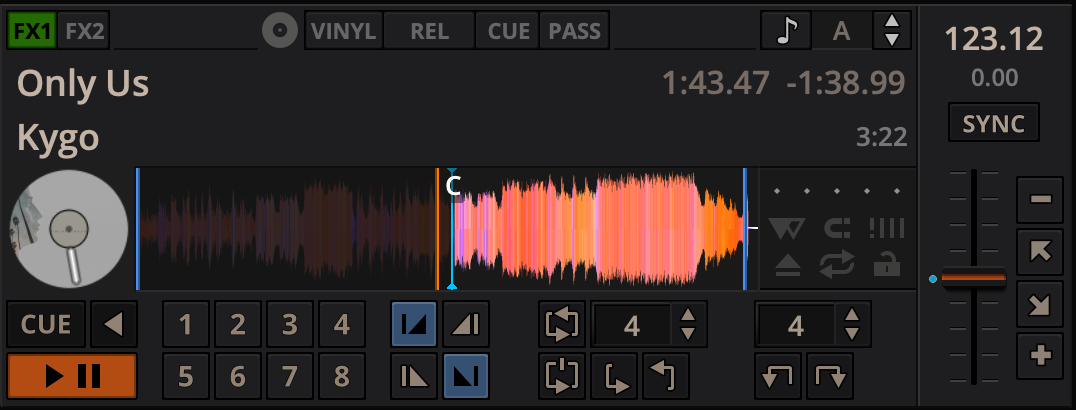
Način upravljanja z gramofonom in kontrola izotčnic v predvajalniku
The control above the waveforms relate to the vinyl control feature in
Mixxx and is hidden in the default
Mixxx user interface. Click the gear icon in the upper right corner, then toggle Skin Settings ‣ Vinyl Control Options, or use the specific Application shortcuts to show or hide the
section.
Poglej Tudi
Za več informaciji o rabi gramofonskega upravljanja, glej Vinyl Control.
Vinyl button
This button enables vinyl control. When enabled in Mixxx, the track
on the Mixxx deck is controlled by the external vinyl control.
Pass button
This button enables passthrough. When enabled, audio from an external vinyl
can be played on the Mixxx deck.
Gumbi Abs/Rel/Const
Absolutni način: Pozicija sladbe sovpada s pozicijo igle in hitrostjo.
Relativni način:- hitrost skladbe je enaka hitrosti igle, ne glede na pozicijo igle.
Konstantni način: hitrost skladbe je enaka zadnji poznani enakomerni hitrosti, ne glede na stanje igle.
Cue/Hot button
Ta gumb določa, kako bodo obravnavane cue iztočnice v relativnem načinu delovanja gramofonskega upravljanja:
Off: Cue iztočnice se ignorirajo.
Cue: If the needle is dropped after the cue point, the track will seek
to that cue point.
Hot: The track will seek to the nearest previous hotcue point.
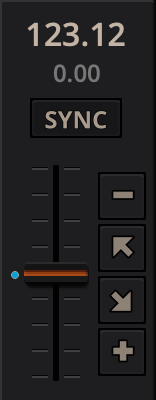
Kontrole za določanje hitrosti omogočajo spreminjanje stopnje hitrosti predvajanja skladb. To je zelo uporabno za usklajevanje ritma dveh skladb v misku. To stopnjo lahko nadzorujete tudi s pomočjo tipkovnice. Za več informaciji glej Uporaba tipkovnice.
SYNC gumb
Levi klik: Spremeni hitrost skladbe, tako da se BPM in faza skladbe ujemata s tistima iz drugega predvajalnika.
Desni klik: Spremeni zgolj hitrost sladbe, da ta ustreza stopnji skladbi v drugem predvajalniku, ob čemer ne popravlja faze.
Predvajalniki in vzorčevalniki sedaj kar med delovanjem izbirajo na katero enoto naj se sinhronizirajo. Predvajalniki se ne morejo sinhronizirati na vzorčevalnike in vzorčevalniki se lahko sinhronizirajo le na predvajalnike. Za vzorčevalnike je enota za sinhronizacijo:
Prvi predvajalnik (po številčnem vrstnem redu), ki predvaja skladbo s pomočjo zaznane ritmične mreže in ki ima hitrost, ki ni enaka nič.
Previ predvajalnik (po številčnem vrstnem redu), ki ima naloženo skladbo z preopznano ritmično mrežo, ne glede na to ali predvaja ali je zaustavljen.
Če denimo sinhronizirate vzorčevalnik in tako predvajalnik 1, kot tudi 2 predvajata skladbi, ki imata ritmični mreži, bo izbran predvajalnik 1, ker je prvi po vrsti. Ciljne enote za sinhronizacijo predvajalnikov se določi z novo funkcijo master sinhronizacije. Za več informaciji glej Master sinhronizacije
Višina/hitrost drsnik
Drsnik omogoča spreminjanje hitrosti skladbe. Privzeti so koraki po 10% glede na originalno hitrost skladbe. Hitrost se povečuje s premikanjem drsnika navzgor, kar je nasprotno od tega, kar najdemo pri DJ gramofonih in CDJ enotah. Desni klik bo povrnil tempo na orignialno vrednost.
Prikaz višine in hitrosti
Tu se prikazuje stopnja pohitritve ali upočasnitve skladbe. Če je drsnik Višina/hitrost na sredini, prikazuje +0.0%, kar pomeni, da ni sprememb v hitrosti.
Nasvet
To make the rate and/or pitch automatically reset whenever a new
track is loaded go to Preferences ‣ Decks ‣
Speed (Tempo) and Key (Pitch) options ‣ Reset on track load.
Začasna spremeba višine/hitrosti (sunek)
Pushing the diagonal arrow buttons is like nudging the metal edge of
a turntable, or the outer edge of a CD player. It will give the track a push
or pull forwards or backwards. If the buttons are released the previous tempo
is restored. The buttons can act as either a fixed pitch bend or a
ramping pitch bend.
Višina/hitrost gumbi
Clicking the - button will set the pitch/rate lower while the + button will set the pitch/rate higher. This is like moving the pitch slider up or down by a fixed amount. Unlike using the temporary pitch/rate buttons, the change is permanent so these button s don’t need to be held down.
Poglej Tudi
To customize the amount by which the buttons alter the pitch of
the track, the slider range as well as the direction, go to
Preferences ‣ Interface ‣
Adjustment buttons ‣ Permanent / Temporary.
Nasvet
Če se tempo skladbe spremeni, boste opazili, da se ton spremeni glede na uporabljeno hitrost (hitrejše predvajanje daje opičij zvok). Lahko vklopite Keylock, da obdržite konstanten ton.
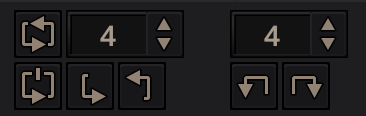
Kontrole predvajalnika za ritmične zanke in zanke
In this section of the Mixxx interface you can control (beat-)loops and set the
loop points of a track.
You can also shift loops using the beatjump / loop move controls shown at the right side of the looping controls.
Beatloop size
The input box allows you to set the size of the loop in beats to set with the Beatloop button. Changing this resizes the loop if the loop already matches the size.
If a loop is set, a loop overlay will be drawn on the
waveforms.
Beatloop
Left-clicking the Beatloop button starts a loop over the set number of beats. If quantize is enabled, it snaps to the nearest beat. This works for manually placed loops as well as automatic loops set by
the beatlooping buttons. Depending on the current status of the loop, the
loop overlay on the waveforms changes color. Right-clicking the Beatloop button temporarily enables a rolling loop over the set number of beats. Playback will resume where the track would have been if it had not entered the loop.
Double loop
Clicking on the arrow pointing up will double the current loop’s
length up to 64 bars. The length of the loop overlay in the waveform will
increase accordingly.
Halve loop
Clicking on the arrow pointing down will halve the current loop’s
length down to 1/32 bars. The length of the loop overlay in the waveform will
decrease accordingly.
Loop-In
This button allows you to manually set the start point of a loop.
A loop-in marker is placed on the waveform indicating the position.
If clicked when a loop was already set, it moves the start point of a loop
to a new position.
Loop-Out
This button allows you to manually set the end point of a loop.
A loop-out marker is placed on the waveform indicating the position. If
clicked when a loop was already set, it moves the end point of a loop to a new
position.
Reloop
Left-clicking this button toggles the current loop on or off. If the loop is ahead of the current position, looping will start when the loop is reached. This works only if the Loop-in and Loop-Out marker are set.
Right-clicking this button enables the loop, jumps to Loop-in marker and stops playback.
Nasvet
If you are playing inside a loop and want to move the end point
beyond its current position in the track, click on the Beatloop button
first and when the play position reaches the desired position, click
on the Loop-Out button.
Poglej Tudi
Če je vključen način Kvantizacija, bodo zanke samodejno skakale na najbližjo dobo. Ta način v izhodišču ni vključenn in se vključi s klikom na Vklop/izklop kvantizacije.
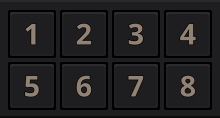
To jump in between different parts of a track, you can use these numbered
buttons. You can also use keyboard shortcuts, go to Uporaba tipkovnice for
more information.
Clicking on a numbered button will set a hotcue at the current play
position on the track. A marker with the corresponding number will appear in the
waveform and the button will light up to indicate that the hotcue is set.
Med predvajanjem: Tapnite gumb hotcue, da predvajanje nemudoma skoči na hotcue iztočnico in se od tam predvaja naprej. Če igrate znotraj zanke in tapnete na hotcue iztočnico, katere pozicija je izven zanke, bo skladba kljub temu takoj skočila na to mesto in zanka bo deaktivirana.
While stopped: Tap a hotcue button to cause the track to instantly jump to
the location of the hotcue and start playing as long as the button is pressed.
Press the Play keyboard shortcut while the hotcue
button is pressed to continue playback, then release the hotcue button.
It’s possible to add labels or colors to your hotcues to make them easier to
distinguish and make it possible to get their „meaning“ at first glance.
Labels and colors can be assigned from the Hotcue context menu, which can be
opened by right-clicking either the hotcue button or the hotcue marker in the
waveform overview.
To delete a hotcue, right-click on the hotcue button or the waveform marker in
the overview waveform to open the context menu, then click the trash icon.
Opomba
Mixxx supports up to 36 hotcues per deck. By default, only some of
them are visible in the user interface. You can customize your
keyboard or controller mappings to use all of them.
Poglej Tudi
Tako kot z zankami (glej zgoraj), bodo tudi hotcue iztočnice samodejno skočile na najbljižjo dobo, če je vklopljen način knvantizacija Ta način v izhodišču ni vključenn in se vključi s klikom na Vklop/izklop kvantizacije.
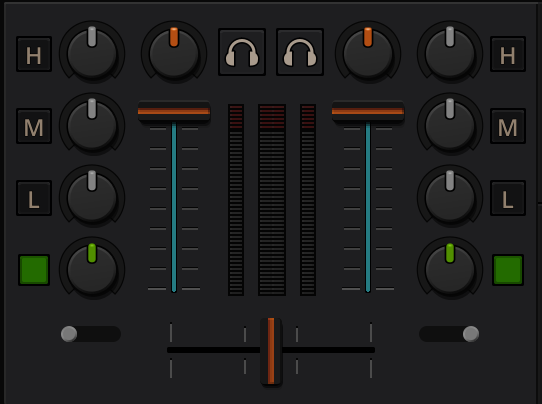
The left meter shows the volume level for the left deck,
while the right meter shows the volume level for the right deck.
The double meter at the center shows the current volume of the main output’s left and right channel separately.
These should stay at the top of the green region, with the loudest parts of the music
(transients) briefly going into the yellow region. They should never be in
the red region. Refer to
Setting your levels properly (gain staging)
for more details.
Line faders
The two large faders on either side of the level meters are the deck volume
faders, also known as Channel- or Line-faders. Adjusting these controls the
volume of each deck.
Nasvet
Some DJ’s prefer to use the line faders over the crossfader for
fading between tracks. Try it, you may like it.
The gain knob (orange) above the volume fader allows you to adjust the gain applied to the deck.
Use this to compensate for the differences in recording levels between tracks.
In general, you should adjust this knob so that the track’s level meter
stays around the top of the green region with the loudest parts of the track
(the transients) briefly going into the yellow region. Do NOT turn the
Gain Knob up so much that the level meter is in the red region. At this point
the track is clipping, which sounds bad and could damage equipment.
Opomba
By default, Mixxx automatically applies an additional ReplayGain so
tracks have approximately equal loudness at unity gain. Your tracks
must be analyzed to take
advantage of this feature. When an unanalyzed track is
loaded, Mixxx calculates its ReplayGain value, but will not apply a
newly calculated ReplayGain value to a track after it has
already started playing (to avoid a sudden change in the gain of a
playing track).
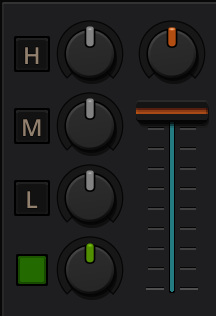
The low, mid, and high EQ knobs allow you to change the filters of the audio.
This allows you to selectively reduce or boost certain frequency ranges of the audio.
The small boxes next to each EQ knob are called kills.
Hold these buttons to fully remove that frequency range. Short click on the
buttons for latching. When in Latch mode, click again to restore the frequency
range. If the Kill switches do not work as expected, check the high/low shelf
EQ settings in the preferences.
Quick Effect Super knob
This knob lets you control the Meta knob of the deck’s Quick Effect. ‚Filter‘ is the default.
Right-click this knob to center it. This is equivalent to ‚no audible effect‘ for the built-in
filter effects only (Filter, Moog Ladder 4 Filter).
The button next to the knob toggles the effect. It provides the same latching capabilities
like the EQ Kill switches.
Poglej Tudi
You can customize the EQ settings in
Preferences ‣ Equalizer.
The headphone button is also known as the pre-fader listen or PFL
button and allows you to use headphone cueing. That is, it allows you to hear
the track you will play next in your headphones before your audience hears it.
This helps you plan when to start the next track and manipulate it to
make it blend better with the currently playing track (for example, by
synchronizing the beats, setting a loop, or using EQs). Pressing the PFL button
plays the track on the headphone output at full volume regardless of the
position of the crossfader or the deck’s line fader. To play a track in your
headphones but not have the audience hear it, press the PFL button and move the
crossfader all the way to the opposite side of the deck or turn the deck’s
volume fader all the way down.
Opomba
Headphone cueing is only available if you have configured a
Headphone Output in Preferences ‣ Sound Hardware.
Opomba
If you use an external hardware mixer, plug your headphones into that
rather than your sound card. Use the headphone buttons on the mixer
rather than the buttons in Mixxx.
The crossfader determines the actual volume of each deck when moving
the slider from left to right. If both decks are playing and the crossfader is
in its default center position, then you will hear both decks. Right-clicking on
the crossfader will reset the slider to its default position.
To move the crossfader left or right, you can use the keyboard shortcutG and H.
To apply small crossfade left and small crossfade right, the shortcuts are Shift + G and Shift + H respectively.
You can reverse the configuration of the crossfader, so that the right deck is
on the left end of the crossfader and vice versa. This is also known as
Hamster Style. To adjust the crossfader to your style of mixing, go to
Preferences ‣ Crossfader.
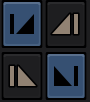
The crossfader orientation switches determine to which side of the crossfader the deck is assigned.
It can be set to the left or right side, or to the center where it is unaffected by the crossfader knob.
Nasvet
Using the AutoDJ feature in Mixxx, you can
automate the crossfade between the decks.
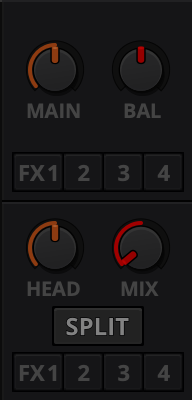
Allows you to control how much of the Main output you hear in the
Headphones output. It works like a crossfader between the stereo
Main and stereo PFL signal. If the knob is set to the left, you
only hear the PFL signal, which is the usual position for prelistening tracks.
This can be used to practice DJing with only one stereo output and a set
of either speakers or headphones.
Additionally, this can be used to mix in headphones when you cannot hear the
speakers connected to the main output and there are no booth
monitor speakers. Some DJs prefer to use this knob to mix in headphones all
the time, but many find it to be a difficult way to play. If there is only one
set of speakers and no booth monitors, you can avoid the need to mix in
headphones by setting up the speakers behind you so both you and your
audience can hear them.
Opomba
Don’t forget to activate the PFL button on the deck you
want to listen to in your headphones.
Head knob (Headphone gain)
This knob controls the gain applied to the headphone output signal that Mixxx
sends to your sound card. Generally, this knob should not be adjusted. To
adjust the volume in your headphones, adjust your sound card’s gain on the
headphone output. Most external sound cards have a gain knob specifically for
the headphone jack. If you use an onboard sound card for your headphones,
adjust the gain control in your OS mixer program.
If your sound card only has one gain knob that controls both the Main output
and the headphone output, then adjust the Head knob in Mixxx
to control the volume of your headphones without affecting your Main output.
Opomba
Not all controls may be present in all skins anymore. However, these controls can be mapped to keyboards and MIDI controllers. See Mixxx Controls for detailed information.
Headphone Split Cue button
If activated, two mono signals are sent to the headphone output instead of one
stereo signal. The main signal plays in the right channel, while the cueing
signal plays in the left channel. You can still adjust the
Head Mix knob to control the mix of the Main and cue signals in
the left channel.
Balance Knob
This knob allows you to adjust the balance (left/right orientation) of
the Main output.
Main Knob
The Main Gain Knob controls the gain applied to the Main output signal that
Mixxx sends to your sound card, Internet broadcasting servers, and recorded
mixes. Generally, this knob should not be adjusted. To change the output
volume, a gain control should be adjusted as close to the speakers as possible
for the best signal-to-noise ratio throughout your signal chain. Ideally, the
volume would only be adjusted by adjusting the gain on the power amplifier.
On active speakers, including computer speakers, studio monitors, and PA
systems that do not require a separate amplifier, this means adjusting the
gain on the speakers (which may be labeled „Volume“).
As a DJ, you may not have access to the power amplifier. In that case,
adjust the volume by adjusting the gain on the equipment closest to the power
amplifier that you have access to. Typically, this is a DJ mixer. If you are
not going through a mixer, adjust the gain of your sound card. If your sound
card does not have any controls on it (for example, for sound cards built into
computers), adjust the sound card settings with your OS
mixer program. The Main Gain Knob in Mixxx should be a last resort for
adjusting volume.
Opozorilo
In no case should any part of the signal chain be clipping,
indicated by a level meter going into its red region
or an LED labeled „clipping“ turning on.
Samplers are miniature decks. They allow you to play short samples and jingles
but also additional tracks in your mix. They come with a small overview waveform
and a limited number of controls. All controls work just like on the regular
decks, see Decks.
The Sampler section can be hidden in the
Mixxx user interface. Click the
SAMPLERS button at the top of the user interface, or use the specific
Application shortcuts to show or hide the section.
The waveform shows the various markers within the track as well as the
waveform envelope of the entire track. Clicking somewhere on the waveform
allows you to jump to an arbitrary position in the track.
Oznake na prikazu valovne oblike
While mixing, some additional markers can appear on the waveforms:
Position marker: A vertical line indicates the playback point of the
sample deck.
Oznaka hotcue iztočnice: Prikazuje pozicijo in številko hotcue iztočnice, če je ta določena.
The buttons grid next to the waveform overview allow you to configure the
sampler deck. Starting from the top row (left to right) and the bottom row (left to right), the buttons are as
follows:
Preklopi ponavljanje
Ko je ponavljanje vključeno, se bo po koncu skladbe predvajanje začelo ponovno od začetka.
Izvrzi skladbo
Clicking this button ejects the track from the deck.
Zakleni/odkleni tonaliteto
Keylock zaklene višino skladbe, tako da spreminjanje tempa s pomočjo drsnika ne vpliva na višino predvajanja skladbe.
Crossfader Orientation Toggle
The crossfader orientation determines to which side of the crossfader the sampler is assigned.
It can be set to the left or right side, or to the center where it is unaffected by the crossfader knob.
Clicking the button always starts playback from the cue point.
If playback is already enabled the play position will jump back to the
cue point. Right-clicking on the button will stop playback and
seek the play position to the beginning of the sample.
Mixxx comes with some built in sound effects that can be chained together in
effect units. Effect units can be freely assigned to different decks as well
as other inputs. The buttons for routing decks to effect units are in the
Decks.
Poglej Tudi
The Učinki chapter has a more detailed explanation of the
effects system.
The microphone section is hidden in the default Mixxx user interface. Click the MICS & AUX button at the top of your user interface, or use the specific Application shortcuts to
show or hide the section.
Poglej Tudi
The Raba mikrofonov chapter has detailed instructions for
setting up microphones with various hardware.
Hold this button and talk to mix the microphone input into the Mixxx Main
output. Short click on the button for latching. This is handy for talking for
an extended period, for example when streaming a
radio show. When in Latch mode, click again to mute the microphone input.
Mix Orientation Toggle
This control determines the microphone input’s mix orientation. Either to the
left side of crossfader, to the right side or to the center (default).
Clicking cycles through all the options.
Microphone Volume Meter
This displays the microphone volume input signal strength.
Microphone Gain Knob
Use this knob to adjust the gain of the microphone output. Try to keep the
volume at a reasonable level to avoid signal clipping.
The Preview Deck is a special deck that allows you to pre-listen to tracks in the
headphones before using them in your mix. Pre-listening to a track does not change
its Played state as well as the play counter and is not
logged in the History. Press CTRL + 4
(Windows/Linux) or CMD + 4 (Mac) to display the Preview Deck.
The features in detail:
Track Artist/Title:
The artist and title of the track is displayed here. This is the same as that
listed under the Track and Title column heading in the Mixxx library. This information is initially loaded from the track’s metadata.
Eject Track button:
Clicking this button ejects the track from the deck.
Play/Pause button:
Clicking the button starts and pauses the playback. Right-clicking on the
button will stop playback and seek the play position to the beginning of the
tracks.
Waveform overview:
Shows the various markers (Cues, Hotcues) within the track as well as the
waveform envelope of the entire track. Clicking somewhere on the waveform
allows you to jump to an arbitrary position in the track.
Gain slider:
Move the slider to adjust the gain of the track.
Volume Meter:
Shows the current volume of the track. If it’s too loud and distorted, a
peak indicator flashes red.