12. DJ’en met Mixxx
Mixxx is ontworpen om gemakkelijk aan te leren voor zowel beginnende als ervaren DJ’s.
In dit deel van de handleiding vindt u aanwijzingen voor het gebruik van de functies van Mixxx om uw eigen mixen te maken.
12.1. Uw niveaus juist instellen (Gain Staging)

De juiste instelling van uw niveaus, ook gain staging genoemd, is essentieel om de beste geluidskwaliteit te krijgen uit de apparatuur die u gebruikt. Bij elke schakel in de signaalketen, van de kanaalversterkers van de Mixxx tot de eindversterker, moet het niveau ruim boven de ruisvloer liggen, maar lager dan het maximale niveau voordat het signaal ‘clipt’. De niveaumeters moeten meestal rond de top van hun groene gebied zijn. De links afgebeelde niveaumeter laat zien waar de niveaumeters van Mixxx gemiddeld moeten zijn tijdens de luidste delen van tracks. Het gemiddelde niveau mag niet in het gele gebied liggen. Gebruik het gele gebied om dynamische ruimte toe te laten, een beschikbaar niveau boven het gemiddelde voordat het signaal begint te clippen. De luidste delen van demuziek (de transiënten) mogen kort in het gele gebied komen.

Een waveform op een goed niveau. Let op: de voorbeeld waveforms in dit gedeelte zijn gemaakt door de visual gain van de waveform-weergave in Mixxx aan te passen om het concept te illustreren. Het aanpassen van de visual gain van de waveform-weergave verandert het niveau van de audio niet.

Als een niveaumeter in het rode gebied komt, is het signaal aan het clippen en moet de gain (versterking) worden verlaagd. Sommige apparatuur heeft echter geen niveaumeter maar heeft alleen een LED die gaat oplicht of knippert wanneer het signaal clipt. Clippen betekent dat de pieken van de waveform afgevlakt worden omdat de apparatuur het maximale versterkingsniveau heeft bereikt. Het gekuid wordt op een onaangename manier versterkt en zelfs vervormd en kan apparatuur beschadigen. Dit komt doordat het geluigd met meer vermogen wordt aangestuurd dan waarvoor het ontworpen is. Het verhogen van de versterking tot voorbij het clippingpunt (verder in het rood op een meter) zal het signaal nog meer vervormen. Als u het geluid zonder clipping of ver-vorming luider wilt maken terwijl elk onderdeel in de signaalketen reeds op een normaal maximumniveau is ingesteld, dan dient u meer luidsprekers te gebruiken of luidsprekers die gevoeliger zijn en elektrische energie efficiënter kunnen omzetten in akoestische energie.

Een clippende waveform

Anderzijds mag het signaal niet te laag zijn. Dit komt omdat elk audio-apparaat een beetje ruis produceert op een niveau dat wordt aangeduid als de ruisvloer. Bovendien nemen analoge signalen ruis op wanneer zij door kabels worden geleid. Het signaal dat door de meter links wordt gemeten, ligt relatief dicht bij de ruisondergrens. Wanneer een apparaat luider wordt gezet, gaat de ruisvloer niet omhoog; alleen het signaalniveau gaat omhoog. Telkens wanneer het signaal wordt versterkt door de niveauaanpassing van het volgende apparaat, wordt naast het signaal ook het ruisniveau van de vorige apparaten versterkt. Als u bijvoorbeeld het niveau van uw geluidskaart laag instelt en u ter compensatie de versterking van uw mengpaneel hoger zet, zal de signaal/ruisverhouding (SNR) van de uitgang van de geluidskaart laag zijn en zal de versterking van het mengpaneel het signaal en de ruis van de geluidskaart versterken, plus de ruis die langs de kabel wordt opgepikt. Het eindresultaat zal meer ruis hebben dan wanneer de uitgang van de geluidskaart hoger was ingesteld voordat het signaal de mixer bereikte en de versterking van de mixer dus niet hoger hoefde te worden gezet.

Een waveform die te dicht bij de ruisvloer ligt
Notitie
Om het uitgangsvolume van een geluidssysteem zó in te stellen dat een zo goed mogelijke signaal/ruisverhouding wordt gerespecteerd, moet de versterking zo dicht mogelijk bij de mogelijkheden van de luidsprekers worden ingesteld. Raadpleeg het gedeelte Gain Knob voor meer informatie.
12.2. Beatmatching en Mixen
Beatmatching is het manipuleren van de snelheid waar-mee een track wordt afspeeld op zo’n manier dat deze overeenkomt met het tempo van een andere track. Beatmatching impliceert ook het beïnvloeden van de phase van de beats in een track zodat deze uitgelijnd worden met de beats in de andere track. Het overeenstemmen van het tempo en het uitlijnen van de beats zijn de twee zaken die ene DJ moet doen om te kunnen beatmatchen
Mixxx kan voor u én het tempo aanpassen én de beats uitlijnen, op voorwaarde dat de BPM-waarde nauwkeurig gedetecteerd werd én dat het beat-raster correct wordt weergegeven voor beide sporen (tracks). Om deze functie in te schakelen, tikt u op de SYNC knop. Om handmatig te beatmatchen, moet het tempo van de twee sporen worden gesynchroniseerd door de afspeelsnelheidschuif-regelaars aan te passen. U kunt de fase van de beats aanpassen door met de rechtermuisknop op een waveform te klikken en deze dan te slepen om één van de tracks tijdelijk te versnellen of te vertragen totdat de beats op één lijn liggen. De tijdelijke pitch bend knoppen kunnen ook worden gebruikt om tijde-lijk de afspeelsnelheid aan te passen, zodat de beats in een track naar voren of naar achteren worden ‘verschoven’, zo kunnen ze worden uitgelijnd met die van een andere track. Zie het hoofdstuk Sync en Snelheidbesturingselementen.
Twee tracks zijn ge-beatmatched als hun tempo’s gelijk zijn afgestemd en hun beats op elkaar zijn uitgelijnd. Een ‘perfecte’ beatmatch is bijna onmogelijk - er zal altijd een klein verschil zijn in de afspeelsnelheden. Een goede DJ zal zijn of haar oren openhouden en luisteren of de beats niet uit de maat lopen. Dit gebeurt wanneer een duidelijke ‘double bass kick’-geluid wordt waargenomen dat vaak wordt voorafgegaan door een verzwakking van de intensiteit van de kick naarmate de twee kicks uit fase raken. Wanneer dit gebeurt, kunnen de beats eenvoudig opnieuw worden uitgelijnd door een paar keer op een van de tijdelijke pitchbend-knoppen te drukken. Natuurlijk dient er in de juiste richting worden versneld / vertraagd.
12.3. Sync Lock
Sync Lock is een intelligente assistent die u toestaat om het beatmatchen aan Mixxx over te laten zodat y zich kan richten op de keuze van de tracks, manipulatie van effecten, lussen, mixen van 4 decks en andere geavanceerde DJ-technieken.
Om Sync Lock op een deck te activeren, druk/click op de SYNC knop en hou die even ingedrukt. U zal zien dat Sync Lock ‘aan’ staat waneer deze opgelicht blijft. Het aanpassen van de snelheid op om het even welk met ‘Sync Lock’ zal de snelheid van alle andere decks met ‘Sync Lock’ wjzigen.U hoeft geen deck specifiek als leider of volger in te stellen. U kan om het even welke track afspelen, stoppen, laden, uitwerpen of in een afspeelwachtrij plaatsen met ‘Sync Lock’, het afspelen van tracks in de andere decks wordt niet onderbroken. Het veranderen van de afspeelsnelheid van een gestopt deck zal echter de snelheid van spelende decks wel beïnvloeden
Sync Lock zal het ook opmerken wanneer één van uw tracks de dubbele BPM heeft van de andere en deze op de juiste wijze aan elkaar koppelen. Dus wanneer u een 140 BPM drum & bass track wil mengen met een 70 bpm dubstep track zal Sync Lock er voor zorgen dat ze juist uitgelijnd worden.
Hint
Normaal gezien zorgt Sync Lock er enkel voor dat de snelheidsschuifregelaars juist worden ingesteld. Wanneer u ook wilt dat de beats perfect uitgelijnd worden, dan dient u de QUANTIZE toets aan te zetten. Wanneer Quantize actief is zal dit er voor zorgen dat de beats ook perfect uitgelijnd worden.
12.4. Sync Lock met een Dynamisch Tempo
Wanneer u werkt met tracks met een dynamisch tempo, die dus een variabele BPM beat grid hebben, dan kan u een perfecte colntrole hebben over het gedrag van de Sync Lock door middel van de volgende ‘Sync Leader’ knoppen(enkel beschikbaar in de LateNight en Deere skins).
 Follower
  Soft Leader
U kan variabele BPM beat grids maken voor bepaalde track door gebruik te maken van Analyze in het bibliotheek context menu (rechtermuisklik op de track) en het Her-analyseren (variabele BPM) commando te kiezen. Anderzijds kan u voor alle tracks die opnieuw moeten geanalyseerd worden een variabele BPM beat grid aanmaken door in de Beat Detection voorkeuren Veronderstel constant tempo uit te vinken.
Wanneer zo een track speelt in een Leidend deck, zal het volgende deck het tempo nauwkeurig volgen. Het is belangrijk op te merken dat de volgende track het ge-detecteerde tempo onvoorwaardelijk volgt, zelfs wanneer er delen met een onstabiel tempo worden afgespeeld (bv. tijdens ‘bruggen’ of in het outro gedeelte waar het actueel gespeelde tempo niet juist werd gedetecteerd.
Wanneer een soft leader deck stopt of gedempt wordt da, selecteert Mixxx automatisch het volgende beste deck as Leider. Door te clicken op de Leader toets kan u kiezen tussen de Soft Leader en de Volger modus. Soft Leader is geen blijvende eigenschap van een deck, de eigenschap gaat over naar het volgend meest geschikte deck van zodra de huidige Leider ongeldig wordt (einde van de track of de track is gestopt).
Standaard wordt het ‘Sync Lock met Dynamisch tempo’ onderdeel geactiveerd en neemt Mixxx de eerste track waarop Sync Lock werd geactiveerd als Soft Leader, bij de overgang neemt Mixxx het tempo van de outro van deze track aan. Indien u liever het tempo van de intro van de volgende track wil ge-bruiken, click dan op de Leader toets (Kroon) van het deck waarin de track geladen is. Dit deck wordt dan de soft leader, en Mixxx zal het tempo van dit deck gebruiken.
Een gestopt deck kan enkel een Leider zijn wanneer er geen enkel ander deck aan het afspelen is. Vanaf het moment dat er een (ander) deck begint te spelen zal Mixxx dit deck gebruiken als Leider. Wanneer een ander deck begint te spelen kan u opnieuw kiezen welk deck de Leider wordt.
Indien u tijdens een overgang een stabiel tempo verkiest zoals in Mixxx voor Version 2.4, dan kan u Gebruik stabiel Tempo selecteren voor Sync modus in de Decks voorkeuren. In deze modus worden alle decks volgers tijdens een overgang en indien u het wenst kan u een dynamische track als Leider aanduiden door op de Leidertoets (Kroon) te clicken.
Een leider speelt steeds de origineel opgenomen tempo wisselingen. Een volger wijzigt zijn tempo om de leider te volgen, dit kan leiden tot een hoorbaar verschil in toonhoogte.Door keylock in te stellen wordt dit effect verzacht.
12.5. Harmonisch Mixen
Harmonisch mixen is een techniek om liedjes te mixen die een bij elkaar passende melodie en harmonie hebben. Om meer te leren over harmonisch mixen bekijk dan het mixshare archief`_.
Mixxx heeft twee functies om u te helpen bij het harmonisch mixen. De eerste is een key lock. Wanneer deze geactiveerd is, heeft het veranderen van de snelheid van een track geen invloed op de toonsoort. Om key lock in te schakelen, klik op de: guilabel:` key lock` knop in: ref:inter-face-button-grid. De tweede functie is dat Mixxx automatisch de toonsoort van een track kan detecteren, deze zal in de bibliotheek en de decks worden weergegeven. De notatie die wordt gebruikt om een sleutel weer te geven, kan worden gewijzigd in Key detectie voorkeuren.
12.6. Je mix opnemen
Met deze geïntegreerde opnamefunctie kan u uw mix als een audiobestand opnemen om later te beluisteren of te verspreiden als een Podcast of om ze op CD te branden.
Standaard neemt Mixxx de main output op. Mixxx kan indien aanders gewenst de output van een externe mixer opnemen indien u een audio interface geconfigureerd heeft als Record/Broadcast input in . Ga naar Opnemen en Uitzenden met een Externe Hardware Mixer voor details.
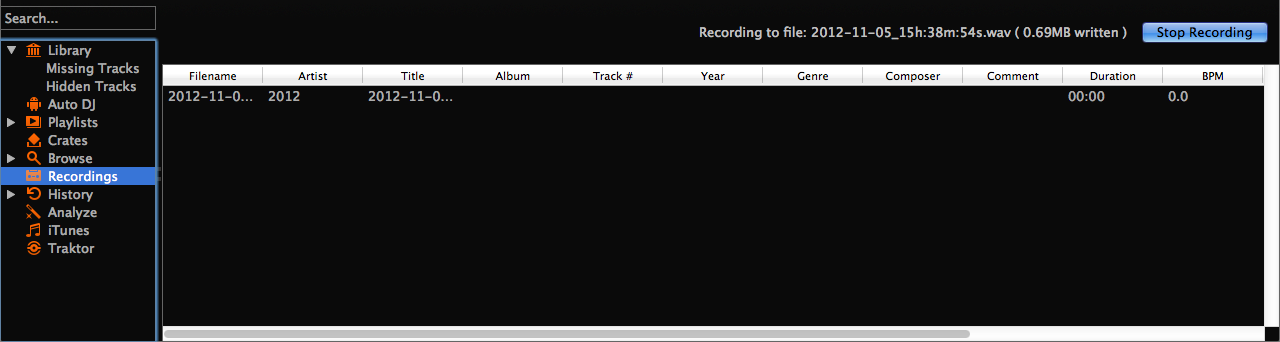
Mixxx-bibliotheek - weergave Opnamen
Mixxx kan uw mix in verschillende formaten en verschillende kwaliteitsniveaus opnemen. U kan uw opnames onderverdelen, cue files genereren, een standaard map voor opnames kiezen en zelfs uw eigen metadata instellen. Standaard bewaart Mixxx uw opnames zonder kwaliteitverlies in het WAV formaat in een Mixxx/Recordings sub-folder in de Mixxx muziek map. U wordt aangeraden om deze instellingen aan te passen voor u met opnemen aanvangt in .
Als u in de zijbalk van de Mixxx-bibliotheek op het Opnamen pictogram klikt, toont de tracktabel in het rechter deelvenster de inhoud van uw opnamenmap. Nieuwe opnames worden automatisch opgeslagen in deze map, evenals CUE-bestanden wanneer u in de voorkeuren het aanmaken hiervan aanvinkt.
Hint
Het opnemen van je mixen en ze later beluisteren om jezelf te beoordelen is een geweldig hulpmiddel om je DJ-vaardigheden te verbeteren. Je mixen doorsturen naar andere DJ’s voor feedback kan ook nuttig zijn.
Uw mix opnemen op schijf
Klik op het opname icoon bovenaan het applicatie venster om de opname te starten en te stoppen. De duur van de lopende opname wordt naast het pictogram weergegeven.
Notitie
De opname widget is mogelijks niet beschikbaar in sommige skins.
Een alternatief:
Klik op het Opnamen icoon in de zijbalk om naar de Opnames weergave te gaan
Klik op de Start opname knop of klik op in het menu bovenin het Mixxx applicatie venster.
Bovenaan de track-tabel wordt weergegeven hoeveel data er reeds is opgenomen, alsook de duur van de opname.
Voer je mix uit
Klik op de Stop Opname toets om de opname te stoppen als de mix klaar is.
Hint
Je kunt je opname onmiddelijk als een track in Mixxx afspelen. Sleep de track gewoon naar een deck.
12.7. Intro- en Outro Cues
Intro/Outro cues worden gebruikt bij de overgang van of naar een track, en kunnen ook worden gebruikt in gebruik in Auto DJ om de overgangen op deze punten te laten gebeuren. Anders dan hotcues, worden deze niet met één punt maar met twee punten gemarkeerd.
Bij het analyseren van een track detecteert Mixxx waar de eerste en laatste geluiden zich bevinden, zo is Mixxx gemakkelijk in staat om de stiltes niet af te spelen in het begin en op het einde van een track. De analyseerfunctie plaatst een intro start punt bij het eerste geluid en een outro eind punt bij het laatste geluid. Het eerste geluid wordt bepaald op het moment dat het signaal voor de eerste maal boven -60 dBFS gaat en het laatste geluid wanneer het signaal voor de laatste maal onder -60 dBFS gaat.
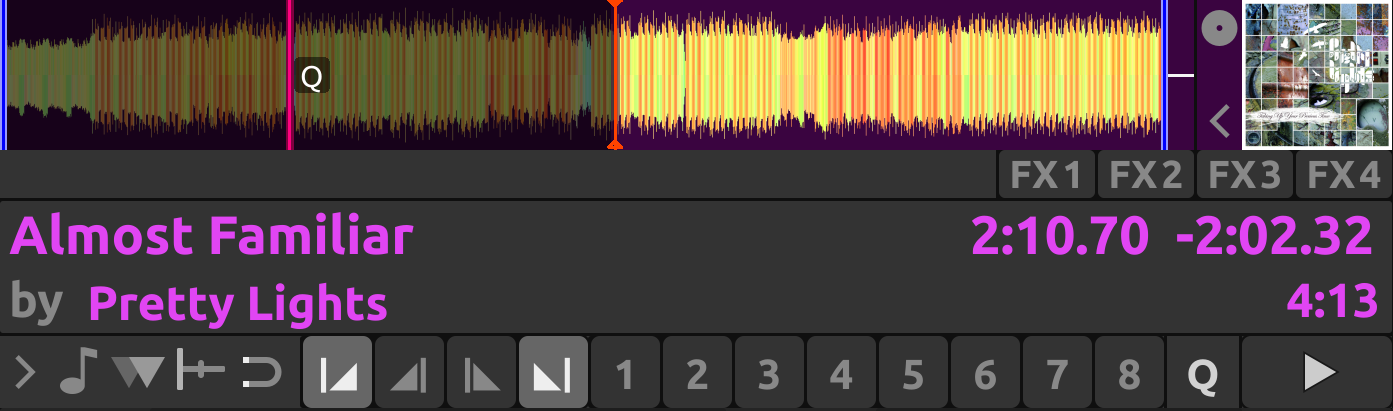
Intro start en outro einde cues worden respectievelijk bij het eerste en laatste geluid van een track geplaatst door de analyseerfunctie
U kan zelf de intro end en outro begin punten bepalen. Zo worden de volledige intro en outro gemarkeerd en kan Mixxx berekenen hoe lang de intro en outro duren en deze in de waveform markeren. Deze informatie kan u helpen zodat u weet wanneer u bij de volgende track op de afspeeltoets moet drukken. Auto DJ kan deze informatie ook gebruiken de tracks uit te lijnen en om te bepalen wanneer en overgang gebeurt en hoe lang deze mag duren.
Intro einde en outro start markeringen worden geplaatst in de track naast de intro start en de outro einde markeringen om delen aan te duiden.
Mixen met Intro & Outro Cues
U kan het einde van de intro en outro uitlijnen zodat de energie van de nieuwe track start wanneer de oude track eindigt.

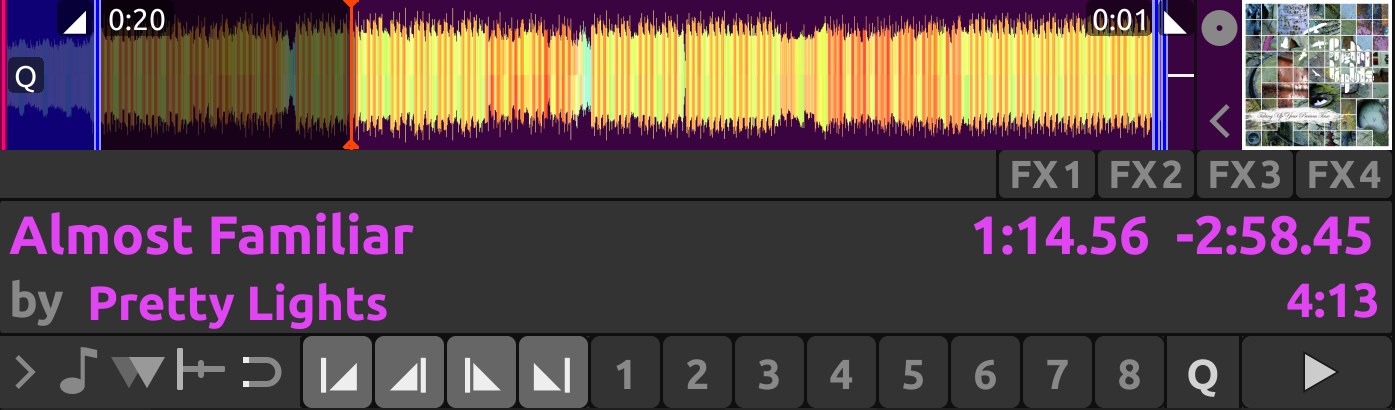
Uitgelijnde Intro en outro einde markeringen weergegeven in de waveform
Wanneer de intro en outro kort genoeg zijn om tegelijkertijd in de waveform te worden weergegeven, kan u gewoon naar de waveforms kijken en op afspelen drukken wanneer de markeringen overeenkomen. Indien niet kan u naar de resterende tijd in het deck kijken of met de muis over de outro einde lijn in de waveform bewegen, Mixxx zal u tonen hoeveel tijd er nog resteerd tot dat punt. Wanneer deze tijd overeenkomt met de lengte van de intro, druk dan op afspelen om het einde van de intro precies uit te lijnen. Mocht u het tempo van de track aangepast hebben wordt de resterende tijd herschaald om de juiste resterende tijd aan het gewijzigd tempo weer te geven.

Een andere methode is om de start van de intro en outro uit te lijnen. In dit geval kijkt u naar de scrollende waveform wanneer het outro startpunt nadert in de oude track en laat de nieuwe track beginnen met afspelen wanneer de oude track het outro start punt bereikt.
Notitie
Er zijn geen regels die bepalen welke methode moet worden gebruikt. De methode die u gebruikt is een artistieke keuze gebaseerd op de muziekale inhoud van elke track, welke sfeer er in het publiek heerst en wat u wil bereiken met de mix.
Indien u bij het laden van een track geen intro einde en outro start mar-keringen terug vindt, kan u deze zoeken en markeren met behulp van de hoofd-telefoon voor u de trax mixt. Zet de track daarna op het intro start punt om de track klaar te zetten. Indien u geen tijd heeft om de het outro eind punt te zoeken en markeren alvorens de track af te spelen, dan kan u met de functie ‘deck clonen’ gebruiken en de track slepen en verplaatsen naar een ander deck, dan kan u vooruit zoeken in de hoofdtelefoon en alsnog het outro start punt bepalen en markeren. Indien hier ook geen tijd voor is dan kan u in de waveform klikken ùet de rechtermuisknop op een punt waar u denkt dat de outro start. Kijk dan hoe ver dit is van het einde van de track om deze tijdspanne te vergelijken met de lengte van de intro van de volgende track.
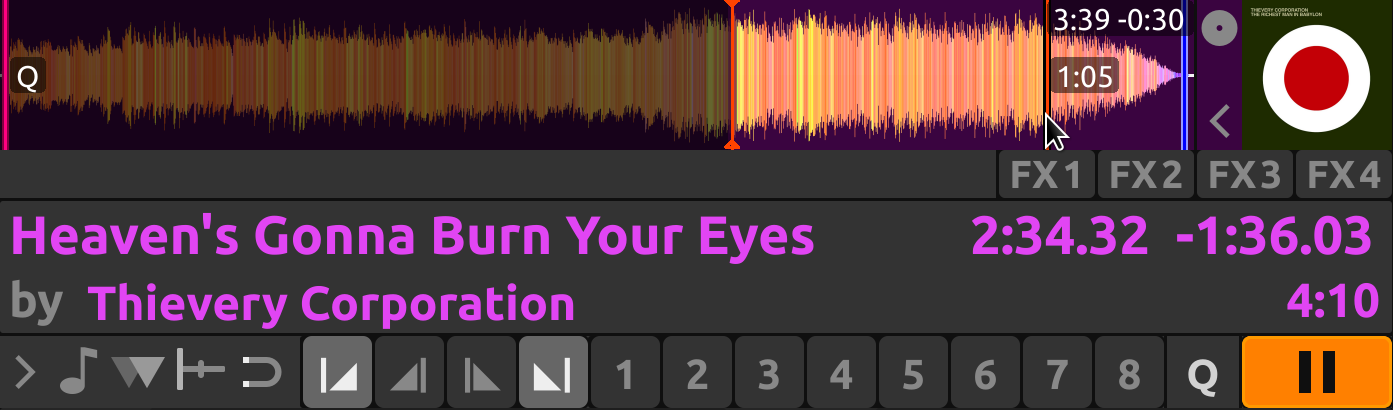
In dit geval is de outro ongeveer 30 seconden lang. De analyseerfunctie heeft echter het outro einde punt voor het einde van de track geplaatst, dee outro is dus in werkelijkheid een klein beetje korter dan 30 seconden. Zonder het outro start punt zou u een hoofdberekening moeten uitvoeren om te weten hoelang de outro exact duurt.
12.8. Auto DJ
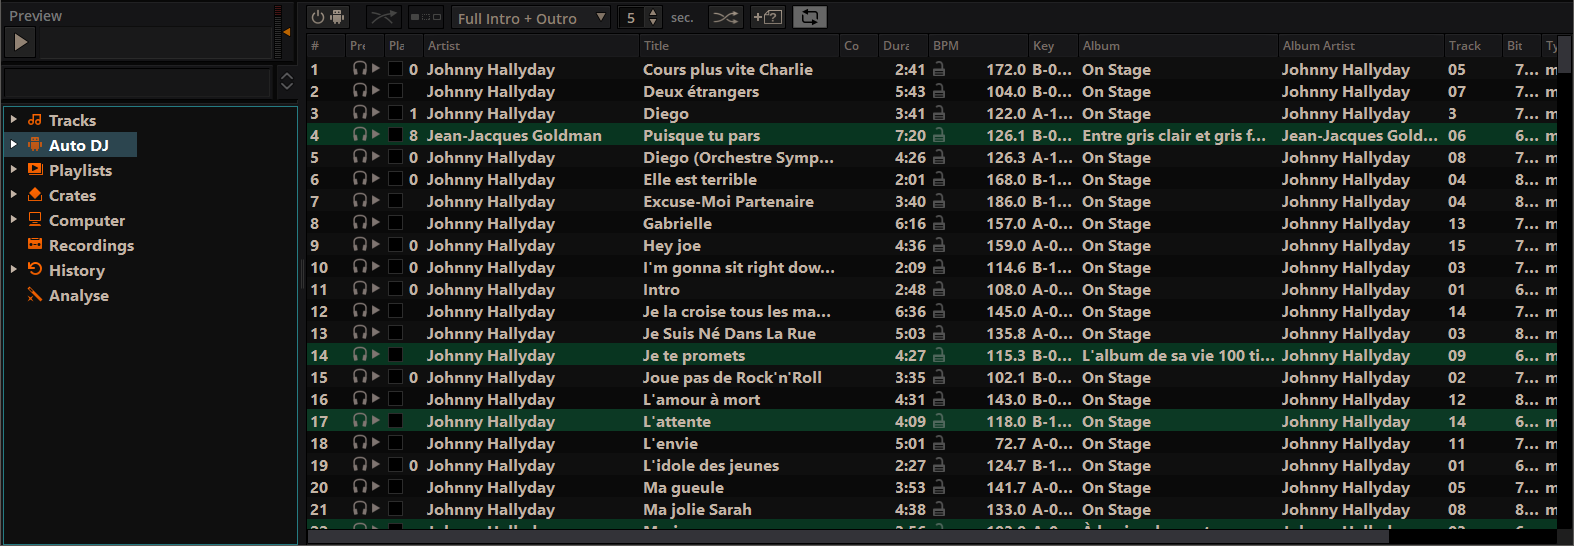
Mixxx-bibliotheek - Auto DJ-weergave
Auto DJ automatically loads tracks in the decks and mixes them. Tracks can be manually added to the Auto DJ playlist, or automatically from assigned source crates or from the entire library.
Auto DJ houdt geen rekening met het volume van elke track, noch de frequentie, noch het ritme. Auto DJ heeft geenszins de ambitie om een menselijke DJ te vervangen maar is goed genoeg om een menselijke DJ een pauze te laten nemen zonder grote onderbrekingen in de mix.
For mixing, Auto DJ takes control of the crossfader. Auto DJ requires at least one deck to be assigned to the left and right side of the crossfader. This can be done with the deck orientation switches next to the crossfader. If a deck’s orientation is centered, the crossfader can’t affect it. Note that in the official Tango skin, these switches are in the decks’ transport controls row, and in Shade skin they don’t exist because decks are statically assigned to the left and right side (bus).
When Auto DJ is toggled on, it will use the first two opposing decks it finds. With default settings these would be decks 1 and 2, but depending on how the orientation switches are set, this could be any configuration, for example deck 4 on the left and deck 1 on the right. If no opposing decks are found Auto DJ won’t start.
Notitie
Note that Auto DJ is currently not aware which decks are currently visible, i.e. it might pick currently hidden decks 3 and/or 4. Refer to the skin settings for how to toggle 4 decks.
When you toggle Auto DJ off, the crossfader will stay on its last position.
Each official Mixxx skin has an Auto DJ indicator icon, located either in the top toolbar or in the mixer. In some skins the crossfader is highlighted, too.
Tracks laden in Auto DJ
Om tracks automatisch te laten afspelen moeten deze eerst in de Auto DJ-afspeellijst geplaatst worden. De Auto DJ-afspeellijst is standaard leeg.
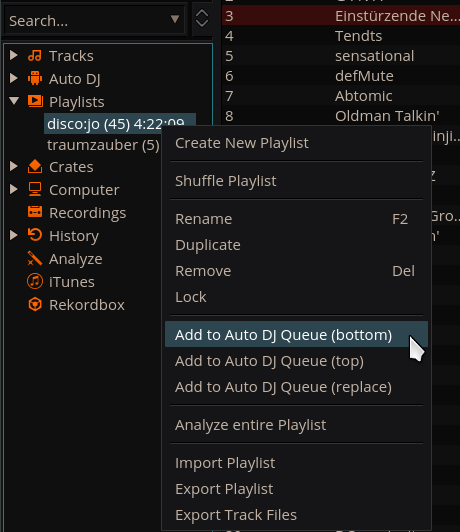
Mixxx-bibliotheek - Een afspeellijst toevoegen aan Auto DJ
Er zijn verschillende manieren om tracks in de Auto DJ afspeellijst te laden:
Selecteer een of meerdere tracks uit de bibliotheek, een gewone afspeellijst of krat en sleep ze naar het Auto DJ icoon aan de linkerkant.
Selecteer een gewone afspeellijst of krat, klik met de rechtermuisknop en selecteer Aan Auto DJ toevoegen in het muismenu. Dit voegt alle tracks van de afspeellijst of krat toe aan Auto DJ.
Terwijl u zich bevind in de Auto DJ-weergave van de bibliotheek bevindt kan u tracks van externe bestandsmanagers slepen naar de Auto DJ-icoon in de zijbalk of naar de tracktabel aan de rechterkant.
Automatisch tracks toevoegen uit kratten
In plaats van de inhoud van de kratten rechtstreeks in de Auto DJ-afspeellijst in te voegen, zijn Auto DJ kratten geassocieerde kratten die een bron van willekeurige nummerselecties worden.
Voeg een krat toe aan de Auto DJ track bronnen: Vouw het Auto DJ item in de zijbalk open, en klik met de rechtermuisknop op het :guilabel: Kratten sub-item. Selecteer een van de bestaande kratten uit de lijst. Dit maakt de inhoud van de krat beschikbaar voor willekeurige selectie in de Auto DJ wachtrij voor automatisch mixen. De naam van de krat wordt nu weergegeven als sub-item onder kratten in Auto DJ.
Als er nog geen kratten beschikbaar zijn voor selectie in de lijst, maak dan eerst een krat aan en voeg een aantal tracks toe, zie library-kratten.
Handmatig tracks toevoegen van trackbronnen aan Auto DJ: Klik op het Auto DJ item in de zijbalk en schakel over naar de Auto DJ weergave van de bibliotheek. Klik op de Voeg willekeurig toe toets om één track tegelijk uit Auto DJ trackbronnen toe te voegen aan het einde van de Auto DJ afspeellijst.
Notitie
Als u geen kratten hebt ingesteld als Auto DJ track bron, zal klikken op de Voeg willekeurig toe toets in plaats daarvan een willekeurig gekozen track uit de hele bibliotheek toevoegen.
Automatisch tracks toevoegen van trackbronnen aan Auto DJ: Mixxx kan willekeurig tracks aan de Auto DJ-afspeellijst toevoegen vanaf trackbronnen zodra er slechts een opgegeven minimumaantal tracks overblijft. Selecteer . Stel in om het minimum aantal tracks te wijzigen waarna willekeurige tracks mogen worden toegevoegd.
Notitie
Als u geen kratten als Auto DJ-trackbron hebt ingesteld, worden in plaats daarvan tracks uit de hele bibliotheek geselecteerd.
Verwijder een krat uit de Auto DJ track bronnen: Vouw het Auto DJ item in de zijbalk uit, en klik met de rechtermuisknop op een van de kratten die onder het :guilabel: Kratten sub-item staan. Selecteer Verwijder Krat als Trackbron om de krat te verwijderen uit de Auto DJ trackbronnen.
Nummers afspelen in Auto DJ
Nu dat je tracks in de Auto DJ-afspeellijst hebt geladen, kun je Auto DJ als volgt activeren:
Klik op het Auto DJ icoon in de zijbalk om over te schakelen naar de Auto DJ weergave van de bibliotheek.
Klik op de Schakel Auto DJ in knop.
De eerste tracks van uw lijst worden in de decks geladen en het afspelen begint.
Mixxx zal automatisch blijven mixen totdat de Auto DJ-afspeellijst leeg is.
Klik op de :guilabel: Schakel Auto DJ uit toets om het automatisch mixen te stoppen
Hint
U kunt een track opnieuw toevoegen aan het einde van de Auto DJ afspeellijst van zodra deze is afgespeeld in plaats van deze uit de lijst te verwijderen. Vink de :menuselectie:`Voorkeuren --> Auto DJ --> Nummers opnieuw in wachtrij plaatsen na afspelen --> Aan` aan.
Auto DJ Mix Modi
Auto DJ heeft verschillende modi, het kan gebruikt worden om tracks te mixen:
Volledige Intro + Outro
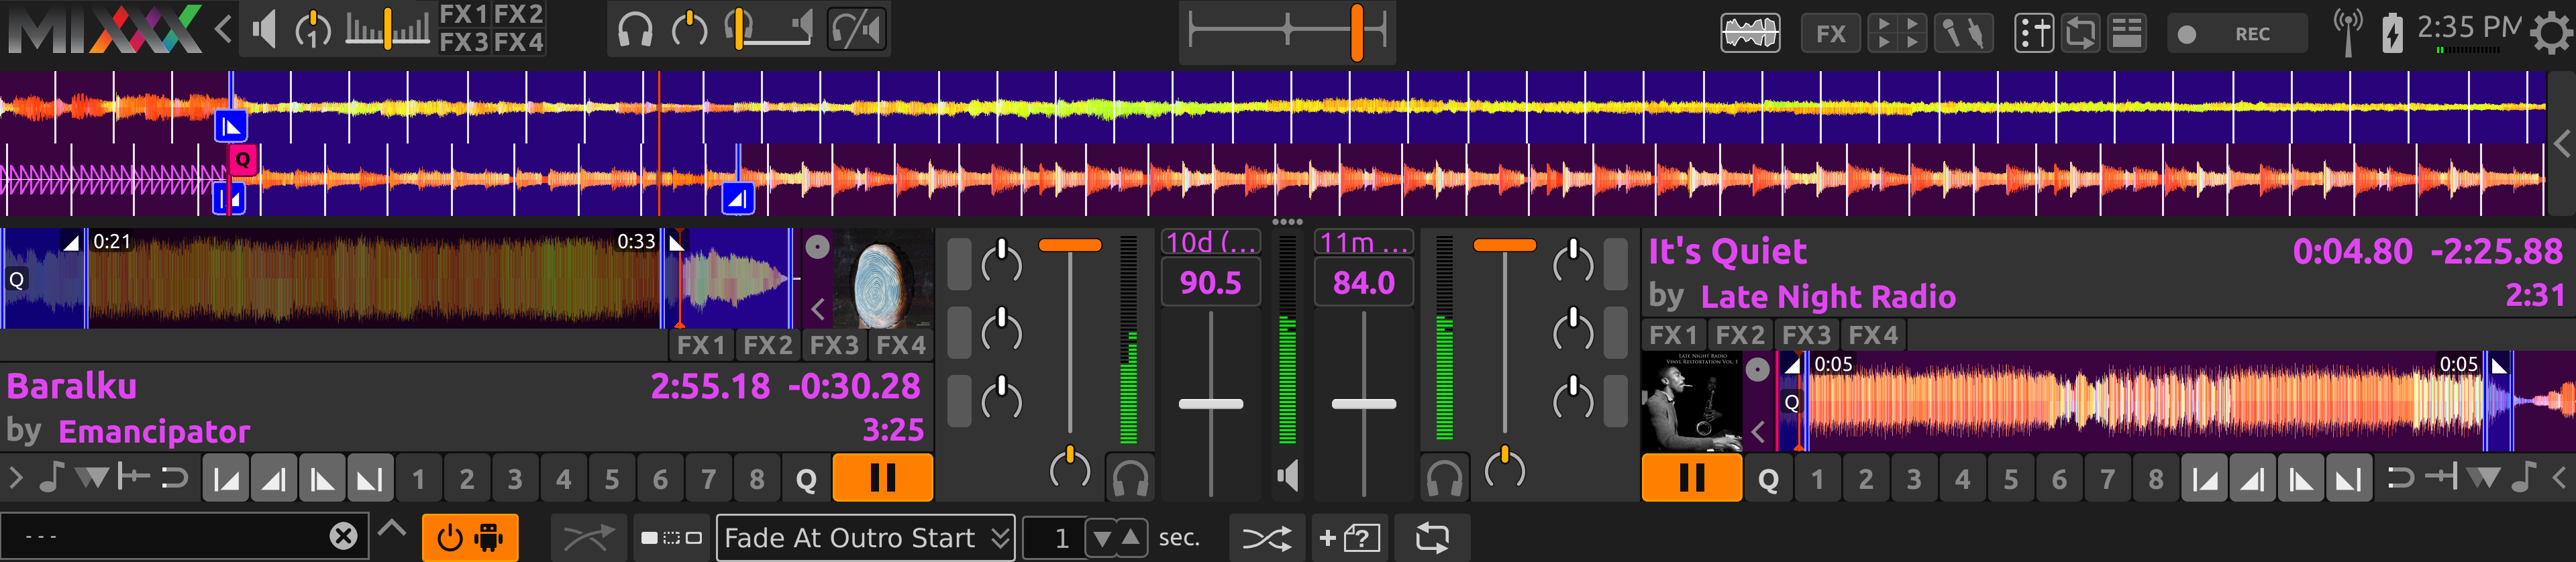
Fade op Outro Start
Volledige track
Stilte overslaan
De ‘volledige Intro + Outro’ en ‘Fade op Outro Start’ modi gebruiken beide de intro en outro cues maar de ‘volledige track’ en ‘Stilte overslaan’ gebruiken deze niet.
Volledige Intro + Outro en Fade op Outro Start
De ‘Volledige Intro + Outro’ en ‘Fade op Outro start’ Auto DJ modes gebruiken de intro & outro cues om te bepalen hoe lang de overgang zal duren en hoe de tracks moeten uitgelijnd worden in de tijd. In beide modi, vergelijkt Auto DJ de duur van de outro van de oude track en de intro van de nieuwe track. Auto DJ neemt de tijd van het kortste deel om de duur van de overgang te bepalen.
Wanneer de outro korter is dan de intro dan zal Auto DJ in beide gevallen het intro start punt uiltlijnen met de outro start punt.
Intro en outro start markeringen uitgelijnd door Auto DJ
Beide modi werken verschillend wanneer de outro langer is dan de intro.
- Volledige Intro + Outro Modus
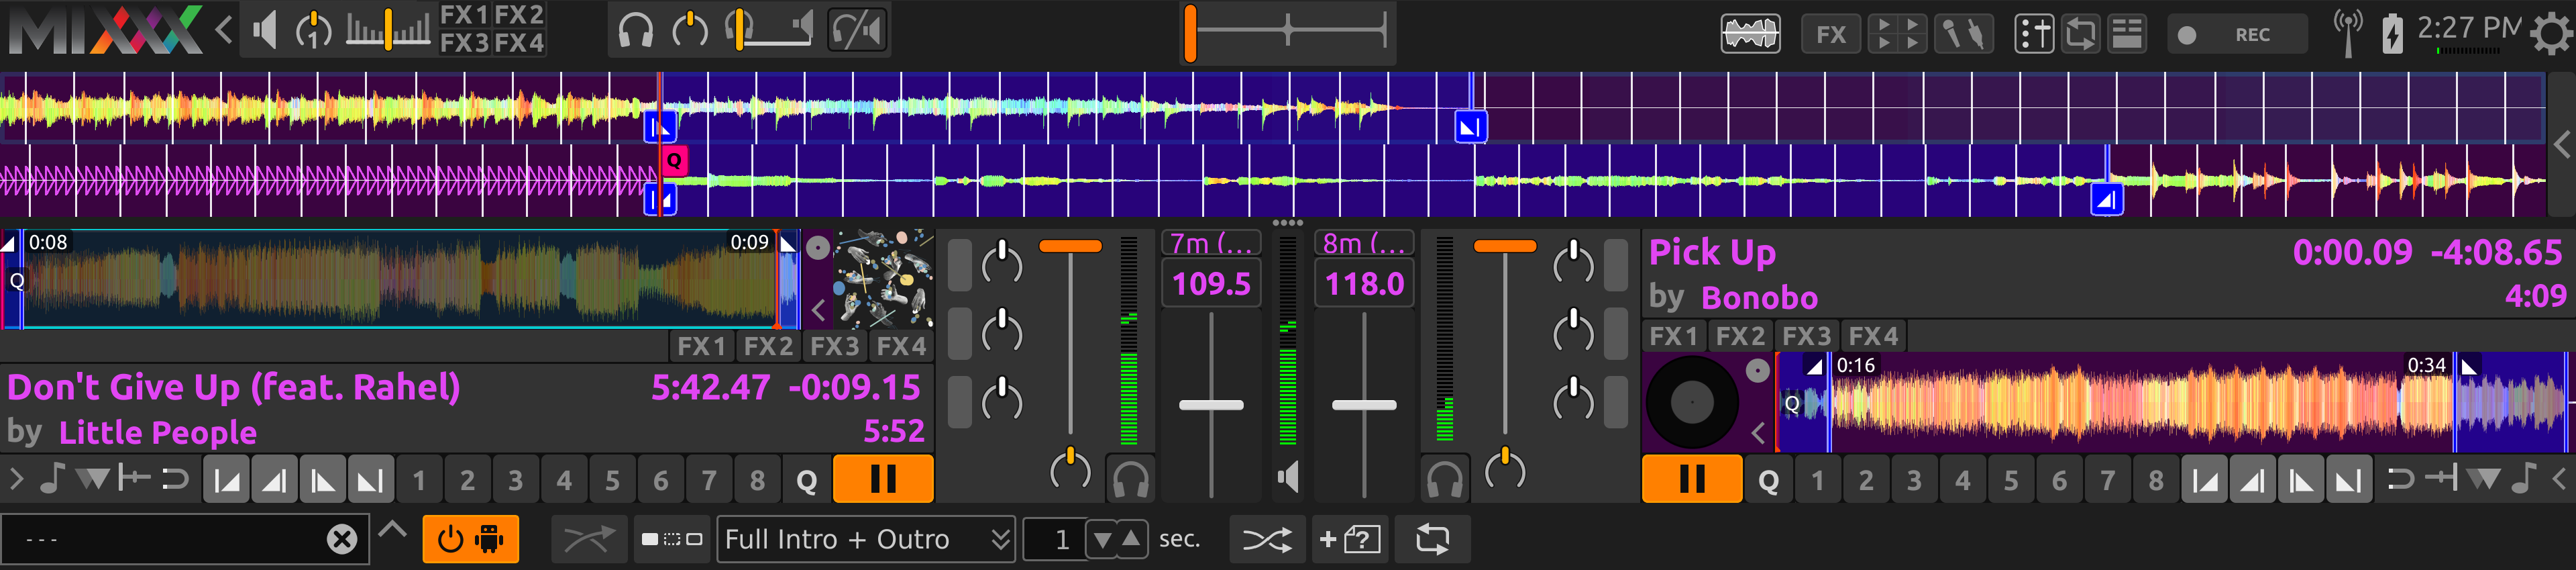
De volledige lengte van zowel de intro alas de outro wordt steeds afgespeeld. Wanneer de outro langer is dan de intro zal Auto DJ het einde van de intro uitlijnen met het einde van de outro en zal het afspelen van de nieuwe track starten tijdens de outro van de vorige track. Deze modus wordt het meest geliefd vermits dit goed klinkt voor een verscheidenheid aan tracks, daarom is dit ook de standaard modus.
Intro en outro start cues uitgelijnd door Auto DJ in Volledige Intro + Outro modus
- Fade op Outro Start
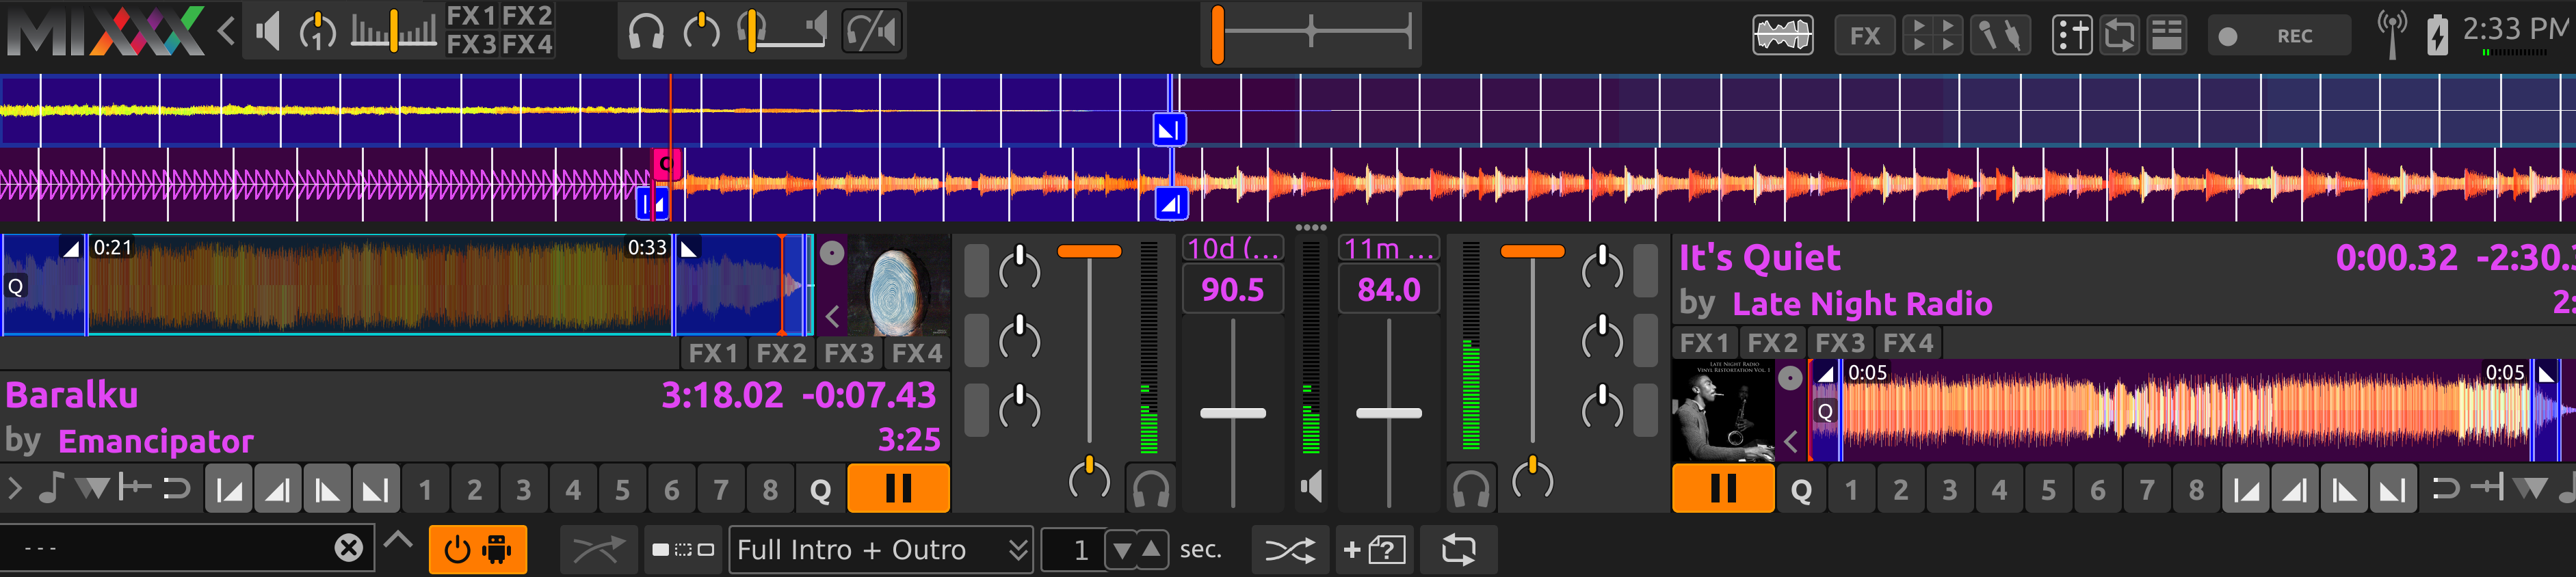
Auto DJ lijnt steeds het begin vand de intro en outro uit. Wanneer de outro langer is dan de intro, dan zal Auto DJ het einde van de outro afknippen. Dit kan handig zijn wanneer u wilt voorkomen dat de energie van de mix ver-loren gaat tijdens een lange outro. Deze overgang kan echter abrupt klinken wanneer de intro kort is.
Intro en outro start cues uitgelijnd door Auto DJ in Fade op Outro modus
Volledige Track en Stilte overslaan
De ‘Volledige Track’ en ‘Stilte overslaan’ Auto DJ modi gebruiken de intro en outro cues niet. Ze maken de overgang gedurende het aantal seconden dat wordt gespecifieerd in het vak naast de modus-keuze. De ‘Volledige Track’ modus speelt elk bestand volledig . De ‘Stilte overslaan’ modus werkt op dezelfde manier maar knipt de stilte aan het begin en einde van de track weg (gedefinieerd als wanneer het signaal voor het eerst boven of onder -60 dBFgaat).
Hint
Indien u Auto DJ als een gewone muziekspeler wilt gebruiken, stel dan één van deze modi in met een overgangstijd van 0 seconden.