2. Aan de slag
2.1. Mixxx installeren
Na het downloaden van Mixxx van onze Website <https://mixxx.org/download/>`_, moet je Mixxx installeren op je computer.
- Windows
Dubbel-klik op het Mixxx installatie bestand en volg de installatie wizard.
- macOS
Dubbel-klik het Mixxx .dmg bestand en sleep het icoon naar je Applicatiemap.
- Linux
Er zijn geen exxtra stappen nodig nadat je de instructies op de download pagina gevolgd hebt.
2.2. Mixxx upgraden
U kan veilig een nieuwe versie over een oude versie installeren. U hoeft de oude versie niet eerst te verwijderen.
Uw instellingen en bibliotheek worden niet verwijderd of gereset, maar ze kunnen worden geüpraded wanneer u de nieuwe versie van Mixxx opstart. Let op: wij kunnen niet garanderen dat dat nieuwe configuraties werken met oudere versies van Mixxx, daarvoor dient u een backup te maken van uw huidige instellingen voor de zekerheid.
Voor de locaties in elk ondersteund OS als voor een gedetailleerde beschrijving van de instellingenbestanden, ga naar de De Mixxx Instellingen Map.
2.3. Mixxx openen
![]() Van zodra u Mixxx geïnstalleerd heeft, begin met het opstarten van Mixxx en met uw muziek te importeren naar de bibliotheek.
Van zodra u Mixxx geïnstalleerd heeft, begin met het opstarten van Mixxx en met uw muziek te importeren naar de bibliotheek.
- Windows
Dubbelklik op het Mixxx-icoon op het bureaublad. U kunt ook door het startmenu van Windows bladeren en op het pictogram Mixxx klikken, of zoeken naar
Mixxx.exe.- macOS
Dubbelklik op het pictogram Mixxx in de map
Applications. U kunt ook het Mixxx-icoontje naar het dock slepen en er daar op dubbelklikken of in Spotlight zoeken naar mixxx.- GNU/Linux
Klik op het Mixxx-icoontje in het applicatiemenu of op de launcher van uw bureaubladomgeving of zoek naar
mixxx. U kunt ook mixxx in de terminal typen en dan op Return drukken. Als uw audio interface niet toegankelijk is vanuit Mixxx omdat deze door andere toepassingen via PulseAudio wordt gebruikt, kunt u Mixxx sluiten en herstarten met pasuspender mixxx. Zie appendix-command-line-opties voor een overzicht van de opdrachtregelopties van Mixxx.
2.4. Uw audiobestanden importeren
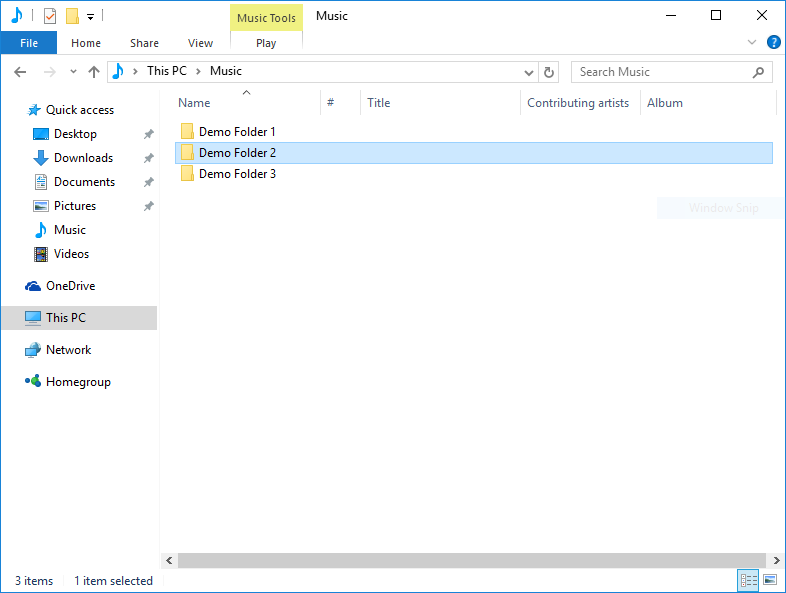
Mixxx draait op Windows 10 - Kies de muziek-bibliotheek map venster
De eerste keer dat u Mixxx start, wordt u gevraagd om de map te selecteren waarin uw muziek is opgeslagen. Standaard verwijst het dialoogvenster naar een locatie waar doorgaans muziekbestanden worden bewaard, maar u kunt elke locatie op uw computer selecteren.
Klik op Selecteer map en Mixxx zal uw muziekbibliotheek scannen. Afhankelijk van de grootte van uw bibliotheek kan dit enige tijd duren. Alle ondersteunde muziekbestanden die Mixxx detecteert worden in de Tracks - Bekijk en bewerk je hele verzameling vermeld.
Als u uw bibliotheek wilt bijwerken (bv. omdat u bestanden hebt toegevoegd of verplaatst), kunt u dit doen met :menuselectie:`Bibliotheek --> Scan Bibliotheek Opnieuw` in het menu. Als u bij elke start opnieuw wilt scannen, selecteert u :menuselectie:`Voorkeuren --> Bibliotheek --> Opnieuw Scannen bij opstarten`.
Waarschuwing
In Windows 7 en 8 wijst het importdialoogvenster naar uw Windows “Muziek”-bibliotheek, een speciale virtuele map. U kunt deze virtuele map niet gebruiken. Selecteer in plaats daarvan een gewone map, meestal “Mijn Muziek”, zoals hierboven afgebeeld.
2.5. Analyseer je bibliotheek
 Mixxx analyseert automatisch tracks wanneer deze voor de eerste maal in een decj geladen worden. Dit staat u toe om beatgrid, key, en ReplayGain detectie van tracks op voorhand uit te voeren. Ook de waveform weergave wordt hiermee voorbereidt, bestandsfouten worden gedetecteerd en de BPM wordt berekend.values.
Zie ook
Voor meer informatie, ga naar configuratie-bpm-detectie.
Waarom zou u uw audio files analyseren
Indien de tracks nooit eerder met Mixxx werden afgespeeld dan zijn de kolommen BPM, Duration en Key in de bibliotheek-tabel leeg of onbetrouwbaar (want dan worden waarden weergegeven die in de bestands-tags opgeslagen zijn en deze kunnen foutief zijn). Beat-grids op voorhand genereren geeft u de mogelijkheid om the beat-markeringen te controleren om u er van te vergewissen dat ze juist zijn. Fouten in de beat-grids kunnen het moeilijk maken om tracks te synchroniseren. Jet analyseren van tracks gebruikt ook een aanzienlijke CPU-kracht en kunnen er toe leiden dat een track niet correct wordt afgespeeld maar dat er deeltjes worden overgeslagen, — zaken die u zeker wil vermijden tijdens een optreden.
Hoe uw audio files analyseren
Eens uw muziek in de bibliotheek geïmporteerd is muziek in de bibliotheek geïmporteerd is, druk OK in het voorkeuren venster.
Ga naar de Analyze weergave in het linkerdeelvenster van de bibliotheek.
Om enkele specifieke tracks te analyseren, druk op de Ctrl toets, en selecteer de tracks die u wil laten analyseren, of u kan ok een bereik selecteren met shift-selecteer. Eens uw selectie gemarkeerd is, klik op de Analyze toets bovenaan rechts in het bibliotheekgedeelte..
Om nieuw toegevoegde tracks te analyseren, markeer het keuzerondje Nieuw en klik daarna op Analyseer.
Om uw volledige bibliotheek te analyseren, markeer het keuzerondje Alle en klik op Analyseer.
De keuzerondjes Nieuw en Alle staan bovenaan links in het analyse-paneel - net boven de Voorbeluisteren en Cover Art kolom titels van de bibliotheektabel.
Tijdens de analyse wordt de vooruitgang procentueel aangeduid net zoals de totale lengte van de wachtrij.
2.6. Configuratie van de geluidsingang en -uitgang
Vooraleer u Mixxx kunt gaan gebruiken, moet u Mixxx configureren om uw geluidshardware te gebruiken in: menuselectie: Voorkeuren -> Geluidsapparatuur. U hoeft niet alle in- en uitgangen te configureren.
Het hoofdstuk: ref: hardware legt verschillende soorten DJ-hardware uit en hoe u deze kunt instellen met de in- en uitgangopties. Om Mixxx optimaal te laten presteren op uw systeem, configureert u de andere: ref: voorkeuren-geluid-hardware ter aanvulling aan de de in- en uitgangen.
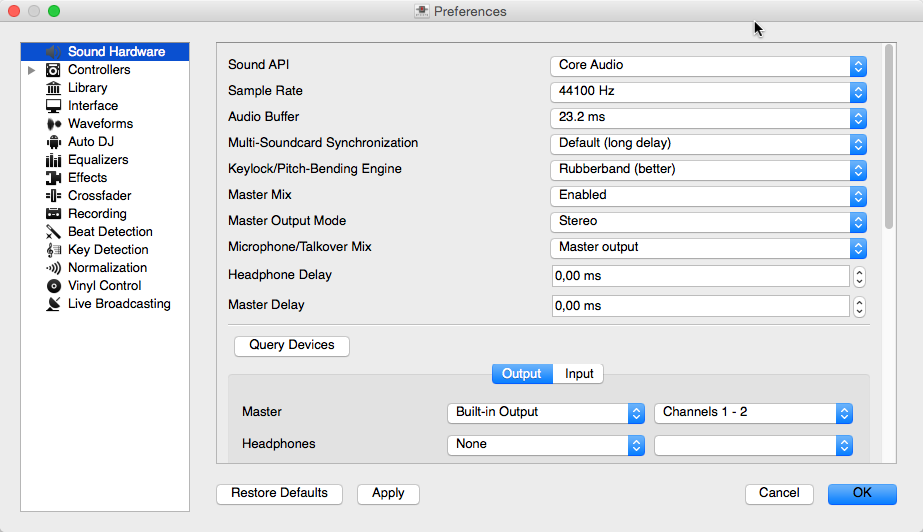
Voorkeuren Mixxx Geluidsapparatuur
Uitgang opties
Intern mixen:
Gebruik deze uitgangen als u geen externe mengtafel gebruikt. Als u een controller met een ingebouwde audio-interface gebruikt, gebruik dan deze uitgangen.
Main: alle decks, samplers, microfoons, en Auxiliaire ingangen worden samen gemixt. Deze uitgang wordt naar de luidsprekers voor het publiek gestuurd.
Hoofdtelefoon: alle decks, samplers, microfoons en Auxiliaire ingangen toe-gewezen aan: term: pre-fader beluistering <PFL>
Booth: gelijk aan main output maar met een gescheiden niveau regelaar.
Extern mixen:
Decks 1-4: de afzonderlijke ongemengde decks die naar een extern mengpaneel worden gestuurd.
Bus Left/Center/Right: alle decks, samplers, en Auxiliaire ingangen toegewezen aan iedere zijde van de crossfader van Mixxx.
Input Opties
Intern mixen:
Gebruik deze ingangen als u geen extern mengpaneel gebruikt. Als u een controller met een ingebouwde audio-interface gebruikt, gebruik dan deze ingangen.
Microfoon 1-4: live microfoon- of instrumenteningangen
Auxiliary 1-4: andere geluidsbronnen
Extern mixen:
Opname/Broadcast: Wanneer deze geconfigureerd zijn, zal Mixxx het geluid opnemen en uitzenden van deze audio interface ingang en niet van de interne main output mix. Indien u een microfoon in de mengtafel heeft ingeplugd, configureer dan de Microfoon ingangen 1-4 NIET.
Intern of extern mixen:
Vinyl Control 1-4: tijdcode-invoer van draaitafels of CDJ’s voor het manipuleren van decks 1-4
Zie ook
microfoons