The library manages all of your music files. This is where you can find the
tracks you want to play and load them into a deck or
sampler; see Loading Tracks. Mixxx
imports your music library automatically when it is run for the first time, see
Changing music directories for more information.
If you want to backup (or delete) your library refer to The Mixxx Settings Directory and look for mixxxdb.sqlite.
The sidebar on the left contains different collections of music. The track list
view on the right displays the tracks in those collections.
Sidebar:
Search: Search for tracks in your Mixxx library.
Tracks: View and edit your whole collection.
Auto DJ: Automatically load and crossfade tracks for unattended mixing.
Playlists: Arrange tracks in a set order.
Crates: Organize tracks in (unordered) collections.
Computer: Navigate, view, and load tracks from folders on your hard disk
and connected devices.
Recordings: Record your mix and view previous recordings.
History: Browse lists of tracks played in past mixing sessions.
Analyze: Generate Mixxx-specific data for tracks before a gig.
External Libraries: Access your existing iTunes, Traktor, Rhythmbox, and
Banshee libraries.
Track List:
Sort: Display and sort track collections by different criteria.
Load: Drag tracks you want to play to the waveform display.
Edit: Rate tracks and edit track properties.
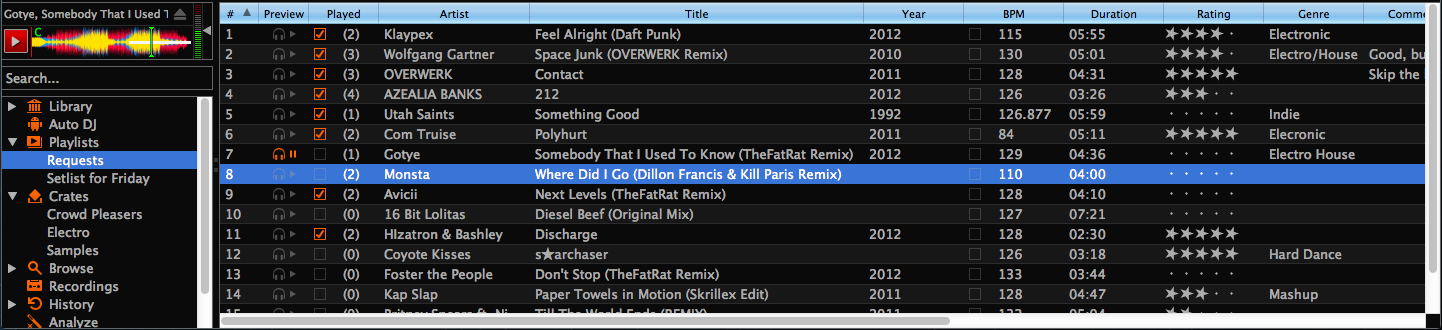
4.2. Tracks - View and edit your whole collection
A sortable list of all the tracks in your music library.
Customizing the view
Move columns by clicking a column header and dragging it to another
position. Right-click on a column header to show or hide individual
columns. Adjust the column width to fit the contents of the rows by
double-clicking on the separator between two column headers.
Sorting Tracks
Tracks are automatically sorted by the active column. Click on the active
column header to reverse the sort order. Click on another column header to
change the active column.
Multi-Column sorting
You can sort multiple columns by clicking up to three column headers you
wish to sort your tracks by. This makes searching for tracks in a large list
more efficient. Clicking twice on a column header will reverse the sort
order.
Example:
Click on the BPM column header -> list is sorted by BPM
Click on the Year column header -> list is sorted by
year. If year is equal, it is still sorted by the last criteria, e.g. BPM.
Click on the Genre column header -> list is sorted by
genre. If genre is equal, it is still sorted by year. If genre and year
is equal, then it is sorted by BPM.
Random sorting
Click on the Preview column header to randomly sort tracks.
Sort keys by circle of fifths
Click on the Key column header.
The order starts with C at the top, then its relative minor (a), then
adds 1 sharp (G), then G’s relative minor (e), and so adding
sharps/removing flats around the circle of fifths.
For Lancelot notation, it starts with
G#m at the top, which is 1A in that notation, and proceeds
alphanumerically (minor keys appear before their relative major keys in this
case).
Rating tracks
Make sure the Rating column is not hidden. Rate tracks by hovering
over the rating field and clicking the stars.
Track Inline editing
Mixxx reads metadata from the tracks to fill the columns of the
library. Double-click on a field, edit the data, and hit Enter when you
are done. Go to the chapter edit metadata for
detailed information.
Loading tracks
To load a track into a deck, you can either drag it
to the waveform display, use the context menu or use keyboard shortcuts. Go to the chapter
Loading Tracks for detailed information.
Importing tracks
Mixxx imports your music library automatically when it is run for the first
time. Go to the chapter Changing music directories for detailed information.
Previewing Tracks
To pre-listen to tracks in your headphones without loading them to a regular
deck, click the icon in the Preview column.
Go to the chapter Previewing Tracks for detailed information.
Cover/Album Art
Mixxx can display cover art it finds for a track in the library.
It will search for available cover art in the following places in order and
will use the first one it finds:
The first image saved in the track’s ID3v2/Vorbis tags
An image file in the track folder (if there is only one image file there.)
%track-file-base%.jpg in the track directory for
%track-file-base%.mp3
%album%.jpg
cover.jpg
front.jpg
album.jpg
folder.jpg
Mixxx supports the following image types: jpg, jpeg, png, gif, bmp
Rescan Library
If you want to manually refresh your library without exiting (for example
because you added or moved files) you can do this with Library
‣ Rescan Library in the menu at the top of the application window. You can
prompt an automatic rescan when Mixxx is started under
Preferences ‣ Library ‣ Rescan on startup.
Rescanning the library will add new files to the library and mark tracks
as missing if the corresponding file has been deleted. It tries to detect
and relocate missing tracks if files have been renamed or moved into another
directory.
Automatically refreshing the metadata of tracks when files have been modified
by an external application is not supported, yet. In this case you need to
select the affected tracks and (re-)import their metadata from file tags.
Right-clicking on selected tracks in the track list reveals the context menu:
Add to Auto DJ
Adds the content of the selection to either the
bottom or top of the Auto DJ
playlist for automatic mixing. The replace option deletes the
Auto DJ queue first, and then fills it with the selected tracks.
Load to
Loads a selected file to one of the available
Decks, Samplers or to the
Preview Deck. Alternatively
simply drag it to the Waveform Displays. The number of available decks
and samplers might differ, depending on the selected skin. Note that you
can’t load multiple files at once.
Add to Playlist
Add selected tracks to an existing playlist, or drag the
selection to a playlist crate in the sidebar. Choose Create new
playlist to put them into a new playlist.
Crates
The checkbox shows in which existing crates the selection is in.
Changing the crates selection does not collapse the menu, which allows
much easier categorization of tracks without going through the menu from
scratch. Choose Create new Crate to put them into a new crate.
Select Color
Assign a color to all selected tracks to indicate mood, energy etc.
Select the black button at the top left to remove the color.
Metadata
Import from File Tags: If the track’s metadata changes,
(e.g. if you used iTunes to edit it,) this option lets you save the new
values for the selected tracks to the Mixxx library. See
edit metadata.
Import from MusicBrainz: Look up metadata online by searching
the MusicBrainz database and apply the search results to your
tracks. See edit metadata.
Export to File Tags: Saves metadata to files. Mixxx may wait
to modify files until they are not loaded to any decks or samplers. If you
do not see changed metadata in other programs immediately, eject the track
from all decks and samplers or shutdown Mixxx.
Cover Art
Choose New Cover: Select an image from the file browser as the cover.
Clear Cover: Delete any cover information saved for this track.
Reload from track/folder: Reload the cover from the tracks» ID3v2
tags or a picture in the track folder if the tags do
not supply any.
Clear
BPM and Beatgrid: Removes the BPM and beatgrid data
from the selected tracks in the Mixxx library. After doing this, we
recommend analyzing the tracks again.
Play Count: Marks selected tracks as not played in the current
session and sets their play counter to zero. The icon in the
Played column changes.
Waveform: Clears the saved waveform data from the selected tracks.
This is useful if a file is overwritten by another file of the same name,
or was edited externally (e.g. in a waveform editor). To clear the
waveform cache for all tracks in the library, select
Preferences ‣ Waveforms ‣ Clear cached Waveforms .
All: Clears all of the data above from the Mixxx library database at
once.
Change BPM
Allows to change the BPM to 50%, 66%, 75%, 133,33%, 150%, or
200% of the BPM set by Mixxx when analyzing
the tracks. If many of the detected BPM values are incorrect, you may try
other settings in the Analyzer Settings
and re-run the analysis.
Lock/Unlock BPM: Locks/Unlocks the BPM of selected tracks so
you can’t edit them in the track properties. The
icon next to the track’s BPM in the library row is a toggle. Clicking it
will set the status to „locked”, and the icon changes to
.
Update ReplayGain from Deck Gain: Applies the deck pregain knob value to
the detected ReplayGain value for the current track. This is a way to update
the ReplayGain value of a track if it has been detected incorrectly. When this
option is selected, the pregain value for the deck will be centered so that
there is no audible difference in track volume, so this operation is safe to
use during performance.
Hide from Library
Temporarily hides selected tracks from the track list.
Hidden tracks are listed in the Hidden Tracks menu item which is
explained below.
Open in File Browser
Brings up the selected files in your file manager.
Properties
Similar to inline editing explained above, the properties
dialog allows you to view and edit metadata such as title, artist, album, and
view the full file name and path. Note that you can not edit multiple files at
once.
Informacja
Most of the context menu items are available in file lists of other
views like Auto DJ, Playlists, and Crates as well.
The Missing Tracks view is accessible by expanding the Library tree item in the
sidebar. Any tracks that were previously loaded into your library but were
later not found on your drive will appear here.
Mixxx does not automatically delete records of missing tracks so that extra
metadata Mixxx might have (such as hot cues and beat grids) will not be lost
in case the file is replaced.
The features in detail:
Select All button: Selects all tracks in the current view.
Purge button: Purges the selected tracks from the Mixxx library, but does
not remove them from your computer. This will delete all metadata
Mixxx has for a track.
The Hidden Tracks view is accessible by expanding the Library tree item in
the sidebar. Any tracks that were previously loaded into your library but were
later set to be hidden from the library will appear here. Use the
Hide from Library context menu item in the
tracks view to temporarily hide selected tracks.
The features in detail:
Select All button: Selects all tracks in the current view.
Purge Button: Purges the selected tracks from the Mixxx library, but does
not remove them from your computer. This will delete all metadata
Mixxx has for a track.
Unhide Button: Removes the selected tracks from the
Hidden Tracks view and makes them available in the regular track
lists again. The tracks will re-appear in every playlist or crate they were
in before being hidden.
Zobacz także
To learn how to permanently remove tracks from the Mixxx library
using the Hidden Tracks view, see
permanently remove tracks.
Right-click the library track table: Right-clicking
on a track in the table will present the options Load in Deck 1
and Load in Deck 2, among others. Making either selection will
load a track into a deck.
By Using a Keyboard to load the selected track in the library track
table. Use keyboard ↑ and ↓ arrow button to select a track, Shift + ←
to load into Deck 1 and Shift + → to load into Deck 2.
Drag-and-drop from library track table: Dragging-and-dropping a track from the
track table onto a waveform display will load the track into that deck.
Drag-and-drop from deck to deck: Once you’ve loaded a track to deck, sampler,
or preview deck, click on the track title, track artist or cover art and
drag it to another deck or sampler.
Note that you can also drop tracks onto Playlists and Crates in the sidebar, as well as into track tables of active Playlists or Crates.
Drag-and-drop from external file browser: Dragging-and-dropping a track from
an external file browser directly onto a waveform display in Mixxx will load
that track. This function also works with some other applications. For
example, on macOS, dragging-and-dropping a track from iTunes onto one of
Mixxx’s waveform displays will load it into that deck.
The search function filters the currently displayed list (e.g. a playlist,
a crate, or even the whole library) for tracks that match your search query.
Activate the search input field by clicking in it or pressing CTRL +
F (Windows/Linux) or CMD + F (Mac).
Type your search term(s). Mixxx filters the tracks as you type and shows only
those matching the search term(s). Search terms can include an artist’s name,
a song title, BPM, etc.
To clear the search string click the clear button right next to the input field.
Hit TAB to cycle between the search and the list of results in the
library. Use the ↑ and ↓ keys to scroll in the
list of results.
Informacja
If the search input field has focus, the Mixxx keyboard shortcuts are
disabled, see Using a Keyboard.
Informacja
The Computer and Recording views currently only
support simple case-insensitive filtering.
It doesn’t matter if you have space between the colon and the argument
or not. Quotes must be used for multi-word text arguments.
You can use = to find exact matches. It reveals only tracks where the entire property
text equals the search term. As without =, you must use quotes for more than one word.
The first of the examples below will find only tracks where the title is
„wow” (case-insensitive like the default search), i.e. not „wowy”, „oh wow!”
or „wow (Hej Remix)”.
Examples
title:=wowtitle:="Track 1"artist:="DJ Flop"
Numeric filtering: bitrate, bpm, played, rating, track, year
You can put a space after the colon but currently there must be no space
between the operator and the number.
Special filtering: key, duration, added, dateadded, datetime_added, date_added
Supports fuzzy matching of key searches. The following example lists tracks
with harmonically compatible keys to C# minor.
~key:c#m
You can combine operators but there’s no way to do an “OR” search right now.
The following example lists all tracks by “Danger” over 3 minutes long that
are rated 4 or 5.
artist:Dangerduration:>3mrating:>=4
Negative search filters. Use the - prefix as negation operator. The
following example would find “hip-hop“ from any year but 1990.
genre:hip-hop-year:1990
Search for empty fields. The following example lists all tracks without a
genre. It works for all text fields, including crates.
To pre-listen to a track, activate the Preview column in a library
view. Clicking the icon in the library’s
Preview column loads the selected track into a special Preview
Deck that will only output sound in the
headphones channel. Click the
icon to stop the playback.
Alternatively, select a track from the track list of the Mixxx library, drag the
track to the waveform view of the Preview Deck
and click the Play button next to the waveform.
To display the Preview Deck,
press CTRL + 4 (Windows/Linux) or CMD + 4 (Mac).
Podpowiedź
Click on the Preview column header to randomly sort tracks.
Mixxx reads relevant metadata from the tracks and displays them in the
library columns. You are free to edit most metadata, and Mixxx offers a number
of different ways to do so. Note that some information can not be edited, such
as bitrate, size, length, type, filename, and location.
Informacja
Mixxx does not support editing the metadata of many tracks at a time
(bulk editing).
Ostrzeżenie
Mixxx won’t touch your audio files by default. Changes to a track’s
metadata will be saved to the Mixxx library, but not to the
track itself.
If you wish to write modified track metadata from the library into
file tags, check the box in Preferences ‣
Library ‣ Track Metadata Synchronisation.
To enable inline editing in the library go to
Preferences ‣ Library ‣ Miscellaneous and check the box
„Edit metadata after clicking selected track”.
Select any track in the library and click on the
field you want to edit. If the field is editable, it will become an editable
text box. Enter a value and hit Enter when you are done.
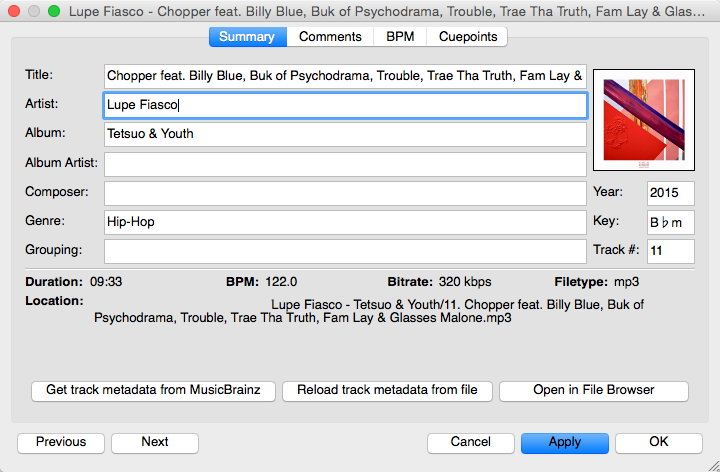
To open the editor right-click on a single track in the library or any track
label in decks or samplers, then select Properties in the track menu.
You can also double-click any track label in the decks or samplers to open the
editor directly.
Add or change values in the editable fields, and save your
changes as explained below.
Apply: Accept the changes and leave the editor open.
Cancel: Discard the changes and close the editor.
Previous/Next: Load the previous or next track in the current library
view.
Import Metadata from File: Prompts Mixxx to re-read the metadata
of the selected track (such as when you have modified it externally with
another application.)
Import Metadata from MusicBrainz:
Look up metadata on-line by searching the MusicBrainz database. See
below.
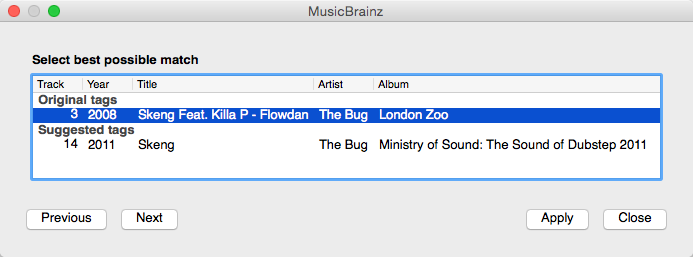
The MusicBrainz wizard in Mixxx allows searching the MusicBrainz database and
applying the results to your tracks.
Click on a single track in the library and select Get Metadata
from MusicBrainz. Mixxx fetches track data from the MusicBrainz database and
displays the search results.
Select the best match from the search results by clicking on it in the list.
Apply: Apply the selected MusicBrainz metadata to the track.
Close: Close the wizard.
Previous/Next: Load the previous or next track in the current library
view and perform a MusicBrainz lookup on it as well.
Fetching track metadata from MusicBrainz can fail:
if Mixxx is unable to find the specified track in the MusicBrainz database,
if Mixxx cannot reach the MusicBrainz servers (if they are down),
or if you are not connected to the Internet.
Podpowiedź
The MusicBrainz service has been designed for identifying full audio
files. If a track is less than 2 minutes long, identifying the file will
likely fail. Identifying a layered mix-track or mash-up may produce false
positives in the result list.
If you have edited file metadata in third-party software you need to re-import
the modified metadata into Mixxx manually by selecting the affected tracks, open
the context menu, and then choose Metadata ‣ Import From File Tags.
Podpowiedź
Rescanning the library with Library ‣ Rescan Library
in the menu on top of the application window will only detect newly
added or removed tracks but no modifications of existing tracks. This
is a known limitation.
Popular software to edit metadata of audio files include:
The Auto DJ queue is a special playlist that contains extra
controls for automatic mixing. This is useful when taking a break from live
mixing or for using Mixxx as media player.
The Auto DJ features in detail:
Enable toggle: Toggles the Auto DJ mode on or off.
Fade now button: Triggers the transition to the next track.
Skip track button: Skips the next track in the Auto DJ playlist.
Transition mode selector: Choose a transition mode.
Transition time spin-box: Determines the duration of the transition. A
negative value will add a pause between tracks.
Shuffle button: Randomizes the order of tracks in the Auto DJ playlist.
Add Random track button: Adds a random track from track sources (crates) to the
Auto DJ queue. If no track sources are configured, the track is added from the
library instead.
Repeat the playlist toggle: Re-queue played tracks.
Selection Info label: Displays the duration and number of selected tracks.
Press Ctrl + A to get the total duration of the AutoDJ queue.
The Skip track, Add Random and Fade now
buttons are only accessible if the Auto DJ mode is enabled. The Search field in
the upper left corner is disabled in Auto DJ.
By default, Auto DJ removes tracks after playing them but if you want it to play the same
tracks over and over again, you can activate the Repeat the playlist toggle.
Auto DJ Crates
It is possible to add random tracks to the bottom of the Auto DJ playlist. The
tracks are chosen from a set of crates that you have set as a source for
Auto DJ, or from the standard library. Mixxx will normally try to select tracks
that haven’t yet been played. You can set a minimum number of tracks that are
always available for selection no matter when they were last played in
Preferences ‣ Auto DJ ‣ Minimum available tracks in Track Source.
Playlists are ordered lists of tracks that allow you to plan
your DJ sets. Some DJs construct playlists before they perform live; others
prefer to build them on-the-fly.
Playlists are not directly loadable into decks as Mixxx is primarily
intended for live, attended performance use. However, you can right-click a
playlist to queue it to Auto DJ, so in a sense you can
„play” it.
Create a playlist: Right-click on the Playlists sidebar item
and select Create New Playlist. Name the playlist and click
OK. The total number of tracks and total duration are displayed
next to the name.
Import playlists:
Right-click on the Playlists sidebar item
and select Import Playlist. Select one or more playlists and click
OK. Mixxx creates an import of these existing external playlists
as new Mixxx playlists.
Add Tracks: Add tracks to a previously created playlist by
dragging-and-dropping a selection of tracks from the library or playlists onto
the name of a playlist in the sidebar. Alternatively, use the right-click
context menu in the library’s track list.
Podpowiedź
If you have a track selected in the library, all of the visible
playlist and crates that it is in are shown in bold.
Right-click on an existing playlist name to access the different features in
the context menu:
Add to Auto DJ: Adds the content of the playlist to the
Auto DJ queue for automatic mixing.
Rename: To rename a playlist, just enter a new playlist name and click
OK.
Duplicate: Sometimes you want to build a playlist based on an existing one.
Select the playlist you would like to duplicate, choose
Duplicate Playlist, name the new playlist and click OK.
Remove: Removes an unlocked playlist. Tracks that were in the playlist
remain in the library for later use.
Lock: This icon indicates a locked playlist. If a playlist
is locked, you cannot add tracks, rename or delete the playlist. Choose
Unlock from the context menu to unlock the playlist.
Analyze entire playlist: Forces the analysis of the tracks in the playlist
in the Analyze view.
Import playlist: Import tracks from external playlists in various file
formats to the selected playlist. For more information, go to
Using libraries from other software.
Export playlist: Export a playlist to various file formats such as
m3u, m3u8, pls, txt, or csv.
This allows you to use the data in other applications.
Export Track files: This copies all of the tracks in a playlist into a
folder such as an external USB stick. Only files are copied, not
Mixxx-specific metadata like waveforms or cover art that is not embedded in
the file.
Crates are unordered collections of tracks, just like DJ cases
holding your favorite records.
Create a crate: Right-click on the Crates sidebar item and
select Create New Crate. Name the crate and click OK.
The total number of tracks and total duration are displayed next to the name.
Import crates:
Right-click on the Crates sidebar item
and select Import Crate. Select one or more playlists and click
OK. Mixxx creates an import of these existing external playlists
as new Mixxx crates.
Add Tracks: Add tracks to a previously created crate by
dragging-and-dropping a selection of tracks from the library or playlists onto
the name of a crate in the sidebar. Alternatively use the context menu in the
library’s track list.
Right-click on an existing crate’s name to access the different features in the
context menu:
Rename: To rename a crate, enter the new crate name and click
OK.
Duplicate: Just like playlists you can duplicate an existing crate.
Select the crate you would like to duplicate, choose
Duplicate Crate, name the new crate and click OK.
Remove: Removes an unlocked crate. Tracks in the crate are still available
in the library for later use.
Lock: This icon indicates a locked crate. If a crate is
locked, you cannot add tracks, rename or delete the crate. Choose
Unlock from the context menu to unlock the crate.
Auto DJ Track Source: Use this crate as a source for random tracks in
Auto DJ, see Auto DJ crates .
Analyze entire crate: Forces the analysis of the crate in the
Analyze view.
Import crate: Import tracks from external playlists in various file
formats to the selected crate.
Export crate: Export a crate to various file formats, such as
m3u, m3u8, pls, txt, or csv. This
allows you to use the data in other applications.
Export Track files: This copies all of the tracks in a crate into a folder
such as an external USB stick. Only files are copied, not Mixxx-specific
metadata like waveforms or cover art that is not embedded in the file.
Crates are unordered collections of tracks. Unlike playlists, they cannot
contain duplicate entries and do not support arranging tracks within them.
Often DJs group tracks by genre, keep lists of favorite tracks, and/or prepare
lists of tracks they want to play at a particular party. In these cases they
rarely care about the order since they will choose it at the party based on the
dance floor and mood. They certainly don’t want duplicates in these lists.
Crates serve these purposes. You can think of them like labels in GMail or Web
2.0 tags for your music.
If however you want to plan out a specific set and practice the transitions,
you will want an ordered list of tracks. Playlists serve this purpose.
4.10. Computer - Loading tracks from anywhere on your computer
This mode works like a file manager and allows you to load
tracks from anywhere on your computer and connected devices, that are not
necessarily already in your Mixxx library.
Click the Computer sidebar item to navigate the computer and find
your music. Depending on your operating system, your music will usually
be found in the “My Music” or “Music” folder. Drag the files you want to import
to the Tracks icon or directly to the
Waveform Displays.
Informacja
Currently you can only drag files (not folders) to the Mixxx library.
Right-click on a folder and choose Add to Library to add the folder
as an additional music directory. Mixxx will watch this directory and its
subdirectories for new tracks.
Using the Quick Links sub-menu you can bookmark folders for direct
access. Click the Computer sidebar item and navigate to the folder you
would like to bookmark. Right-click and choose Add to Quick Links.
The folder is now pinned below the Quick Links. To un-pin that
folder, right-click and choose Remove from Quick Links.
The history section automatically keeps a list of tracks you
play in your DJ sets. This is handy for remembering what worked in your DJ sets,
posting set-lists, or reporting your plays to licensing organizations. Every
time you start Mixxx, a new history section is created. If you don’t play any
tracks during the session, it will be discarded.
This icon indicates the current session.
Click on the History icon in the sidebar to switch to the History
view, then right-click on a session’s name/date to access the different features:
Add to Auto DJ: Adds the content of the session to the
Auto DJ queue for automatic mixing.
Rename: Rename a session. The default is the calendar date (YYYY-MM-DD).
Remove: Remove a previous (unlocked) session. (You cannot remove the
current session.)
Lock: Protect a previous session against accidental merge or deletion. An
icon indicates a locked session.
Create new history playlist: Split off the current history session and
add a new session without having to restart Mixxx. The current history must
contain at least one track for this option to be available.
Join with previous: Append the selected history session to the end of the
previous one.
Export playlist: Export a session in various file formats. This allows you
to use the data in other applications.
This section allows you to analyze your tracks in advance of loading them into
a deck. Analyzing tracks requires considerable CPU power and may cause skips in
the audio while performing, so it helps to have your tracks analyzed before you
play. See Analyze your library for details.
The external library views allow you to use music libraries you have created
in these third-party applications. You can access music as well as playlists. If
available, Mixxx automatically loads the external libraries from their default
locations on your hard drive.
Informacja
Playing a track from an external library will add it to your Mixxx
library.
Zobacz także
External libraries can be disabled under
Preferences ‣ Library.
Using the iTunes/Traktor/Rhythmbox/Bashee/Rekordbox library
Right-click on the iTunes icon in the Library tree and select
Choose Library to load the iTunesMusicLibrary.xml from a
different location. Select Use Default Library to reset.
Right-click on a iTunes/Traktor/Rhythmbox/Banshee playlist and choose
Import Playlist to import it into a new Mixxx playlist.
If you have an iTunes configuration file (*.xml) from a Windows or
Mac partition mounted in Linux, you can load it and use your iTunes tracks and
playlists as well.
To read Rekordbox databases for CDJ/XDJ players on USB or SD devices,
the database has to be exported to a USB or SD device with a FAT or HFS
file system using the Rekordbox Export mode.
Databases that have been moved to an external device via Preferences > Advanced > Database management in Rekordbox are not supported.
Plug your USB or SD drive in while Mixxx is running.
Click on the Rekordbox item in the library sidebar to scan for Rekordbox prepared USB drives. If no Rekordbox devices show up, you can click on Check for attached Rekordbox devices (refresh).
Click on the desired removable device. All your folders and playlists will be revealed for you to play from.
How Rekordbox hotcues, memory cues, and loops are imported
The following data is read:
Folders
Playlists
Beatgrids
Hot cues
Memory cues
Loops
Mixxx currently has one main cue point, one loop, and thirty eight hotcues. As such:
All Rekordbox hotcues are mapped to Mixxx hotcues as expected, the first chronological Rekordbox memory cue is mapped to the Mixxx main cue.
The first chronological Rekordbox loop is also mapped to the Mixxx loop.
All loops (including the first loop), and all subsequent Rekordbox memory cues are appended as Mixxx hotcues following the previously imported Rekordbox hotcues.
The hotcue and memory cue colors you assigned in Rekordbox are also imported, assisting in distinguishing between them.
Although additional imported Rekordbox loops only appear in Mixxx 2.3 as hotcues, their loop information is stored in the Mixxx library and will become usable in Mixxx 2.4.
Mixxx supports reading your Serato library and crates both from your local hard drive as well as portable USB drives. Smart crates are currently not supported.
Serato stores information such as hot cues, saved loops, track color and beatgrid in the file tags.
Regardless of whether a track is loaded into deck from the library or directly from the file browser, Mixxx will import that information automatically if present.
Waveforms, Gain values and „Flips” are not imported from Serato.
Informacja
Due to differences in the metadata format, importing Serato information from Ogg Vorbis files is currently not supported.
To import Serato libraries from external USB drives:
Copy music library from Serato into external USB drive
Plug in USB drive while Mixxx is running
Click on Serato in the library. All USB drives containing a Serato library will be detected automatically.
For each removable device, the library and all crates from Serato will accessible.
If you have already added a track containing Serato Metadata to your Mixxx library in a Mixxx version that didn’t support reading that data, you can reimport it from the file’s tags via the track context menu.
Ostrzeżenie
This action will clear your existing cuepoints in Mixxx if the file contains Serato Metadata
To reimport metadata from files:
Right click on the track to show the context menu
Select Metadata ‣ Import From File Tags.
Podpowiedź
Decoders may slightly detect different track start and end times for files from different sources, this could possibly be because of the presence of countless encoders and decoders for MP3 and M4A/AAC.
This problem may cause your cues to be shifted up by a few milliseconds.
Mixxx might not always be able to mitigate this problem, but it’s possible to shift all cues for a track at once as a workaround.
Removing tracks from the Mixxx library will not physically delete them from
your drive. However it does delete extra metadata Mixxx might have (such as
hotcues and the beatgrids), and removes links to playlists or crates.
Click the Library item in the sidebar.
Find and select the tracks you want to remove, perform a right-click on them
and select Hide from Library from the context menu.
Expand the Library item in the sidebar and click on the
Hidden tracks sub-item. All tracks that were set to be hidden
from the library will appear here.
Select the tracks you want to remove, or use the Select All
button.
To confirm you want to permanently remove these tracks from the library,
click Purge.
Podpowiedź
If you want to hide or purge only tracks from a specific folder you may use
the location:search operator, or
sort the table by „Location”.
Podpowiedź
If you later decide to add some of the deleted tracks back, import
them to the Mixxx library again, see Changing music directories.
Lossless formats preserve every detail of the original recording and are
recommended for the best sound quality. The FLAC format compresses the
files to take less space on your computer without sacrificing audio quality.
WAV and AIFF files are uncompressed and take up much more space.
Lossy formats take up less storage space on your computer than lossless
formats at the expense of reducing sound quality. Assuming an average track
length of about 4 minutes, a 1 TB hard drive or solid state drive can store
about 42000 FLAC files or about 115000 MP3 files at 320 kbps.
There is no benefit to converting lossy file to lossless formats. The detail
lost when making the lossy file cannot be recovered.
AAC(M4A) is supported on Windows Vista and macOS 10.8 onwards. The
Platform Update Supplement
is required for Windows Vista.
DRM protected files, such as m4p files purchased in the
iTunes Store in 2009 or earlier, are not supported.
Ostrzeżenie
ALAC files use the same container MP4 container format
and file extensions (m4a, mp4) as AAC files, but Mixxx cannot
play ALAC files. It is recommended to convert ALAC files to FLAC
for use in Mixxx. This will not reduce the sound quality of the
files.
Mixxx can not play music directly from audio CDs. Use a CD ripping program to
copy the audio from the CD to files on your computer. It is recommended to
save the ripped files in the FLAC format. Many different programs are
available to rip CDs, but not every program is capable of saving them to
FLAC.
 A sortable list of all the tracks in your music library.
 icon in the Preview column.
Go to the chapter Previewing Tracks for detailed information.
icon in the Preview column.
Go to the chapter Previewing Tracks for detailed information. icon next to the track’s BPM in the library row is a toggle. Clicking it
will set the status to „locked”, and the icon changes to
icon next to the track’s BPM in the library row is a toggle. Clicking it
will set the status to „locked”, and the icon changes to
 .
. icon to stop the playback.
 The Auto DJ queue is a special playlist that contains extra
controls for automatic mixing. This is useful when taking a break from live
mixing or for using Mixxx as media player.
The Auto DJ queue is a special playlist that contains extra
controls for automatic mixing. This is useful when taking a break from live
mixing or for using Mixxx as media player. Playlists are ordered lists of tracks that allow you to plan
your DJ sets. Some DJs construct playlists before they perform live; others
prefer to build them on-the-fly.
Playlists are ordered lists of tracks that allow you to plan
your DJ sets. Some DJs construct playlists before they perform live; others
prefer to build them on-the-fly. This icon indicates a locked playlist. If a playlist
is locked, you cannot add tracks, rename or delete the playlist. Choose
Unlock from the context menu to unlock the playlist.
This icon indicates a locked playlist. If a playlist
is locked, you cannot add tracks, rename or delete the playlist. Choose
Unlock from the context menu to unlock the playlist. Crates are unordered collections of tracks, just like DJ cases
holding your favorite records.
Crates are unordered collections of tracks, just like DJ cases
holding your favorite records. This mode works like a file manager and allows you to load
tracks from anywhere on your computer and connected devices, that are not
necessarily already in your Mixxx library.
This mode works like a file manager and allows you to load
tracks from anywhere on your computer and connected devices, that are not
necessarily already in your Mixxx library. In this section of the library you can start and stop
recording your session as well as view previous recordings and the dates they
were made.
In this section of the library you can start and stop
recording your session as well as view previous recordings and the dates they
were made. The history section automatically keeps a list of tracks you
play in your DJ sets. This is handy for remembering what worked in your DJ sets,
posting set-lists, or reporting your plays to licensing organizations. Every
time you start Mixxx, a new history section is created. If you don’t play any
tracks during the session, it will be discarded.
The history section automatically keeps a list of tracks you
play in your DJ sets. This is handy for remembering what worked in your DJ sets,
posting set-lists, or reporting your plays to licensing organizations. Every
time you start Mixxx, a new history section is created. If you don’t play any
tracks during the session, it will be discarded. This icon indicates the current session.
 This section allows you to analyze your tracks in advance of loading them into
a deck. Analyzing tracks requires considerable CPU power and may cause skips in
the audio while performing, so it helps to have your tracks analyzed before you
play. See Analyze your library for details.
This section allows you to analyze your tracks in advance of loading them into
a deck. Analyzing tracks requires considerable CPU power and may cause skips in
the audio while performing, so it helps to have your tracks analyzed before you
play. See Analyze your library for details. iTunes (Windows, macOS)
 Traktor (Windows, macOS)
 Rhythmbox (GNU/Linux)
 Banshee (Windows, macOS, GNU/Linux)
 Serato (Windows, macOS)
 Rekordbox (Windows, macOS)