8. Vinyl Control / DVS
Digital Vinyl Control functionality allows users to control the playback speed of a track in Mixxx using traditional turntables or DJ controllers that play back recorded media. This allows DJs to retain the tactile feel of turntable DJing while leveraging the benefits of digital audio features.
Such a Digital Vinyl System (DVS) can consist of:
Traditional turntables with control vinyls, where the time position is encoded in the groove
CD-based DJ players with timecode signal stored on CDs (e.g., Pioneer DJ CDJ-1000)
USB-based DJ players with timecode signal stored on USB sticks (e.g., Pioneer DJ CDJ-3000)
DJ devices with internally-generated timecode signal (e.g., RANE TWELVE MKII or Phase)
8.1. How does it work?
Vinyl control uses special timecode records or CD’s which are placed on real turntables or CDJ. The audio output of the turntables is plugged into a audio interface connected to a computer on which Mixxx is running. When a record is played on one of the attached turntables, Mixxx reads the timecode from the record and uses the information to manipulate whatever track is loaded.
8.2. What do I need to use it?
It is possible to use Mixxx’s vinyl control with a variety of setups. Unlike some proprietary DJ software, Mixxx can use several types of timecode media and any audio interface that your operating system has drivers to use. Optionally, any MIDI/HID controller can be used together with timecode control. The basic setups for timecode control are:
Setup 1: Vinyl DJ
2-4 timecode vinyls, 2-4 turntables with phono pre-amplifiers (or line-level output), and 2-4 stereo sound inputs.
Your audio interface inputs must match the turntable outputs. Turntables output very quiet phono-level outputs that must be amplified for Mixxx to use. You should either find a audio interface that has phono pre-amplifiers built in (one for each deck), use standalone phono pre-amplifiers, or use turntables with built in phono pre-amplifiers.
You can try skipping the phono pre-amps if you use the software pre-amp in Mixxx on the Vinyl Control preferences pane. This may not work for everyone. Line-level signals are preferred and recommended.
For turntables a typical setup is depicted in the figure below. First, connect the RCA cables from the turntables to the inputs on your audio interface. Second, connect the outputs of your audio interface to the inputs on your mixer.
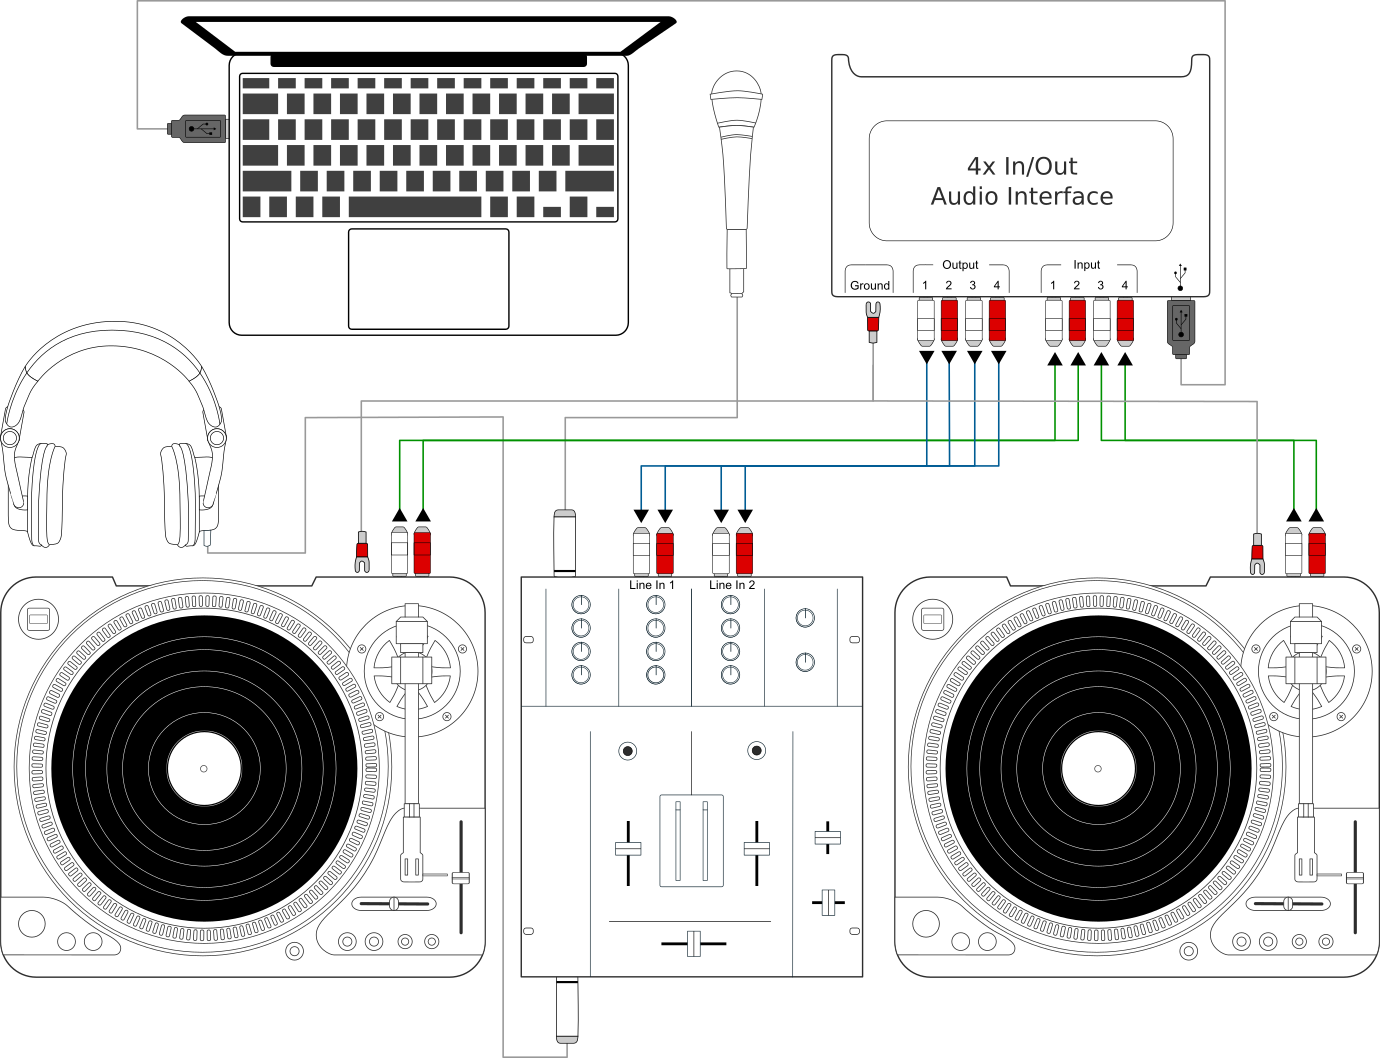
Using Mixxx together with turntables and external mixer
Nota
Many modern turntables have a Line/Phono select switch. If yours does, make sure it matches the input or switch setting on your sound card.
Setup 2: CDJ
2-4 timecode CDs, 2-4 CD decks, and 2-4 stereo sound inputs.
Setting up CDJs for use with timecode CDs is similar to setting up turntables. The figure below outlines a typical configuration. First, connect the RCA cables of the CDJs to inputs of your audio interface. Second, connect the inputs of your mixer to the outputs of your audio interface. Make sure the input mode of your audio interface is set to Line.

Using Mixxx together with CDJs and external mixer
Sound inputs
It is recommended to use a DJ audio interface that has multiple stereo line inputs on it.
Alternatively you can use multiple audio interfaces, each with a single stereo line in, but this is strongly discouraged.
Mixxx supports vinyl control input through a single audio interface with at least 4-channels of input (two stereo line-in jacks), or through multiple separate audio interfaces which each have 2-channels of input (a single stereo line-in jack). Vinyl control requires the use of stereo line-in jacks - Mono or microphone inputs will not work.
It is strongly recommended to use a audio interface that comes with native low latency drivers such as ASIO (Windows) or CoreAudio (Mac). Linux users depend on the quality of the corresponding open source driver.
Nota
For best scratch performance with vinyl control, we recommend using a system capable of latencies of 10ms. With higher latencies the scratch sound will start to become distorted.
Nota
An external hardware mixer is not required for using timecode control. You can use a MIDI or HID controller to mix in software instead.
Supported Timecode media
You can use any of the timecode media supported by Mixxx:
Tipo |
Responsiveness / Signal Quality |
Sizes |
Media availability |
|---|---|---|---|
Serato CV02/2.5 Vinyl |
Very high / Strong Signal |
7», 10» and 12» vinyls |
All Serato Control Vinyls produced since 2012 are of this type |
Serato Control CD 1.0 |
Very high |
CD, file to download |
Available |
Traktor Scratch MK1 |
Limitations at high spinning velocities |
12» vinyls, CD |
Legacy, produced from 2006 to 2011 |
Traktor Scratch MK2 |
Not supported yet (planned for Mixxx 2.7) |
12» vinyls, CD |
Available since October 2011 |
MixVibes DVS V2 Vinyl |
Very high |
7» and 12» vinyls |
Legacy, no longer available |
Pioneer RekordBox DVS |
Unknown |
12» vinyls |
Available |
At the present time, Serato records are recommended if you are looking to buy vinyl. If you want to use CDs, you can download a free copy for personal use from Serato.
8.3. Configuring Input and Output devices
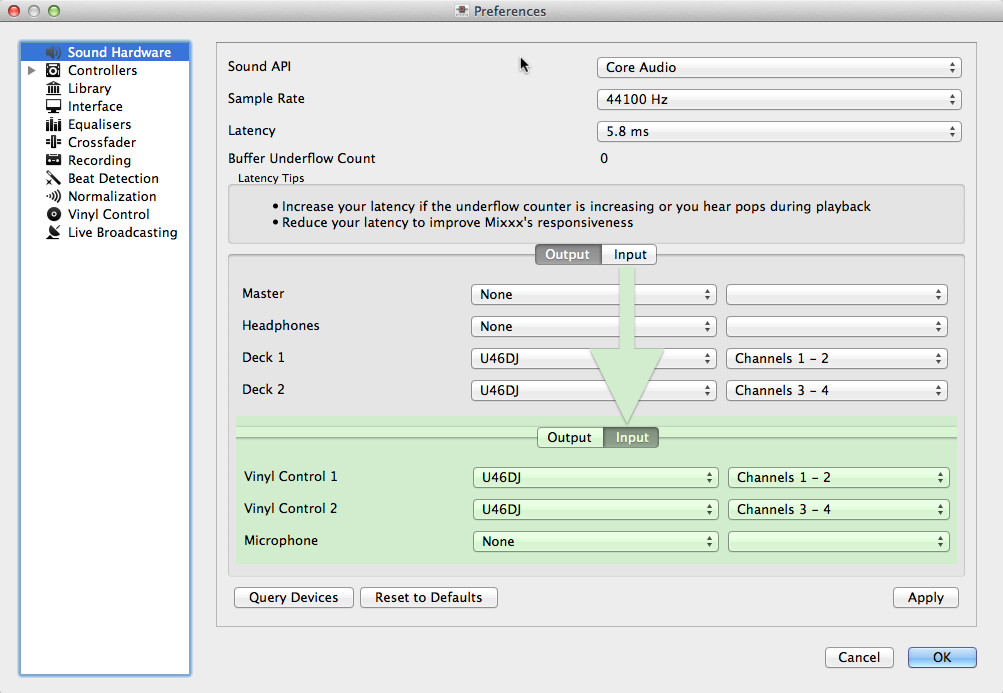
Mixxx preferences - Setting up Input and Output devices for Vinyl Control
Mixxx can be controlled by up to 4 decks with either timecoded vinyl or timecoded CDs.
Open
Select the Input tab
From the Vinyl Control 1 - Vinyl Control 4 drop-down menus, select the audio interface(s) which your decks are plugged into.
In the channel selection drop-down menu, select the channel pairs corresponding to the plug on your audio interface that your deck(s) are plugged into, typically Channels 1-2 and Channels 3-4 etc.
Click Apply to save the changes.
Select the Output tab
Specify Deck 1 - Deck 4 to route Mixxx’s output directly to the external mixer
Click Apply to save the changes.
8.4. Configuring Vinyl Control
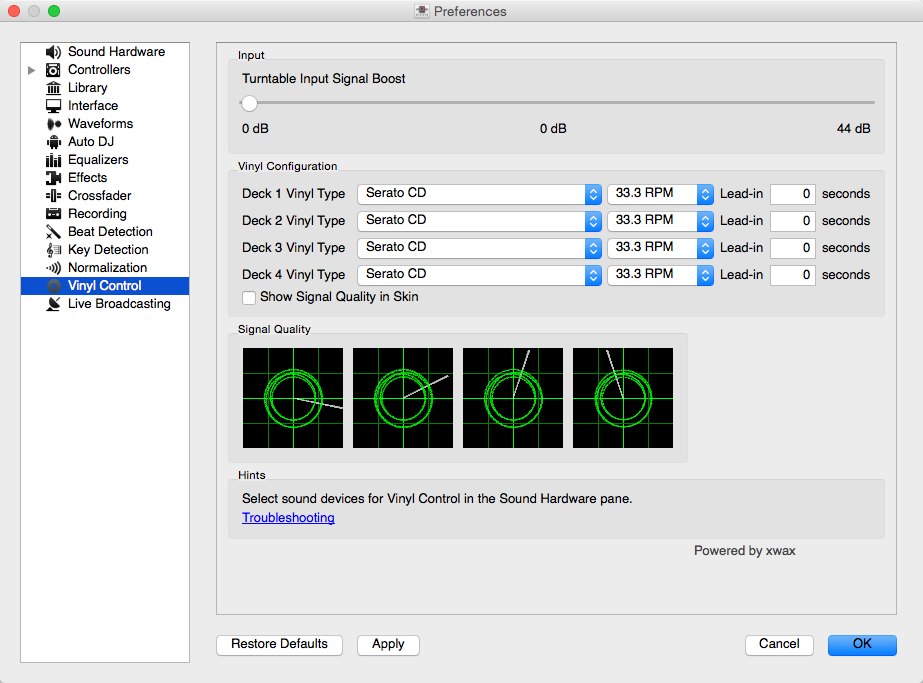
Mixxx preferences - Setting up vinyl control
You can configure vinyl control in .
Amplificación de señal de entrada de Vinilo
Many turntables provide unamplified “phono level” output which must be boosted to a “line level” signal. Normally, a mixer or audio interface provides this amplification, but if you’re plugging a turntable’s phono output directly into a audio interface that doesn’t support phono input, Mixxx can do the amplification. The Turntable Input Signal Boost slider allows you to adjust the level of preamplification applied to your decks” signal. However, it is always preferable to use a proper phono preamplifier if you have one.
Configuración de Vinilo
Vinyl Type: Several types of timecoded media can be used to control Mixxx. Configure the drop-down menus to match what type of timecoded media you are using on your decks.
Deck Vinyl Tempo: Change this if you prefer to scratch with your turntable or CDJ set at 45 RPM, default is 33 RPM.
Lead-in Time: Allows you to set a dead-zone at the start of your vinyl or CD, where the time code will be ignored. This is useful in situations where the time code begins very close to the edge of a vinyl which can make back-cueing over the first beat in a track tricky to do without your turntable’s needle falling off the vinyl. Setting a lead-in time of 20 seconds or more helps alleviate this by giving you more room on the vinyl to cue with. It’s also useful when you’ve worn the grooves at the edge of a control record to the point that it no longer works reliably: you simply set the lead-in so that the start of the tracks begin in good groove area. You can keep doing this until you run out of groove area, thereby decreasing your record replacement frequency.
Show Signal Quality in Skins: If enabled, a circular representation of the incoming timecode signal is displayed in real-time on the Vinyl Widget in the Mixxx Interface.
Consejo
Although not recommended, you can use different kinds of timecode media per deck.
Modo de Control
Mixxx has three control modes regardless of which control records you use.
Absolute Mode: Provides Mixxx with both pitch and position information from the timecode, and allows you to seek by needle dropping on your vinyl or seeking on your CDJ.
Relative Mode: Takes the position to be relative to your deck’s starting point, and only controls the pitch in Mixxx. It is not possible to seek using your deck in relative mode, with one exception. If you drop the needle in the Lead-in Time area (see Vinyl Configuration), Mixxx will seek back to the beginning of the track. Once a track is playing in Relative Mode, Mixxx will not allow you to select Absolute mode. Otherwise, the track would suddenly jump to a new position. Make sure the record is stopped and then you’re free to select Absolute mode.
Constant Mode: This special mode is usually only activated when Mixxx needs to keep playing a track even if the vinyl control signal isn’t present. Constant mode is automatically enabled when the needle reaches the end of a vinyl control record.
Cueing Modes
Mixxx has two optional cueing modes for vinyl control which only apply to Relative Mode. These modes are useful for quickly seeking to specific positions in a track without touching the laptop. Turntablists often need to find a break or a vocal sample, and cueing modes make these easy to find.
Cue: In this mode, when you drop the needle on the record after the Cue point, Mixxx will seek to that cue point.
Hot Cue: When the needle is dropped Mixxx will seek to the nearest hotcue point, working backwards. So if you have a hotcue at the one-minute mark, and another at the two-minute mark, you can drop the needle anywhere between one and two minutes and Mixxx will seek to the one-minute hotcue.
Consejo
You can change the Control and Cueing Modes directly in the Mixxx user interface while mixing, go to Vinyl Control Mode and Cueing controls. Alternatively, use the Application shortcuts.
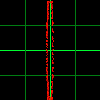
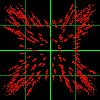
Calidad de Señal
A successful vinyl control setup hinges on good signal quality. Many factors can affect signal quality, but the most important one is ensuring the volume level of your timecode signal is moderate. A signal that is too loud or too quiet will cause adverse performance, often characterized by a loss of position data causing absolute mode to behave like relative mode.
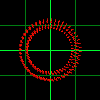
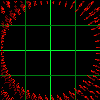
Mixxx represents the quality of the timecode signal as a circular graphic coming from the vinyl control audio itself. The graphs correspond to your active input devices Deck 1 - Deck 4 .
If your vinyl signal is working, you should see a round, green circle drawn with two lines. This vinyl “doughnut” should be as circular as possible, and the lines should be clear with a minimum amount of fuzz.
Consejo
You can display the signal quality in the Mixxx user interface while mixing, see Configuring Input and Output devices .
8.5. Enabling Vinyl Control
For each deck, select , or use the Application shortcuts.
Vinyl Control Status Display
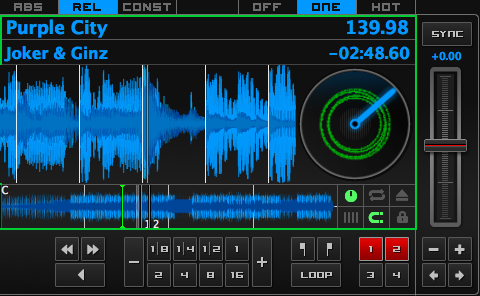
The vinyl control status, and signal quality display of the deck
A rectangle provides visual feedback with regards to vinyl control status of a deck.
Off: Vinyl control disabled on the deck.
Green: Vinyl control is enabled on the deck.
Yellow: The needle has reached End-Of-Record.
8.6. Single Deck Control
If you only have one turntable, you can still use Mixxx to play your sets. In the tab, use the same audio input for both Vinyl Control decks.
When mixing, you’ll have one track playing automatically while the other is controlled by the turntable. Start by enabling vinyl control on the first deck, and start mixing. When you’re ready to cue up the next record, just disable vinyl control on the first deck and enable it on the second deck. Playback will continue on the first deck without interruption. Cue up the second track and mix it in. When you’re ready to cue the first deck again, just toggle the second deck off and the first deck on again.
Use the Application shortcuts to swap focus from one deck to the other. Alternatively, select in the Asistente para la configuración de la controladora, to assign the control to a key on your controller.
8.7. End-Of-Record Mode
Sometimes the track you are playing is longer than the timecode area on your record. If the needle reaches the end of the vinyl timecode, Mixxx will enter a special End-Of-Record Mode. When this happens, the vinyl indicator (usually a green rectangle) will blink yellow as a warning. At the same time, Mixxx will automatically enable Constant Mode and will ignore the turntable’s pitch. At this point the track will simply continue playing until the end. When you load a new track, End-Of-Record Mode will be automatically disabled and Constant Mode turned off.
When you’re in End-Of-Record Mode and you want to still use the turntable for pitch control, simply lift the needle and place it anywhere in the main timecode area. It’s OK, the track won’t stop playing. As soon as Mixxx detects that the needle has settled, it will automatically switch to Relative Mode.
8.8. Control Track
Some vinyl control records have a special portion of grooves near the center of the record for selecting and loading tracks in the user interface. You can see these grooves because there is a gap between the main timecode area and the inner circle. Some control records have not been tested with Mixxx, and their control areas are not supported. Serato CV02 Vinyl and Traktor Vinyl MK1 are known to work. Serato CV02 CDs are known not to work.
Just drop the needle in the control area and let the record play forward or backward. The highlighted row in the library should move up or down. Simply lift the needle and drop it anywhere in the main timecode area to load the track.
8.9. Solución de problemas
Configuration
To complete your setup you must configure Mixxx properly. Make sure you have:
specified Deck 1 - Deck 4 in to route Mixxx’s output directly to the external mixer
specified Vinyl Control 1 - Vinyl Control 4 under
selected the correct control type under in the preferences. See the list of Supported Timecode media
enabled vinyl control via the menu under .
Signal Quality
The graph is displayed in , see Calidad de Señal.
Signal |
Meaning |
Solución de problemas |
|---|---|---|
|
Vinyl control input channels not correctly set up. Vinyl control will not work. |
Open Preferences/ Sound Hardware and set up the devices you want to use, see Configuring Input and Output devices |
|
Vinyl control input channels set up correctly. Waiting for timecode input signal. |
Start your turntable or CDJ with the selected timecode vinyl or CD. |
|
Nearly perfect green doughnut about half the width of the graph. Rotating radar sweeps in the direction your record on the turntable is spinning. |
Everything is OK, nothing to do. Go spin some beats. |
|
Incorrect choice of vinyl control source. Doughnut looks good but has a solid red color. |
Select the correct vinyl type in the preferences. E.g. maybe you selected side B of the Serato Vinyl but your record is on side A. |
|
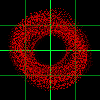
Input signal is bad. As the vinyl signal gets worse, you’ll see the color of the doughnut change from green over orange to red. |
Check the wiring / grounding on your turntable / CDJ. You timecode record / CD might be worn out or the needle on your turntable is dirty. |
|
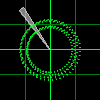
Wrong direction. The green doughnut looks good but the radar sweeps in the opposite direction of the record on your turntable / CDJ. |
You probably have a wiring problem. Try reversing the left and right inputs on your turntable. You may also have to rewire the headshell. |
|
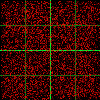
Input signal is no timecode signal. Mixxx receives a normal audio signal while it expects a timecode signal. |
Start your turntable or CDJ with the selected timecode vinyl or CD. You may want to check if the inputs devices are set up correctly in the preferences. |
|
Left or right channel is missing. Mixxx receives only a mono signal but needs a stereo timecode signal to operate. |
Check the wiring on your turntable / CDJ and also the headshell and needle on your turntable. |
|
Timecode signal too loud. Mixxx receives a signal which has too much amplification. |
Lower the amplification, either on your external mixer, audio interface, or with the Turntable Input Signal Boost. |
|
Timecode signal too quiet. Mixxx receives a signal which has not enough amplification. |
Boost the amplification, either on your external Mixer, audio interface, or with the Turntable Input Signal Boost. |