14. Tópicos Avançados
14.1. Adicionando suporte para o seu Controlador MIDI/HID
With several dozens of DJ controllers supported out-of-the-box, Mixxx gives you comprehensive hardware control for your DJ mixes, see Usando Controladores MIDI/HID.
Support for additional devices can be added to Mixxx by creating a new mapping file. This file tells Mixxx how to translate, or map, MIDI/HID messages from a controller into commands that Mixxx understands.
You can download and share custom controller mappings in the Mixxx User Controller Mapping forums.
For a list of controls that can be used in a controller mapping, see Mixxx Controls.
Assistente de Controlador
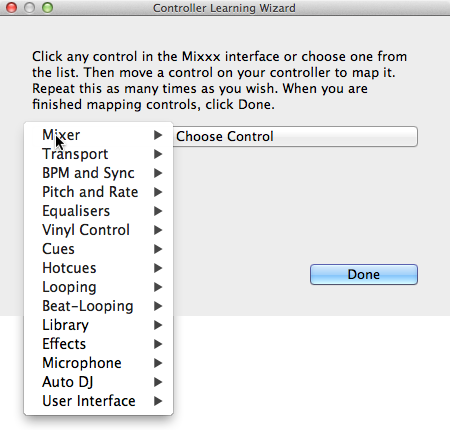
Assistente de Controlador do Mixxx - Mapeando um controle
By far, the easiest way to create a new MIDI mapping is by using the Controller Wizard.
Conecte o(s) seu(s) controlador(es) no seu computador
Inicie o Mixxx
Vá para
Selecione o seu dispositivo da lista de dispositivos disponíveis na esquerda, e o painel da direita vai mudar
Ative a caixa de seleção Ativado
Clique em Assistente de Aprendizado para abrir o diálogo de seleção
Clique em qualquer controle do GUI do Mixxx
Alternativamente, clique no botão Escolher Controle e escolha um de uma lista de seleção
Aperte Aprender e mova um controle ou aperte um botão no seu controlador para mapeá-lo. Você também pode mover um controle sem apertar o botão Aprender se você estiver aprendendo vários controles.
Se você estiver aprendendo um botão, aperte apenas uma vez. Se você está aprendendo um botão giratório ou um deslizante, tente movê-lo por todo a sua extensão.
After Mixxx detects the control, you may click Learn Another or you can click on another button in the Mixxx GUI to learn another control.
Quando você estiver terminado de mapear controles, clique Concluído
Há algumas opções avançadas no Assistente Midi que você pode precisar usar:
Soft Takeover: Use this option for knobs or sliders to avoid sudden jumps in when the knob in the GUI doesn’t match the physical knob. If you select this option, you won’t be able to perform super-fast motions as easily. (Recommended off)
Invert: Use this option for controls that you want to work backwards from how they were detected.
Modo Chave: Use esta opção em controladores que tem diferentes controles que agem como chaves e emitem um valor na primeira vez que são apertados, e um valor diferente na próxima vez. (Pense como um interruptor físico, ou um botão que acende quando você aperta e depois desliga na segunda vez).
Jog Wheel / Botão de Seleção: Use isso para potenciômetros que não tem um começo ou fim, mas giram continuamente.
The Controller wizard saves the new mapping to the controllers directory in
the user settings directory, see The Mixxx Settings Directory.
You can then modify the XML file it creates (or any of the ones that ship with Mixxx) if you’d like to fine-tune it or add more mappings. For more information, go to https://github.com/mixxxdj/mixxx/wiki/MIDI-Controller-Mapping-File-Format.
O Assistente de Controlador funciona apenas para dispositivos MIDI. Atualmente você não pode mapear teclas modificadoras (shift) e rotações de prato. Ao invés disso use ref:Scripting MIDI <advanced-controller-midiscript>.
Scripting MIDI
Para suportar as funcionalidades mais avançadas de vários controladores MIDI/HID, o Mixxx oferece o que chamamos de Scripting MIDI.
It enables MIDI controls to be mapped to QtScript (aka Javascript/EMCAScript) functions stored in function library files, freeing Mixxx from a one-to-one MIDI mapping ideology. These user-created functions can then do anything desired with the MIDI event such as have a single controller button simultaneously affect two or more Mixxx properties (“controls”), adjust incoming control values to work better with Mixxx (scratching), display a complex LED sequence, or even send messages to text displays on the controller.
For more information, go to https://github.com/mixxxdj/mixxx/wiki/Midi-Scripting and https://github.com/mixxxdj/mixxx/wiki/Hid-Mapping , as well as the Components-JS library which greatly simplifies mapping, for example effect units and complex behaviour like switching deck layers or pad grid modes. Note that this is the preferred way of mapping if intended your mapping to be included in Mixxx since Components-JS significantly reduces effort for both mapping and reviewing Pull Requests.
14.2. Fazendo um Mapeamento Personalizado de Teclado
Os mapeamentos padrões mappings são definidos em um arquivo de texto que pode ser encontrado no seguinte caminho:
Linux:
/usr/local/share/mixxx/keyboard/en_US.kbd.cfgmacOS:
/Applications/Mixxx.app/Contents/Resources/keyboard/en_US.kbd.cfgWindows:
<diretório de instalação do Mixx>\keyboard\en_US.kbd.cfg
Depending on your system’s language settings, Mixxx might use a different
file as default, e.g. de_DE.kbd.cfg for German or es_ES.kbd.cfg
for Spanish.
It is not recommended that you modify the system-wide keyboard mapping file because all your changes may be lost if you uninstall or upgrade Mixxx. Instead, copy the default mapping file to the following location:
Linux:
~/.mixxx/Custom.kbd.cfgmacOS:
~/Library/Containers/org.mixxx.mixxx/Data/Library/Application Support/Mixxx/Custom.kbd.cfgWindows:
%LOCALAPPDATA%\Mixxx\Custom.kbd.cfg
Then edit this file and save the changes. On the next startup, Mixxx will check
if Custom.kbd.cfg is present and load that file instead of the default
mapping file. This has the advantage that you can always revert back to the
default mapping by deleting Custom.kbd.cfg.
Note that the situation is a bit different with the menubar shortcuts in the [KeyboardShortcuts] section. If you want to use any of these default menubar shortcuts for something else, it is not sufficient to remove the respective line from the mapping file. The menubar will use the hard-coded defaults if doesn’t find an entry in the mapping file. Hence, to use any of the menubar shortcuts, you need to supply another key to be picked up by the menubar. This may be an unused key, or if you don’t need the menubar shortcut at all, a key that’s not present on your keyboard and can also not be composed by accident, for example Cyrillic characters on a french keyboard.
For a list of controls that can be used in a keyboard mapping, see Mixxx Controls.
You can download and share custom keyboard mappings in the Mixxx User Keyboard Mapping forums.
14.3. Efeitos Adicionais via Modo de Mixer Externo
Mixxx comes with a set of native effects. Additionally, using the external mixer mode you can route each deck directly to 3rd party effect hosts.
The following examples are only intended to encourage experimentation, they are not definitive guidance.
Effects via AU Lab on macOS

The Au Lab routing for external effects on macOS
On macOS there is a simple and free way to give Mixxx access to the collection of AU/VST/MAS plugins that are installed on your system.
Install the free SoundflowerBed, a system extension for inter-application audio routing.
Install the free digital audio mixing application AU Lab.
Dica
macOS 10.15 (Catalina) introduces additional restrictions on running non-Apple software. Make sure to grant permission in System Preferences –> Security & Privacy –> Microphone –> AU Lab.
Alternatively, try Blackhole, a modern virtual audio driver that allows applications to pass audio to other applications with zero additional latency, and Hosting AU, a free micro-sized DAW that hosts Audio Unit instruments and effect plugins.
No Mixxx
Vá em
Selecione para o Deck 1 o dispositivo Soundflower 16 com Canal 1-2
Selecione para o Deck 2 o dispositivo Soundflower 16 com Canal 3-4
Clique no botão Aplicar
No AU Lab
Clique no botão + para criar uma nova configuração
Add 2 stereo input tracks in the Audio Input Tab
Adicione 2 saídas estéreo na Guia de Saída de Áudio
Clique OK
Mude o dispositivo de entrada de áudio para Soundflower 16
Mude o dispositivo de saída de áudio para, por exemplo Entrada Embutida
Clique em Criar documento
In the Output 1 channel, select an effect from the drop-down menu, for example
O efeito agora deve reagir se você tocar uma faixa no Mixxx.
Efeitos via JACK Rack no GNU/Linux
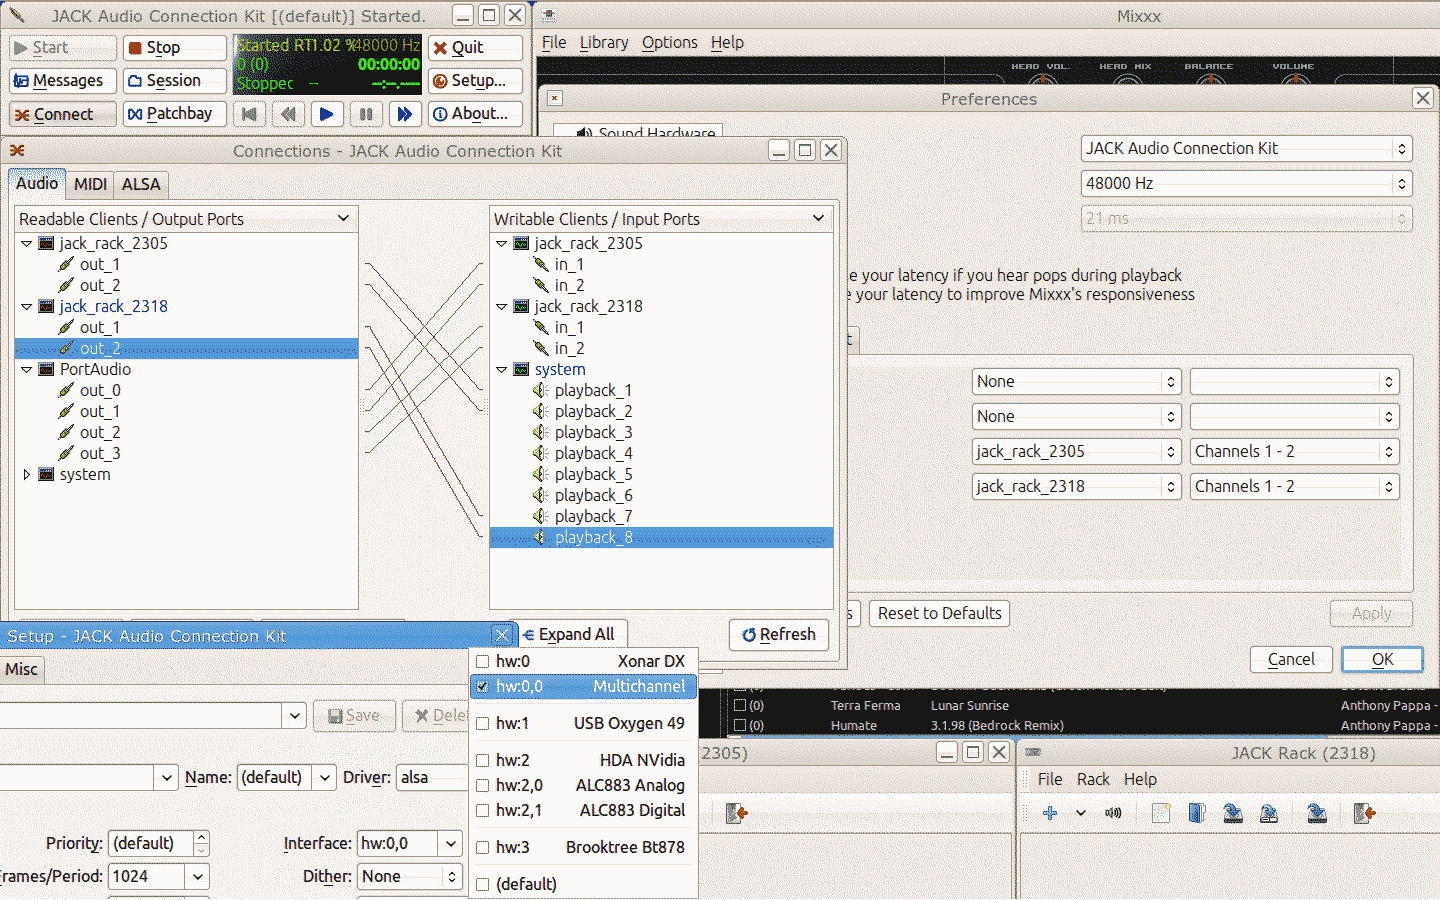
O roteamento Jack para efeitos externos no GNU/Linux
Use Jack to route each deck directly through JACK Rack effect racks, or for more control you can use Ardour (or another DAW) using sends for effects. This gives Mixxx access to the extensive collection of LADSPA plugins.
Make sure the correct multichannel audio interface has been selected in Jack (Jack settings visible bottom left). Note that Mixxx possibly labels its Jack ports as Portaudio.
14.4. Migrate your Mixxx library and settings to a new computer
If you move to a new computer, or to another operating system on the same computer, you can take your existing Mixxx setup with you. This includes your track library, settings, controller mappings and broadcast profiles.
You don’t necessarily need to be able to run your previous Mixxx installation, all you need is your settings directory and the music directories you imported into your Mixxx library via .
Preparation
If you still have access to your Mixxx installation open Mixxx, go to and uncheck Rescan on startup. If you are not able to start Mixxx anymore, e.g. if you only managed to recover your settings directory, you can do this manually in the settings file: open
mixxx.cfgwith a text editor, delete the line withRescanOnStartupand save the file.Make a copy of both the Mixxx settings directory and your music directories. Put all in a save place. Do not restructure your music directories!
Install your new operating system, get your new PC ready.
Get the current stable Mixxx version from the official download page.
Install Mixxx, though don’t run it, yet!
Migration
Copy your Mixxx settings directory to the appropriate location, see The Mixxx Settings Directory. In case you already started Mixxx previously, make sure to rename or delete your existing settings directory in order to avoid any file conflicts.
Copy your music directories to the new computer.
Start Mixxx.
If you’ve put the settings directory in the correct location Mixxx should not ask you for your music directories and all your settings should be as before.
Go to and Relink each of your music directories as described in Changing music directories.
Now, all your music files should be available, all your playlists, crates and your session histories be restored. A library rescan is not required. Configure a sound output and test if you can play all tracks as before. Note that this will obviously not include your external libraries (iTunes, Traktor etc.), you need to configure those again.
Known issues
If you migrated to another operating system, operating system version or another Mixxx version, the used audio decoders may have changed which may cause beatgrids and cue points to appear shifted, i.e. they are set off from the desired points in the audio stream. Unfortunately, there is no automatic fix available, yet. As of now you need to shift cues for each track individually with the cue shift buttons in the beatgrid editing controls section, see Mostradores de Onda.
14.5. Migrate your Mixxx library and settings to Flatpak
Since version 2.5 Mixxx is also provided as Flatpak.
If you do want to switch from a distribution package or Mixxx built from source code to the Flatpak, a little setup is required. Flatpak stores Mixxx’s database, settings, and custom controller mappings in a different location than the ~/.mixxx directory that Mixxx has always used before. Flatpak uses ~/.var/app/org.mixxx.Mixxx/.mixxx instead. To copy your database, settings, and controller mappings into the Flatpak sandbox, run:
mkdir -p ~/.var/app/org.mixxx.Mixxx
cp -r ~/.mixxx ~/.var/app/org.mixxx.Mixxx
If your library contains any directories outside of your XDG Music Directory (~/Music unless you have reconfigured this), you will need to relink these directories to access the files inside of Flatpak’s sandbox. Run Mixxx from the Flatpak and go to . Any directories that have a warning icon with ! in a yellow triangle need to be relinked. Select the directory in the preferences window and click the Relink button, then select the directory in the file picker dialog. Flatpak will automatically remap the directory under /run/user so Mixxx can read and write your music files from inside the Flatpak sandbox. Press Ok in the preferences window, then in Mixxx’s main window, go to .