6. Example Setups
This chapter presents some example hardware setups with instructions for how to configure Mixxx to work with them.
Ver também
DJ Hardware: background information about different types of equipment.
Configuring sound input and output: details about each available input and output option.
Using Microphones: details for configuring Mixxx to work with microphones.
DJ Hardware Guide lists specific devices with information about their prices, features, and compatibility with Mixxx.
6.1. Computer Only
The built-in audio interface on most computers comes with a single stereo line-out and a microphone input. This can be set up with Mixxx in two ways:
Practicing Mixing / Broadcasting
This setup can be used with a single audio output for speakers or headphones to practice DJing without investing in any equipment other than a computer and a set of speakers or headphones. With this configuration, use the Pre/Main Knob to switch back and forth between the main mix and PFL signal. This setup cannot be used to play for a live audience because the main mix is not sent to an audio interface output. However, it can be used by radio DJs who only need to send the main mix to a broadcast audience.
Abra
Selecione a aba Saída
From the Headphones drop-down menu, select your built-in audio interface, then Channels 1-2. Although this is labeled Headphones, you can also plug speakers into the output jack of your computer.
Depending on your audio interface, you can specify a microphone
Use o seu microfone embutido ou conecte um microfone no seu computador
Verifique se o microfone foi detectado pelo seu SO
Abra a aba Entrada
Do menu drop-down Microfone, selecione a entrada que o seu microfone está conectad
Clique em Aplicar para salvar as mudanças.
Playing for an Audience
This setup allows for playing to an audience without headphone cueing.
Usando o Mixxx apenas com a placa de som embutida.
Abra
Selecione a aba Saída
From the Main drop-down menu, select your built-in audio interface, then Channels 1-2
Depending on your audio interface, you can specify a microphone
Use o seu microfone embutido ou conecte um microfone no seu computador
Verifique se o microfone foi detectado pelo seu SO
Abra a aba Entrada
Do menu drop-down Microfone, selecione a entrada que o seu microfone está conectad
Clique em Aplicar para salvar as mudanças.
6.2. Laptop e Cabo Divisor
The cheapest way to DJ and cue with headphones uses a stereo-to-mono DJ splitter cable (also known as a “Y cable”) plugged into the headphone jack of a laptop or other computer. This cable divides the stereo output from a single jack into two separate mono signals.
This setup allows you to start DJing without having to invest in expensive equipment. However, because the signals are in mono, you and your audience will not be able to enjoy music producers’ positioning of sound in space (although many club PA systems are wired in mono anyway). Furthermore, audio interfaces built into computers are usually low quality and often pick up interference from other components of the computer.
Using a built-in audio interface and a stereo-to-mono splitter
Abra
Selecione a aba Saída
Verifique os fones de ouvido estejam plugados no lado do cabo com o símbolo dos fones e que os auto-falantes estejam plagados no lado do cabo com um símbolo de auto-falante.
From the Main drop-down menu, select your built-in audio interface, then Channel 1
From the Headphones drop-down menu, select your built-in audio interface, then Channel 2
Clique em Aplicar para salvar as mudanças.
Aviso
Most splitter cables, particularly those marketed as headphone splitter cables, output the same stereo signal to two headphone jacks and will not work for this DJ setup. Also, if you use a generic stereo-to-mono splitter adapter, you may only be able to hear out of one side of your speakers and headphones. DJ splitter cables allow you to hear the same mono signal on both sides of your headphones and speakers.
6.3. Laptop and External USB Audio Interface
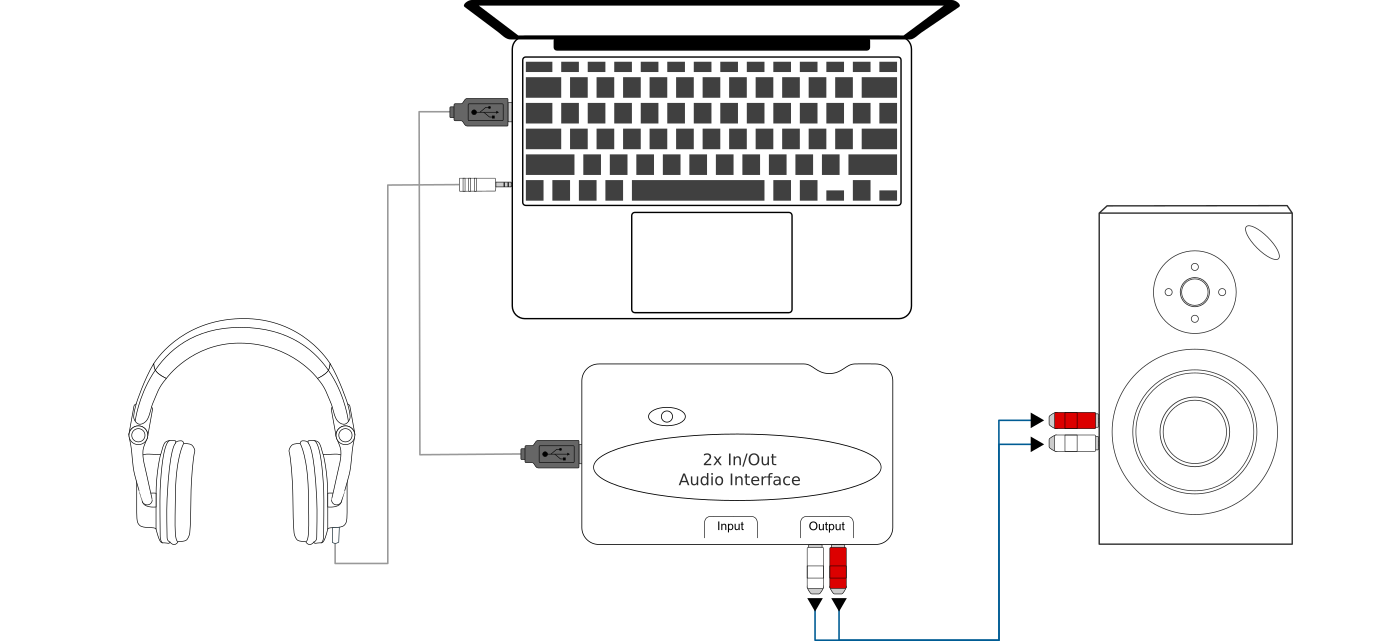
Using Mixxx together with an external audio interface
Using two audio interfaces (built-in + external)
Abra
Selecione a aba Saída
From the Main drop-down menu, select the external audio interface, then Channels 1-2
From the Headphones drop-down menu, select the built-in audio interface, then Channels 1-2
Using an external multi-channel audio interface
Abra
Selecione a aba Saída
From the Main drop-down menu, select the external audio interface, then Channels 1-2
From the Headphones drop-down menu, select the external audio interface, then Channels 3-4
Clique em Aplicar para salvar as mudanças.
6.4. Laptop e Controlador MIDI ou HID
Ver também
The Controladores section of the DJ Hardware chapter has background information about controllers.
Controllers with an integrated audio interface
Many DJ controllers include an integrated multi-channel audio interface. A setup with this kind of controller may look like the diagram below:
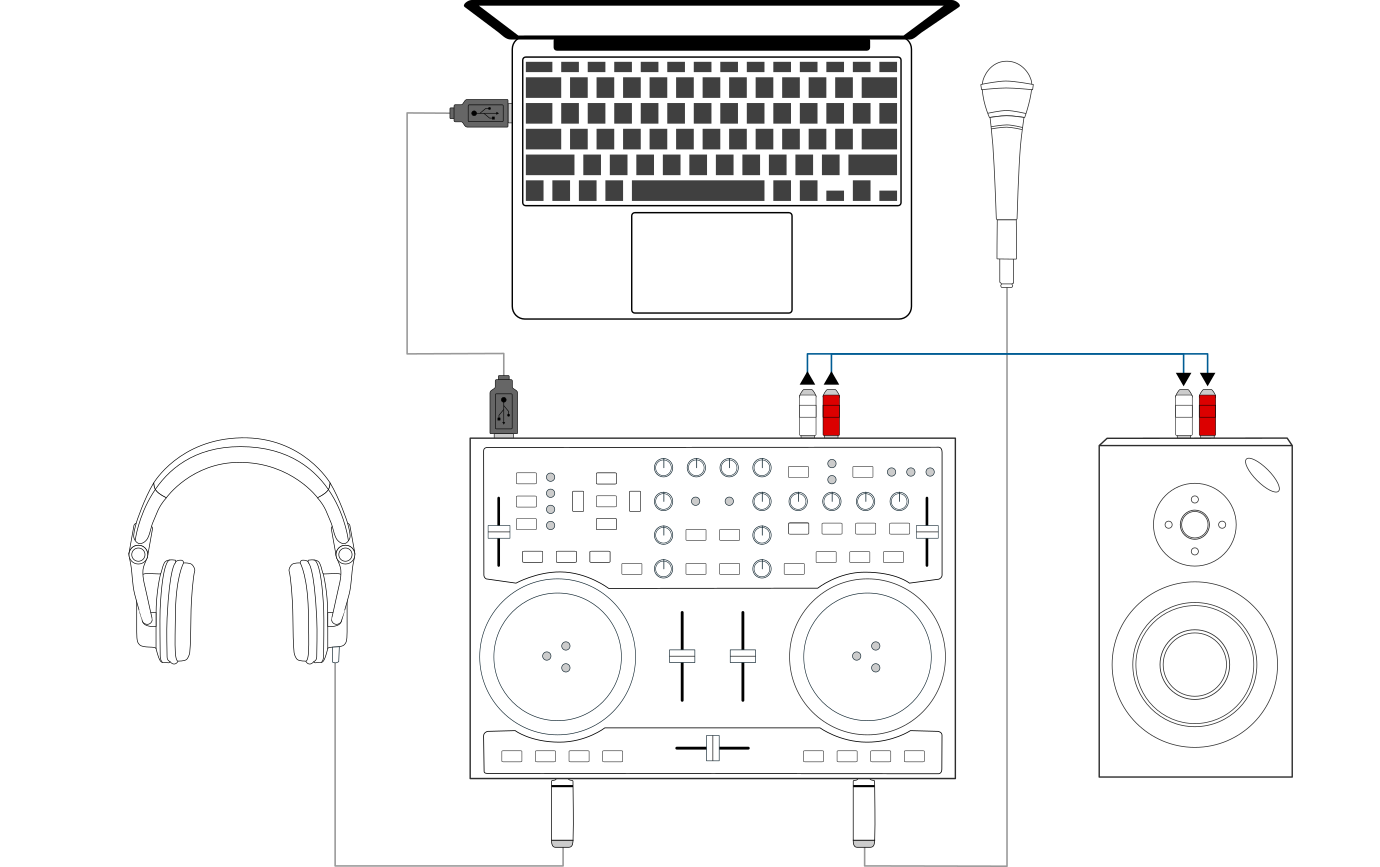
Using Mixxx together with a DJ controller and integrated audio interface
Using a controller with an integrated multi-channel audio interface
Abra
Selecione a aba Saída
From the Main drop-down menu, select your controller’s audio interface, then Channels 1-2
From the Headphones drop-down menu, select your controller’s audio interface, then Channels 3-4
Clique em Aplicar para salvar as mudanças.
Controllers without an integrated audio interface
Controllers without an integrated audio interface can be used together with a USB audio interface as depicted in the diagram below:
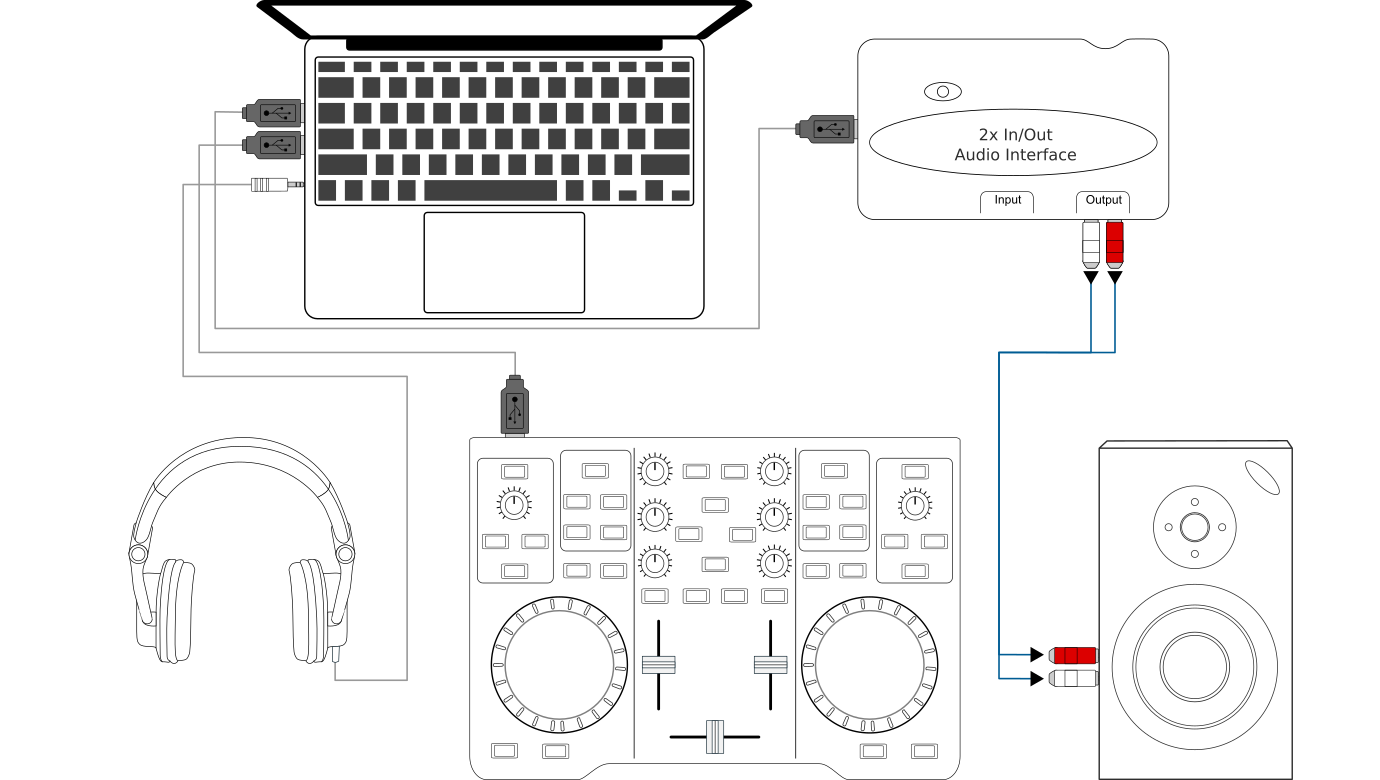
Using Mixxx together with a DJ controller and external audio interface
Using a controller without an integrated audio interface
Abra
Selecione a aba Saída
From the Main drop-down menu, select the external audio interface, then Channels 1-2
From the Headphones drop-down menu, select the built-in audio interface, then Channels 1-2
Clique em Aplicar para salvar as mudanças.
6.5. Laptop, Mixer Hardware Externo e Controle por Vinil
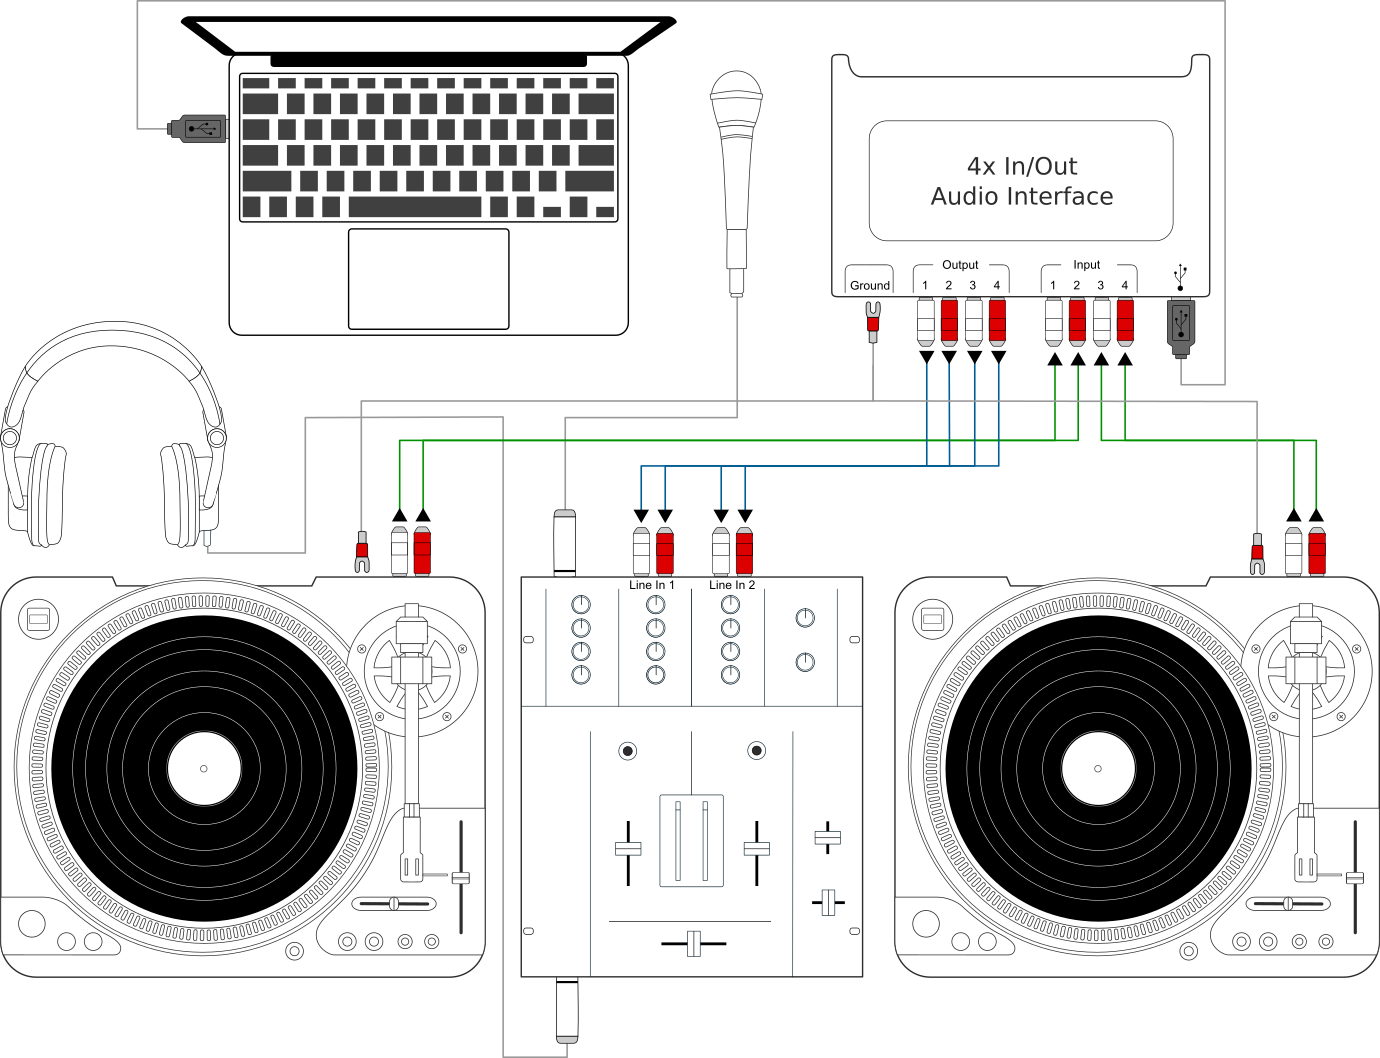
Usando o Mixxx junto com toca-discos e um mixer externo
This setup allows DJs to use the techniques of DJing with vinyl record turntables combined with the portability and flexibility of a laptop computer. Instead of carrying crates of records or CDs, DJs can carry their entire music collection on their laptop. In addition to a laptop and headphones, this setup requires an audio interface with at least two pairs of stereo inputs and outputs as well as a pair of timecode records.
Ver também
Vá para o capítulo Vinyl Control / DVS para mais informações detalhadas.