6. Exemples de configurations
Ce chapitre présente quelques exemples de configurations matérielles avec des instructions sur la façon de configurer Mixxx pour fonctionner avec elles.
Voir aussi
Matériel DJ: background information about different types of equipment.
Configuration de l’entrée et de la sortie audio: details about each available input and output option.
Utilisation de microphones: details for configuring Mixxx to work with microphones.
DJ Hardware Guide lists specific devices with information about their prices, features, and compatibility with Mixxx.
6.1. Ordinateur uniquement
L’interface audio intégrée sur la plupart des ordinateurs est livrée avec une seule sortie stéréo et une entrée microphone. Cela peut être configuré avec Mixxx de deux manières:
Pratiquer le Mixage/Diffusion
This setup can be used with a single audio output for speakers or headphones to practice DJing without investing in any equipment other than a computer and a set of speakers or headphones. With this configuration, use the Pre/Main Knob to switch back and forth between the main mix and PFL signal. This setup cannot be used to play for a live audience because the main mix is not sent to an audio interface output. However, it can be used by radio DJs who only need to send the main mix to a broadcast audience.
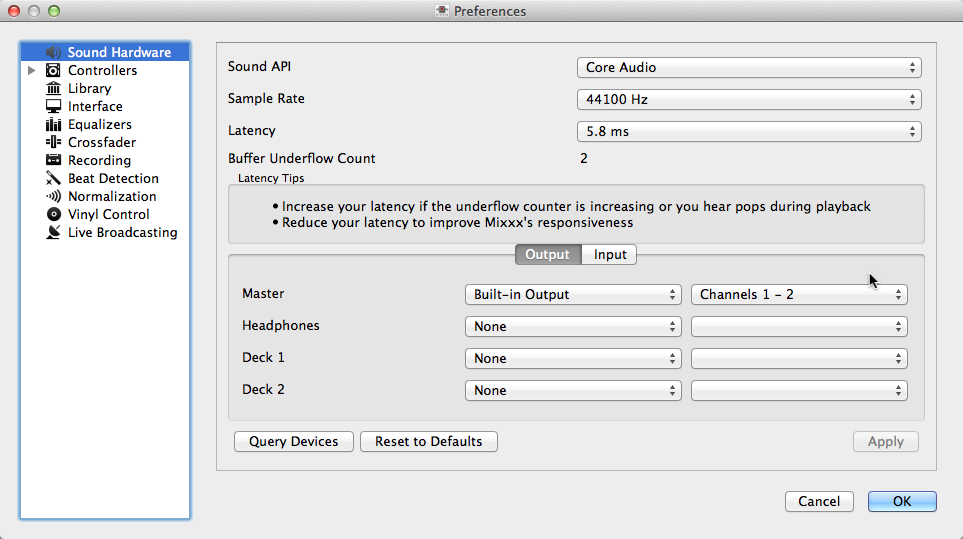
Open
Select the Output tab
From the Headphones drop-down menu, select your built-in audio interface, then Channels 1-2. Although this is labeled Headphones, you can also plug speakers into the output jack of your computer.
Depending on your audio interface, you can specify a microphone
Utiliser le microphone intégré ou connecter un microphone à votre ordinateur
Check that your microphone is detected by your OS
Open the Input tab
From the Microphone drop-down menu, select the input your microphone is connected to
Click Apply to save the changes.
Jouer pour un public
This setup allows for playing to an audience without headphone cueing.
Utilisation de Mixxx avec votre carte son intégrée
Open
Select the Output tab
From the Main drop-down menu, select your built-in audio interface, then Channels 1-2
Depending on your audio interface, you can specify a microphone
Utiliser le microphone intégré ou connecter un microphone à votre ordinateur
Check that your microphone is detected by your OS
Open the Input tab
From the Microphone drop-down menu, select the input your microphone is connected to
Click Apply to save the changes.
6.2. Ordinateur portable et câble séparateur
The cheapest way to DJ and cue with headphones uses a stereo-to-mono DJ splitter cable (also known as a “Y cable”) plugged into the headphone jack of a laptop or other computer. This cable divides the stereo output from a single jack into two separate mono signals.
Cette configuration vous permet de démarrer le DJ sans avoir à investir dans un équipement coûteux. Cependant, comme les signaux sont en mono, vous et votre public ne pourrez pas apprécier le positionnement du son par les producteurs de musique dans l’espace (bien que de nombreux systèmes de sonorisation de club soient câblés en mono de toute façon). De plus, les interfaces audio intégrées aux ordinateurs sont généralement de faible qualité et captent souvent les interférences d’autres composants de l’ordinateur.
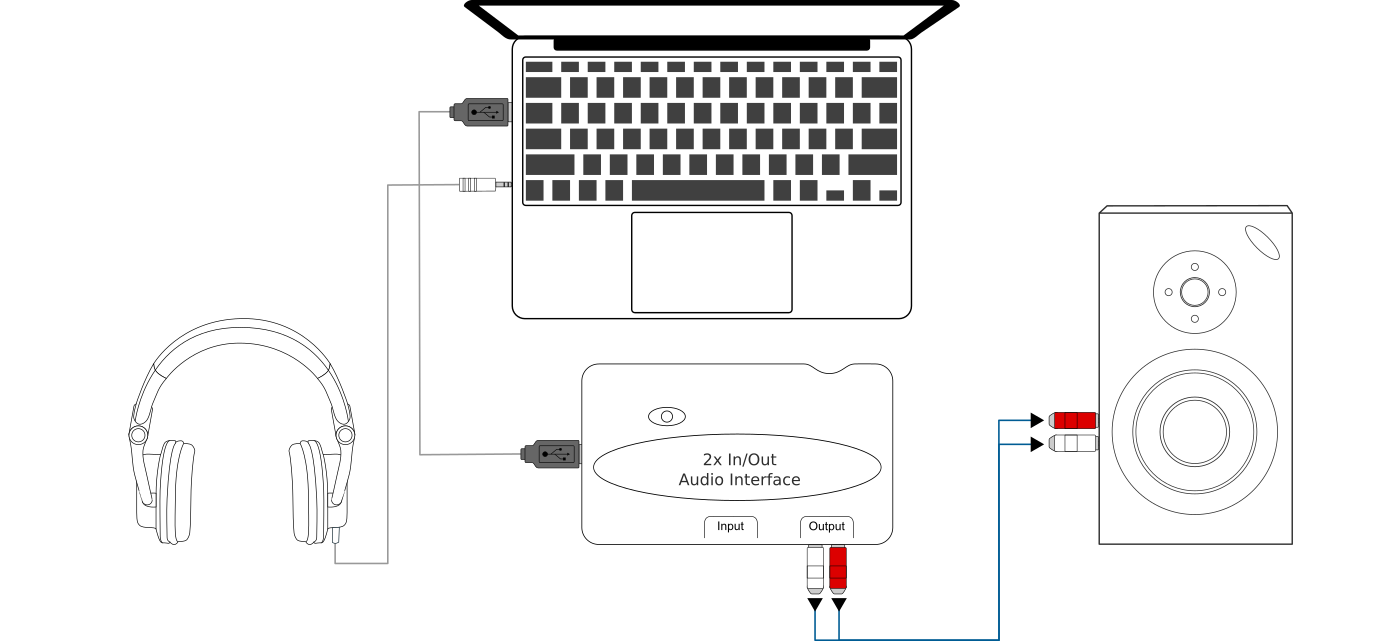
Utiliser une interface audio intégrée et un séparateur stéréo vers mono
Open
Select the Output tab
Vérifier que votre casque est branché dans le côté du câble avec un symbole de casque et que les enceintes sont branchées dans le côté du câble avec un symbole d’enceintes.
From the Main drop-down menu, select your built-in audio interface, then Channel 1
From the Headphones drop-down menu, select your built-in audio interface, then Channel 2
Click Apply to save the changes.
Avertissement
La plupart des câbles séparateurs, particulièrement ceux vendus comme séparateurs pour casques, retranscrivent le même signal stéréo aux deux prises casque et ne fonctionneront pas pour cette configuration DJ. De même, si vous utilisez un câble séparateur stéréo vers mono générique, vous pourriez n’entendre que d’un côté de vos haut-parleurs et de vos écouteurs. Les câbles séparateurs pour DJs vous permettent d’entendre le même signal mono dans les deux côtés de votre casque et de vos enceintes.
6.3. Ordinateur portable et interface audio externe USB
Utilisation de Mixxx avec une interface audio externe
Utilisation de deux interfaces audio (intégrée + externe)
Open
Select the Output tab
From the Main drop-down menu, select the external audio interface, then Channels 1-2
From the Headphones drop-down menu, select the built-in audio interface, then Channels 1-2
Utilisation d’une interface audio externe multi-canaux
Open
Select the Output tab
From the Main drop-down menu, select the external audio interface, then Channels 1-2
From the Headphones drop-down menu, select the external audio interface, then Channels 3-4
Click Apply to save the changes.
6.4. Ordinateur et contrôleur MIDI ou HID
Voir aussi
The Contrôleurs section of the Matériel DJ chapter has background information about controllers
Contrôleurs avec une interface audio intégrée
Beaucoup de contrôleurs DJ incluent une interface audio intégrée multi-canaux. Une configuration avec ce type de contrôleur peut ressembler au schéma ci-dessous:
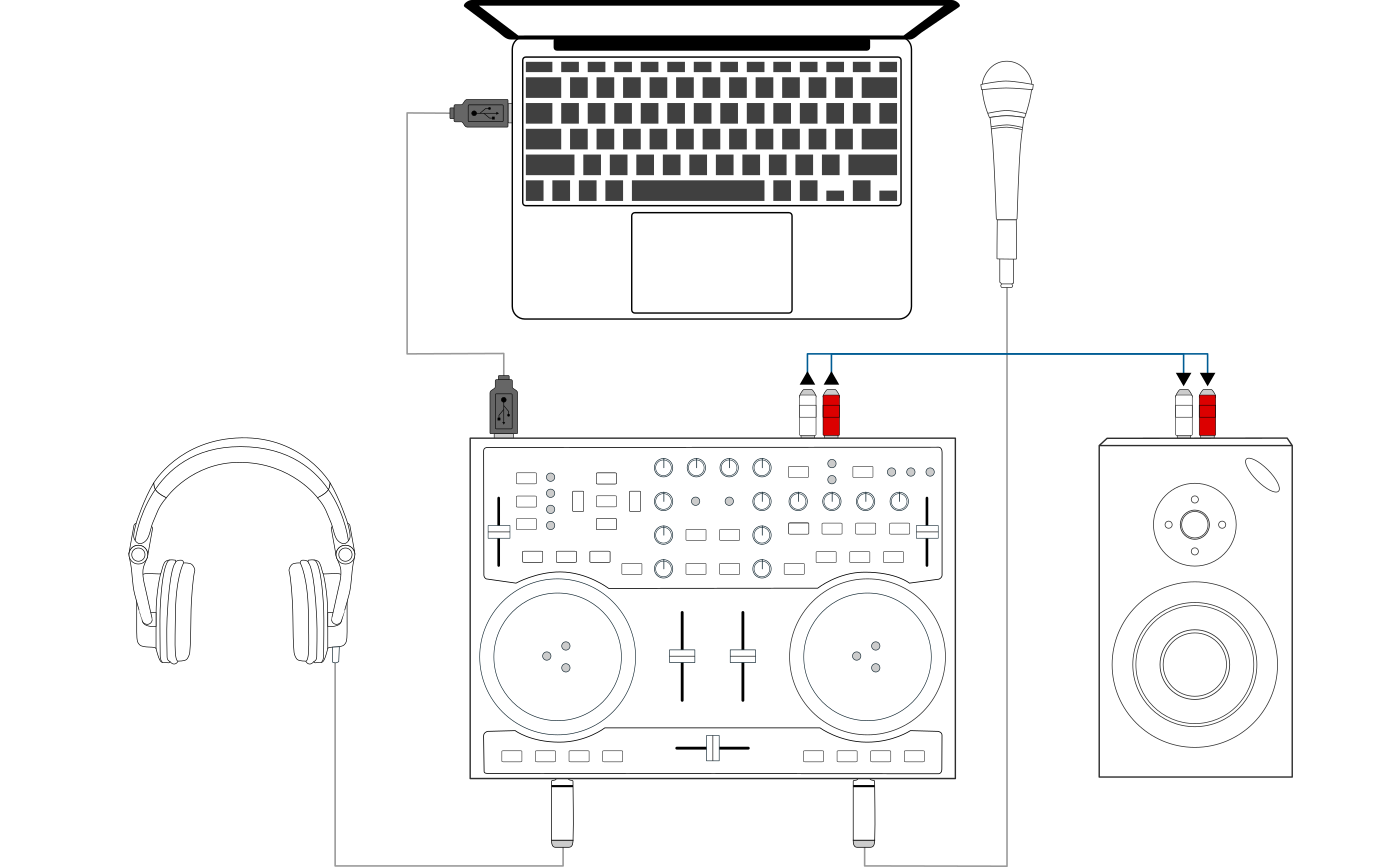
Utilisation de Mixxx avec un contrôleur DJ et une interface audio intégrée
Utilisation d’un contrôleur avec une interface audio multicanaux intégrée
Open
Select the Output tab
From the Main drop-down menu, select your controller’s audio interface, then Channels 1-2
From the Headphones drop-down menu, select your controller’s audio interface, then Channels 3-4
Click Apply to save the changes.
Contrôleurs sans interface audio intégrée
Les contrôleurs sans interface audio intégrée peuvent être utilisés avec une interface audio USB comme le montre le schéma ci-dessous:
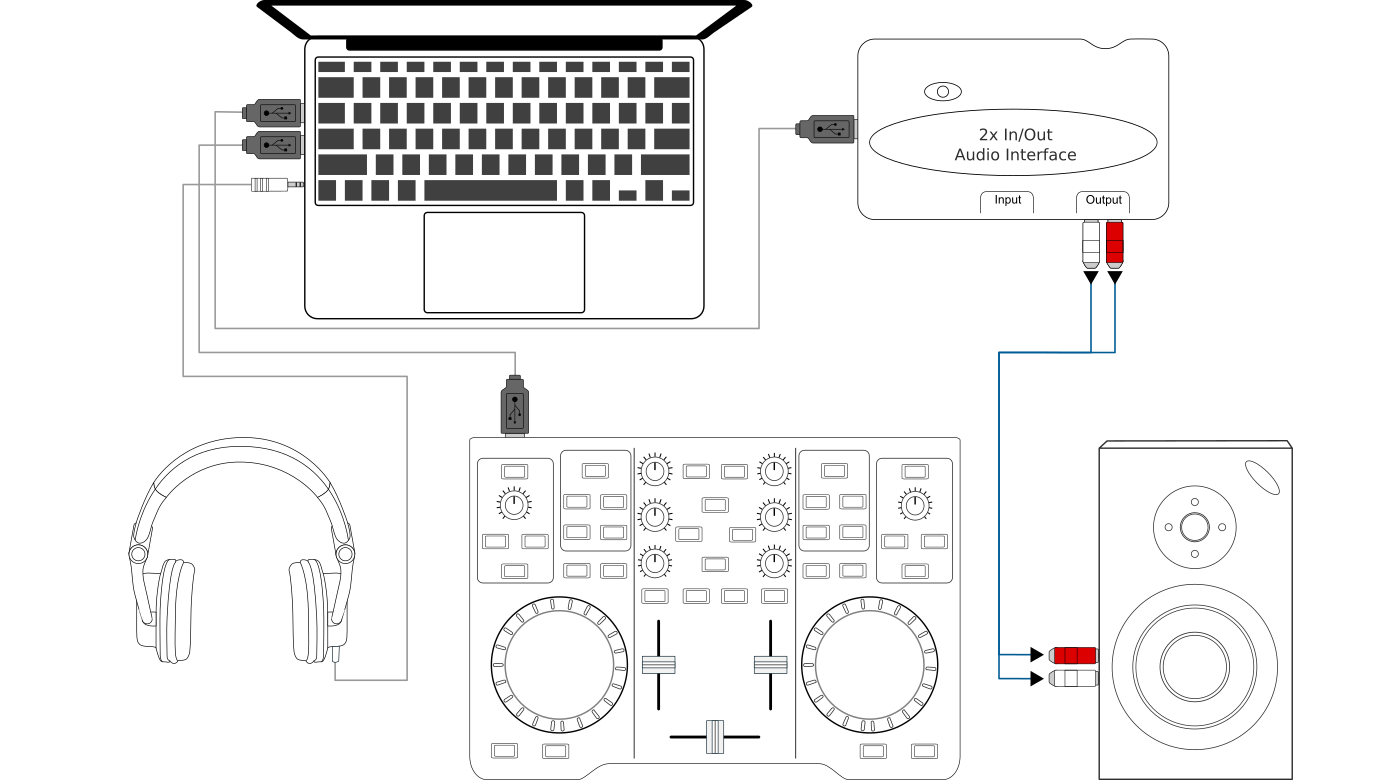
Utilisation de Mixxx avec un contrôleur DJ et une interface audio externe
Utilisation d’un contrôleur sans interface audio intégrée
Open
Select the Output tab
From the Main drop-down menu, select the external audio interface, then Channels 1-2
From the Headphones drop-down menu, select the built-in audio interface, then Channels 1-2
Click Apply to save the changes.
6.5. Ordinateur portable, table de mixage matérielle externe et contrôleur vinyle
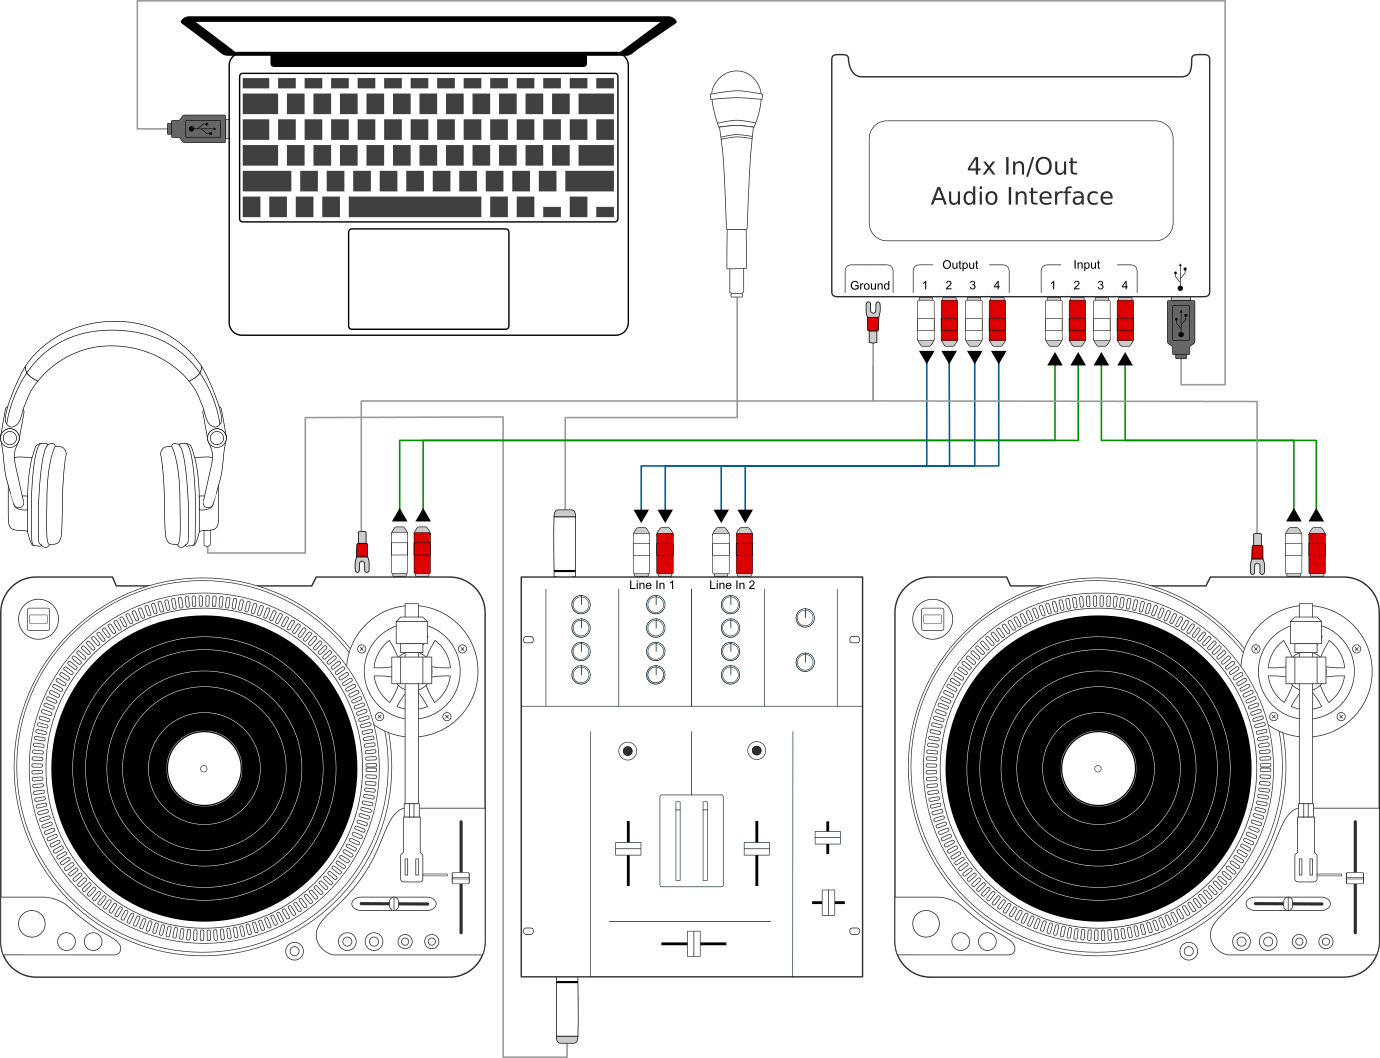
Utilisation de Mixxx avec des platines et une table de mixage externe
This setup allows DJs to use the techniques of DJing with vinyl record turntables combined with the portability and flexibility of a laptop computer. Instead of carrying crates of records or CDs, DJs can carry their entire music collection on their laptop. In addition to a laptop and headphones, this setup requires an audio interface with at least two pairs of stereo inputs and outputs as well as a pair of timecode records.
Voir aussi
Go to the chapter Vinyl Control / DVS for detailed information.