6. Primeri posatavitev
V tem poglavju je predstavljenih nekaj primerov postavitev strojne opreme z navodili, kako konfigurirati Mixxx za delo z njimi.
Poglej Tudi
Strojna oprema za DJ-anje: background information about different types of equipment.
Nastavitve vhodnih in izhodnih naprav: details about each available input and output option.
Raba mikrofonov: details for configuring Mixxx to work with microphones.
DJ Hardware Guide lists specific devices with information about their prices, features, and compatibility with Mixxx.
6.1. Zgolj računalnik
Vgrajeni zvočni vmesnik večine računalnikov ima zgolj po en stereo izhod in mikrofonski izhod. Ta je v Mixxxu mogoče nastaviti na dva načina:
Vaje miksanja/ oddajanja
This setup can be used with a single audio output for speakers or headphones to practice DJing without investing in any equipment other than a computer and a set of speakers or headphones. With this configuration, use the Pre/Main Knob to switch back and forth between the main mix and PFL signal. This setup cannot be used to play for a live audience because the main mix is not sent to an audio interface output. However, it can be used by radio DJs who only need to send the main mix to a broadcast audience.
Open
Select the Output tab
From the Headphones drop-down menu, select your built-in audio interface, then Channels 1-2. Although this is labeled Headphones, you can also plug speakers into the output jack of your computer.
Depending on your audio interface, you can specify a microphone
Uporabite vgrajeni mikrofon ali priključite mikrofon na vaš računalnik
Check that your microphone is detected by your OS
Open the Input tab
From the Microphone drop-down menu, select the input your microphone is connected to
Click Apply to save the changes.
Predvajanje za občinstvo
This setup allows for playing to an audience without headphone cueing.

Uporaba Mixxx z vgrajeno zvočno kartico
Open
Select the Output tab
From the Main drop-down menu, select your built-in audio interface, then Channels 1-2
Depending on your audio interface, you can specify a microphone
Uporabite vgrajeni mikrofon ali priključite mikrofon na vaš računalnik
Check that your microphone is detected by your OS
Open the Input tab
From the Microphone drop-down menu, select the input your microphone is connected to
Click Apply to save the changes.
6.2. Prenosnik in razdelilni kabel
The cheapest way to DJ and cue with headphones uses a stereo-to-mono DJ splitter cable (also known as a “Y cable”) plugged into the headphone jack of a laptop or other computer. This cable divides the stereo output from a single jack into two separate mono signals.
Takšna postavitev omogoča didžejanje brez vložkov v drago opremo. Vendar, ker se signali prenašajo v mono načinu, vi in poslušalci ne boste mogli uživati v protorskem zvoku (resda je veliko klubskih sistemov itak zvezanih v mono načinu). Poleg tega so zvočni vmesniki računalnikov pogosto slabe kakovosti in pobirajo motnje drugih sestavnih delov računalnika.
Uporaba vgrajenega zvočnega vmesnika in stereo-v-mono razdelilnika
Open
Select the Output tab
Prepričajte se, da so slušalke vklopljene v vhod z oznako s slušalkami in zvočniki v vhod z oznako za zvočnike.
From the Main drop-down menu, select your built-in audio interface, then Channel 1
From the Headphones drop-down menu, select your built-in audio interface, then Channel 2
Click Apply to save the changes.
Opozorilo
Večina razdelilnih kablov, še posebej tisti, ki se prodajajo pod oznako razdelilnik za slušalke, pošiljajo isti stereo signal na dva jack izhoda in zato ne bodo delovali v takšni DJ postavitvi. Če uporabljate generičen stereo na mono razdelilnik, boste zvok lahko slišali zgolj na eni strani slušalk oz. zvočnikov. DJ razdelilni kabli omogočajo, da slišite isti mono signal na obeh straneh vaših slušalk ali zvočnikov.
6.3. Prenosnik in zunanji USB zvočni vmesnik
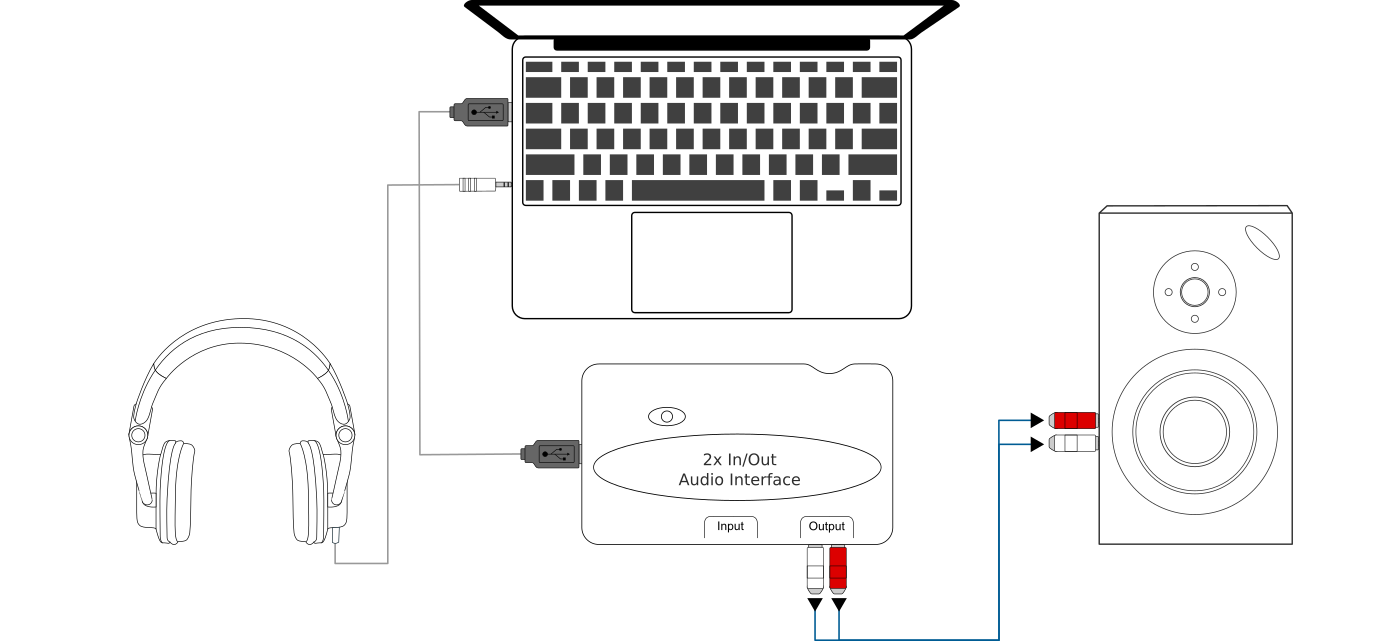
Uporaba Mixxx-a z zunanjim zvočnim vmesnikom
Uporaba dveh zvočnih vmesnikov (vgrajeni in zunanji)
Open
Select the Output tab
From the Main drop-down menu, select the external audio interface, then Channels 1-2
From the Headphones drop-down menu, select the built-in audio interface, then Channels 1-2
Uporaba zunanjeega večkanalnega zvočnega vmesnika
Open
Select the Output tab
From the Main drop-down menu, select the external audio interface, then Channels 1-2
From the Headphones drop-down menu, select the external audio interface, then Channels 3-4
Click Apply to save the changes.
6.4. Prenosnik in MIDI ali HID kontroler
Poglej Tudi
The Kontrolerji section of the Strojna oprema za DJ-anje chapter has background information about controllers
Kontrolerji z vgrajenim zvočnim vmesnikom
Mnogo DJ kontrolerjev ima integriran „več-kanalni“ zvočni vmesnik. Posatvitev s takšnim kontrolerjem bi lahko bila videti kot na spodnjem diagramu:
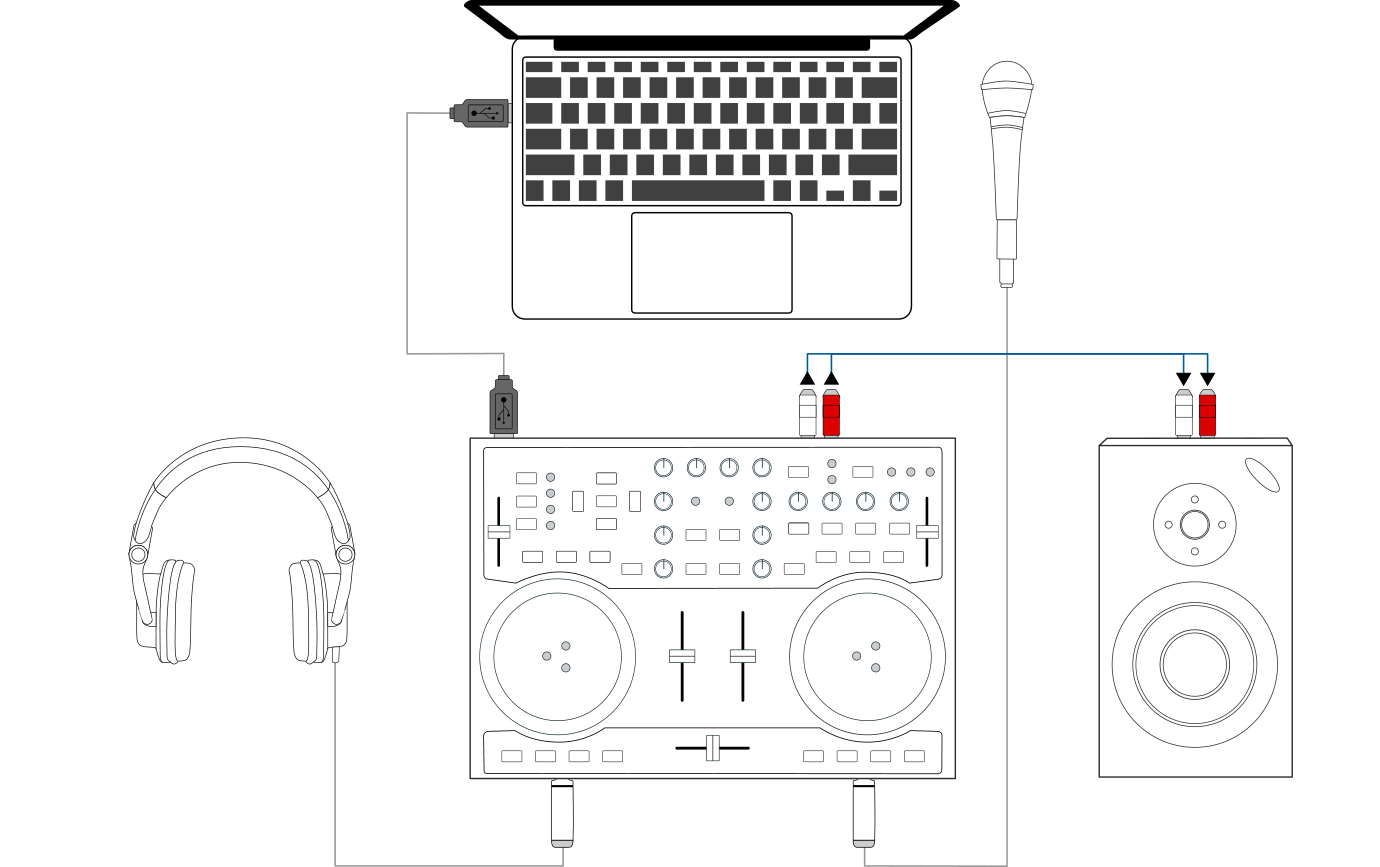
Uporaba Mixxx-a z DJ kontrolerjem in vgrajenim zvočnim vmesnikom
Uporaba kontrolerja in vgrajenega večkanalnega zvočnega vmesnika
Open
Select the Output tab
From the Main drop-down menu, select your controller’s audio interface, then Channels 1-2
From the Headphones drop-down menu, select your controller’s audio interface, then Channels 3-4
Click Apply to save the changes.
Kontrolerji brez vgrajenega zvočnega vmesnika
Kontrolerje brez vgrajanega zvočnega vmesnika lahko uporabljate skupaj z USB zvočnim vmesnikom, kot je prikazano na spodnjem diagramu:
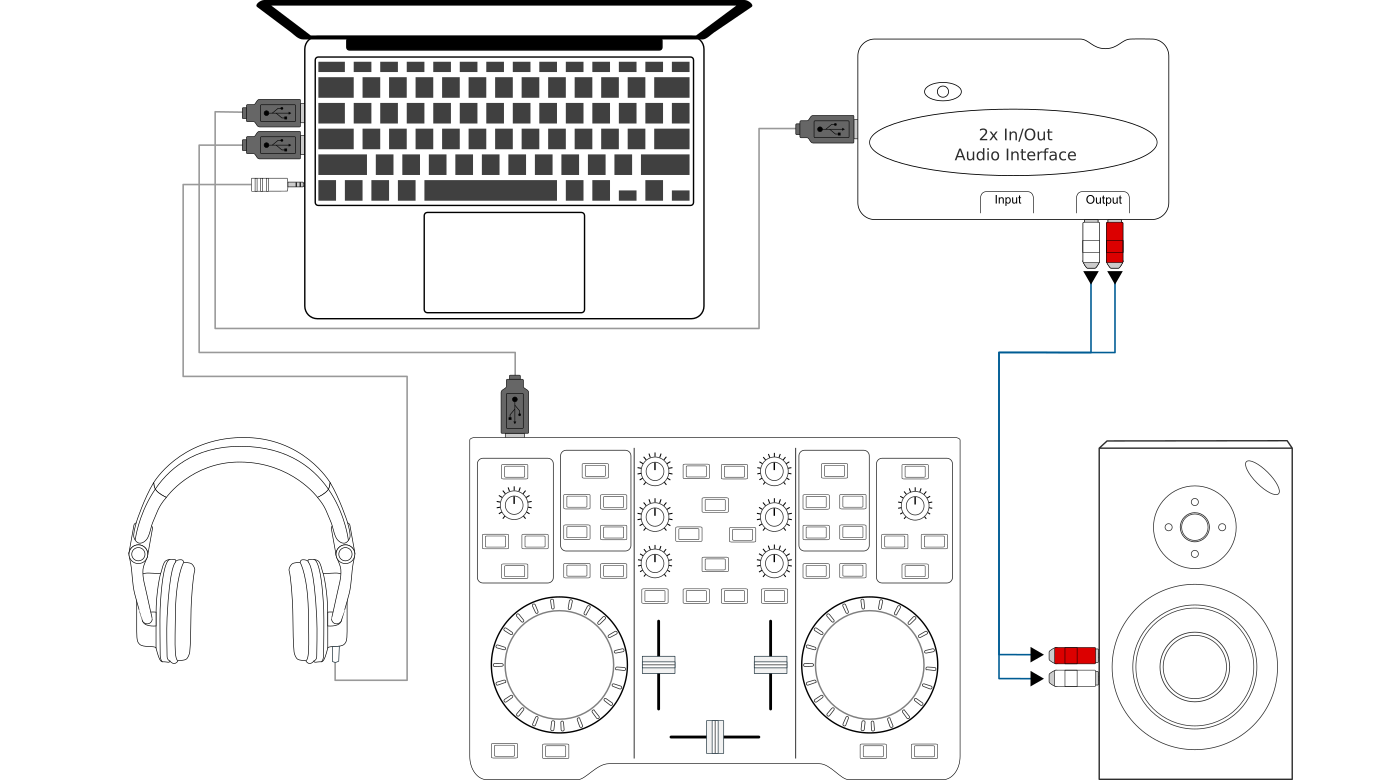
Uporaba Mixxx-a z DJ kontrolerjem in zunanjim zvočnim vmesnikom
Uporaba kontrolerja brez vgrajenega zvočnega vmesnika
Open
Select the Output tab
From the Main drop-down menu, select the external audio interface, then Channels 1-2
From the Headphones drop-down menu, select the built-in audio interface, then Channels 1-2
Click Apply to save the changes.
6.5. Prenosnik, zunanja fizična mešalna miza in gramofonsko upravljanje
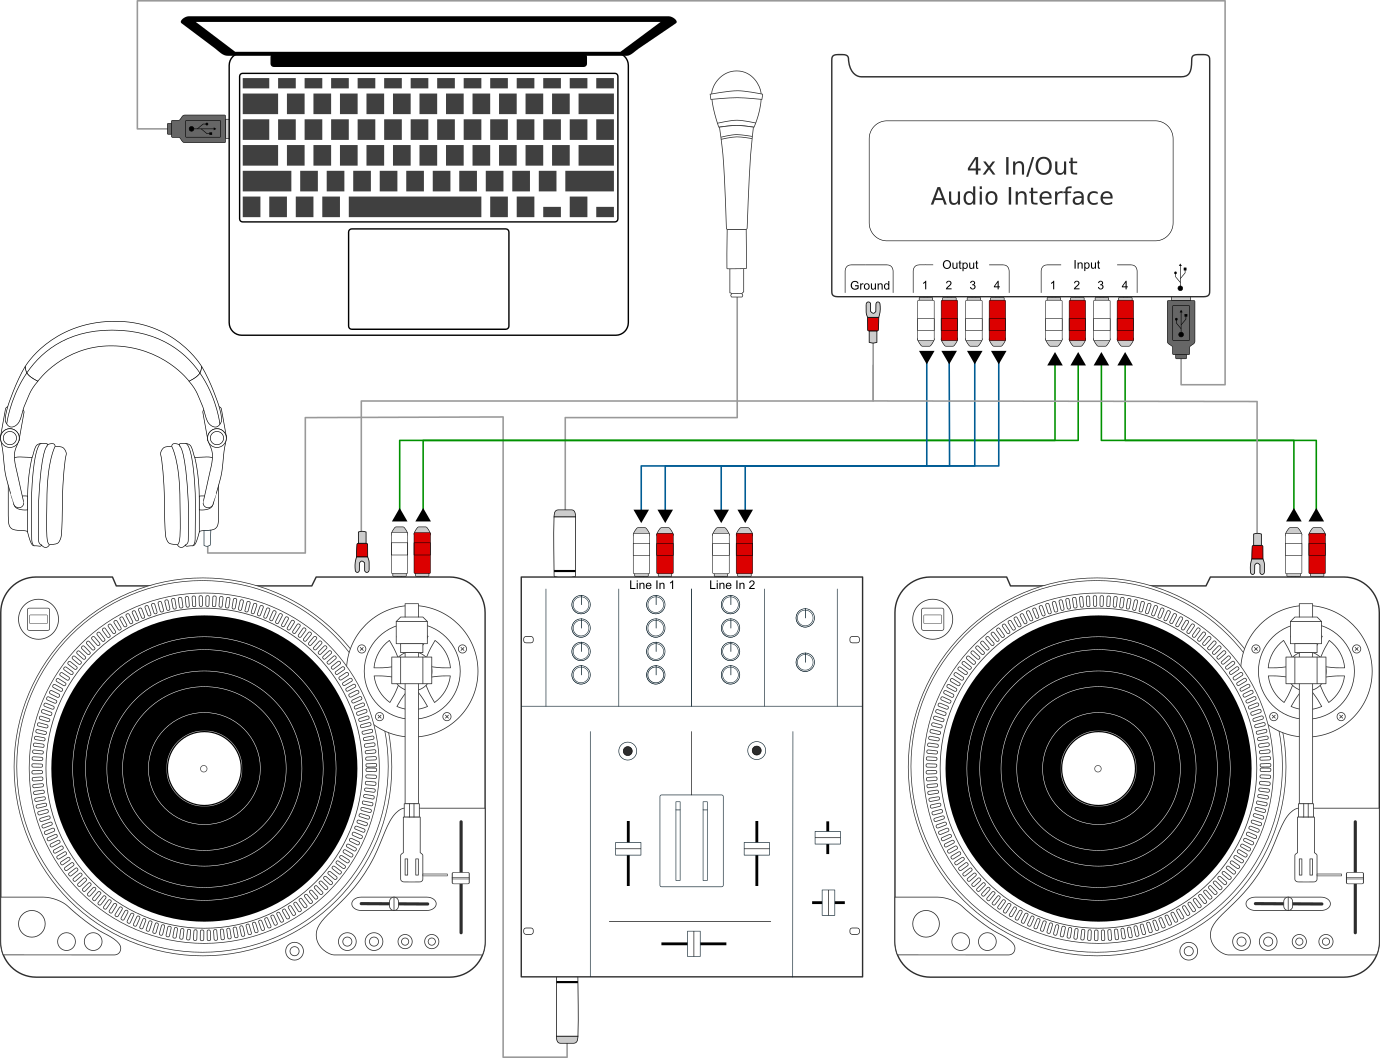
Uporaba Mixxx-a z gramofoni in zunanjo mešalno mizo
This setup allows DJs to use the techniques of DJing with vinyl record turntables combined with the portability and flexibility of a laptop computer. Instead of carrying crates of records or CDs, DJs can carry their entire music collection on their laptop. In addition to a laptop and headphones, this setup requires an audio interface with at least two pairs of stereo inputs and outputs as well as a pair of timecode records.
Poglej Tudi
Go to the chapter Vinyl Control / DVS for detailed information.