14. Geavanceerde onderwerpen
14.1. Ondersteuning toevoegen voor uw MIDI/HID Controller
Met tientallen out-of-the-box ondersteunde DJ-controllers biedt Mixxx u uitgebreide hardwarecontrole voor uw DJ-mixen, zie Gebruik van MIDI/HID Controllers.
De ondersteuning voor andere apparaten kan aan Mixxx worden toegevoegd door een nieuw toewijzingsbestand te maken. Dit bestand geeft aan Mixxx de manier door waarop MIDI/HID instructies van een controller moeten worden geïnterpreteerd en vertaald deze naar commando’s die Mixxx begrijpt.
U kan aangepaste toewijzingsbestanden vinden in en downloaden van de Mixxx Gebruikers Verbindingsbestanden fora.
Voor een lijst met besturingselementen die kunnen hebruikt worden in een controller toewijzingsbestand, zie Mixxx Controls.
Controller Wizard
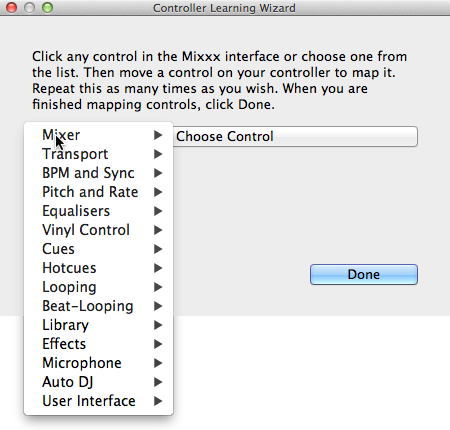
Mixxx Controller Wizard - Een besturing koppelen/toewijzen
Veruit de gemakkelijkste manier om een nieuwe MIDI toewijzing te maken is door gebruik te maken van de Controller Wizard.
Sluit uw controller(s) aan op uw computer
Start Mixxx
Ga naar of controllers
Selecteer uw apparaat in de lijst met beschikbare apparaten aan de linkerkant en het rechter deelvenster zal worden aangepast.
Activeer het selectievakje Inschakelen.
Klik op Learning Wizard om het selectiedialoogvenster te openen.
Klik op een willekeurig besturingselement in de Mixxx GUI
Of klik op de knop Kies Besturing en kies er een uit de keuzelijst.
Druk op Leren en beweeg vervolgens een besturingselement of druk op een toets op je controller om deze te koppelen. U kunt ook een besturingselement bewegen zonder op de Leren-knop te drukken als u veel besturingselementen aan het aanleren bent.
Als je een toets wil toewijzen, druk je er maar één keer op. Als je een knop of een schuifregelaar wilt gebruiken aanleert, probeer deze dan over het hele bereik te verplaatsen.
Nadat Mixxx het besturingselement heeft gedetecteerd, kunt u klikken op: guilabel: Andere Aanleren of u kunt op een andere knop in de Mixxx GUI klikken om een ander besturingselement aan te leren.
Wanneer u klaar bent met het toewijzen van de besturingselementen, klikt u op Klaar
Er zijn ook enkele geavanceerde opties in de Midi Wizard die u mogelijks moet gebruiken:
Soft Takeover: gebruik deze optie om te voorkomen dat knoppen of schuifregelaars plotselinge sprongen maakt wanneer de knop in de: term: GUI niet overeenstemt met de fysieke knop. Als u deze optie selecteert, kunt u geen supersnelle bewegingen maken. (Aanbeveling = Uit)
Invert: Gebruik deze optie voor besturingselementen die u omgekeerd wilt laten functioneren ten opzichte van de manier waarop ze zijn gedetecteerd.
Switch Mode: Gebruik deze optie op controllers die besturingen hebben die als schakelaars werken en één waarde uitzenden bij de eerste druk en een andere waarde bij de volgende druk. (Denk aan een echte hardware-tuimelschakelaar of een knop die oplicht bij de eerste keer drukken en uitschakelt bij de tweede keer drukken).
Jog Wheel / Select Knob: Gebruik dit voor knoppen die geen beginpunt of eindpunt hebben, maar continu kunnen draaien.
De Controller wizard bewaart het nieuwe toewijzingsbestand in de controllers map in de hebruikersinstellingen map, zie De Mixxx Instellingen Map.
U kan het XML bestand dat wordt aangemaakt (of één van diegene die met Mixxx meekomen aanpassen indien u deze wil fine-tunen of indien u andere besturings-elementen wil toevoegen. Voor meer informatie, ga naar https://github.com/mixxxdj/mixxx/wiki/MIDI-Controller-Mapping-File-Format.
De Controller Wizard werkt alleen voor MIDI-apparaten. Momenteel kunt u geen modificatietoetsen (shift-toetsen) en plaat-rotaties toewijzen. Gebruik in plaats daarvan MIDI Scripting.
MIDI Scripting
Om de geavanceerde functies van veel MIDI/HID controllers te ondersteunen, biedt Mixxx een scripting tool aan, wat wij MIDI Scripting noemen.
Hiermee schakelt u de mogelijkheid in om MIDI-besturingselementen toe te wijzen aan QtScript (ook wel Javascript/EMCAScript genoemd) functies worden bewaard in de functie-bibliotheekbestanden, waardoor Mixxx wordt bevrijd van een èèn een-op-èèn MIDI-mapping ideologie. Door de gebruiker de mogelijkheid te geven om zelf functies te creëren kan deze via een combinatie van MIDI-be-sturingen een gebeurtenis genereren. Zo kan bijvoorbeeld dezelfde controller-knop tegelijkertijd twee of meer Mixxx-eigenschappen (“controls”) beïnvloeden, kunnen inkomende controlwaarden aangepast worden om deze beter met Mixxx te laten werken (bv. scratchen), kan een complexe LED-sequentie weergeven worden, of kunnen zelfs berichten op controller-tekstdisplays weergegeven worden.
Voor meer informatie, ga naar https://github.com/mixxxdj/mixxx/wiki/Midi-Scripting en https://github.com/mixxxdj/mixxx/wiki/Hid-Mapping , als ook de`Components-JS library <https://github.com/mixxxdj/mixxx/wiki/Components-JS>`_ welke de toewijzing veel gemakkelijker maakt, bijvoorbeeld voor effect units en complex gedrag zoals schakelen tussen decklagen of pad grid modi. Let op: dit is de aangewezen manier van toewijzen wanneer u uw toewijzingsbestand wil toevoegen aan Mixxx vermits Components-JS zowel het toewijzen als het nakijken van Pull Requests veel simpeler maakt
14.2. Het maken van een Aangepaste Toetsenbord Toewijzing
De standaard toetsenbord toewijzingen zijn gede-finieerd in een tekstbestand dat op de volgende locatie te vinden is:
Linux:
/usr/local/share/mixxx/keyboard/en_US.kbd.cfgmacOS:
/Applications/Mixxx.app/Contents/Resources/keyboard/en_US.kbd.cfgWindows:
<Mixxx installation directory>\keyboard\en_US.kbd.cfg
Afhankelijk van de taalinstellingen van uw systeem kan Mixxx een ander standaard bestand gebruiken, bijvoorbeeld de_DE.kbd.cfg voor Duits of es_ES.kbd.cfg voor Spaans.
Het wordt niet aanbevolen om het standaard toetsenbord toewijzingsbestand, dat op uw systeem gebruikt wordt, te wijzigen, het gevaar bestaat immers dat al uw ijzigingen verloren gaan als u Mixxx verwijdert of bijwerkt. Kopieer daarom beter het standaard toewijzingsbestand naar de volgende locatie:
Linux:
~/.mixxx/Custom.kbd.cfgmacOS:
~/Library/Containers/org.mixxx.mixxx/Data/Library/Application Support/Mixxx/Custom.kbd.cfgWindows:
%LOCALAPPDATA%\Mixxx\Custom.kbd.cfg
Bewerk dan dit bestand en sla de wijzigingen op. Bij de volgende opstart zal Mixxx controleren of Custom.kbd.cfg aanwezig is en dit bestand laden in plaats van het standaard toewijzings bestand. Dit heeft als voordeel dat u altijd terug kunt keren naar de standaard toewijzing door Custom.kbd.cfg te verwijderen.
Voor een lijst van besturingselementen die kunnen gebruikt worden in een toetsenbord toewijzing, zie Mixxx Controls.
U kan een toetsenbord toewijzingsbestand downloaden en delen in de Mixxx User Keyboard Mapping forums.
14.3. Extra effecten via externe Mixer-modus
Mixxx wordt geleverd met een set van native effects of systeemeigen effecten. Bovendien kunt u met behulp van de externe mixer-modus elk deck rechtstreeks naar de 3rdparty-effecten hosts leiden.
De volgende voorbeelden zijn enkel bedoeld om het experimenteren aan te moedigen, ze zijn geen definitieve leidraad.
Effecten via AU Lab op macOS
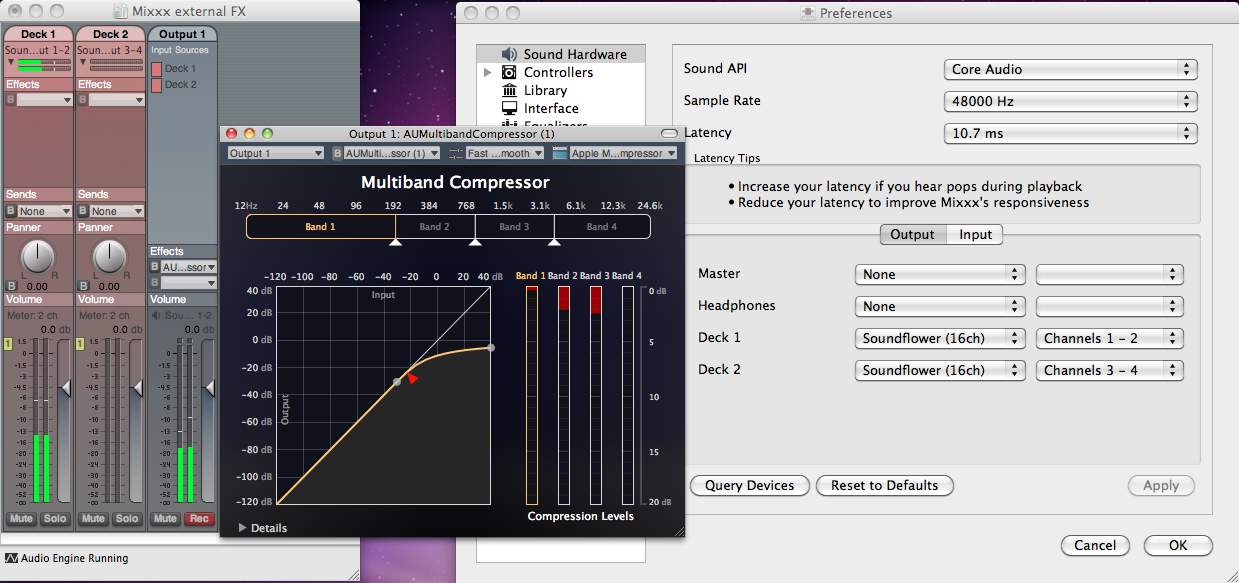
De Au Lab-routering voor externe effecten op macOS
Op macOS is er een eenvoudige en gratis manier om Mixxx toegang te geven tot de collectie AU/VST/MAS-plugins die op uw systeem zijn geïnstalleerd.
Installeer het gratis SoundflowerBed, een systeem-uitbreiding voor routering van audio tussen applicaties.
Installeer de gratis digital audio mixing applicatie AU Lab.
Hint
macOS 10.15 (Catalina) introduceert extra beperkingen voor het uitvoeren van niet-Apple software. Zorg ervoor dat u toestemming geeft in Systeemvoorkeuren –> Veiligheid & Privacy –> Microfoon –> AU Lab.
Als alternatief kan u Blackhole proberen, een moderne virtuele audio besturing die applicaties toestaat om audio door te sturen naar andere applicaties zonder additionele latency, en Hosting AU, een gratis minuscule DAW die Audio Unit instrumenten en effect invoegtoepassingen bevat.
In Mixxx
Ga naar .
Selecteer voor Deck 1 het Soundflower 16 apparaat met Kanaal 1-2.
Selecteer voor Deck 2 het Soundflower 16 apparaat met Kanaal 3-4.
Klik op de knop Toepassen.
In AU Lab
Klik op de knop + om een nieuwe configuratie aan te maken.
Voeg 2 stereo input tracks toe in het Audio Input Tab.
Voeg 2 stereo output tracks toe in het Audio Output Tab.
Klik OK
Wijzig het audio-invoerapparaat in Soundflower 16.
Wijzig het audio-uitvoerapparaat bijvoorbeeld in :guilabel: Built-in Output
Klik Document maken
In het Output 1 kanaal, selecteer een effect uit het drop-down menu, bijvoorbeeld
Het effect zou nu moeten reageren als je een track in Mixxx afspeelt.
Effecten via JACK Rack op GNU/Linux
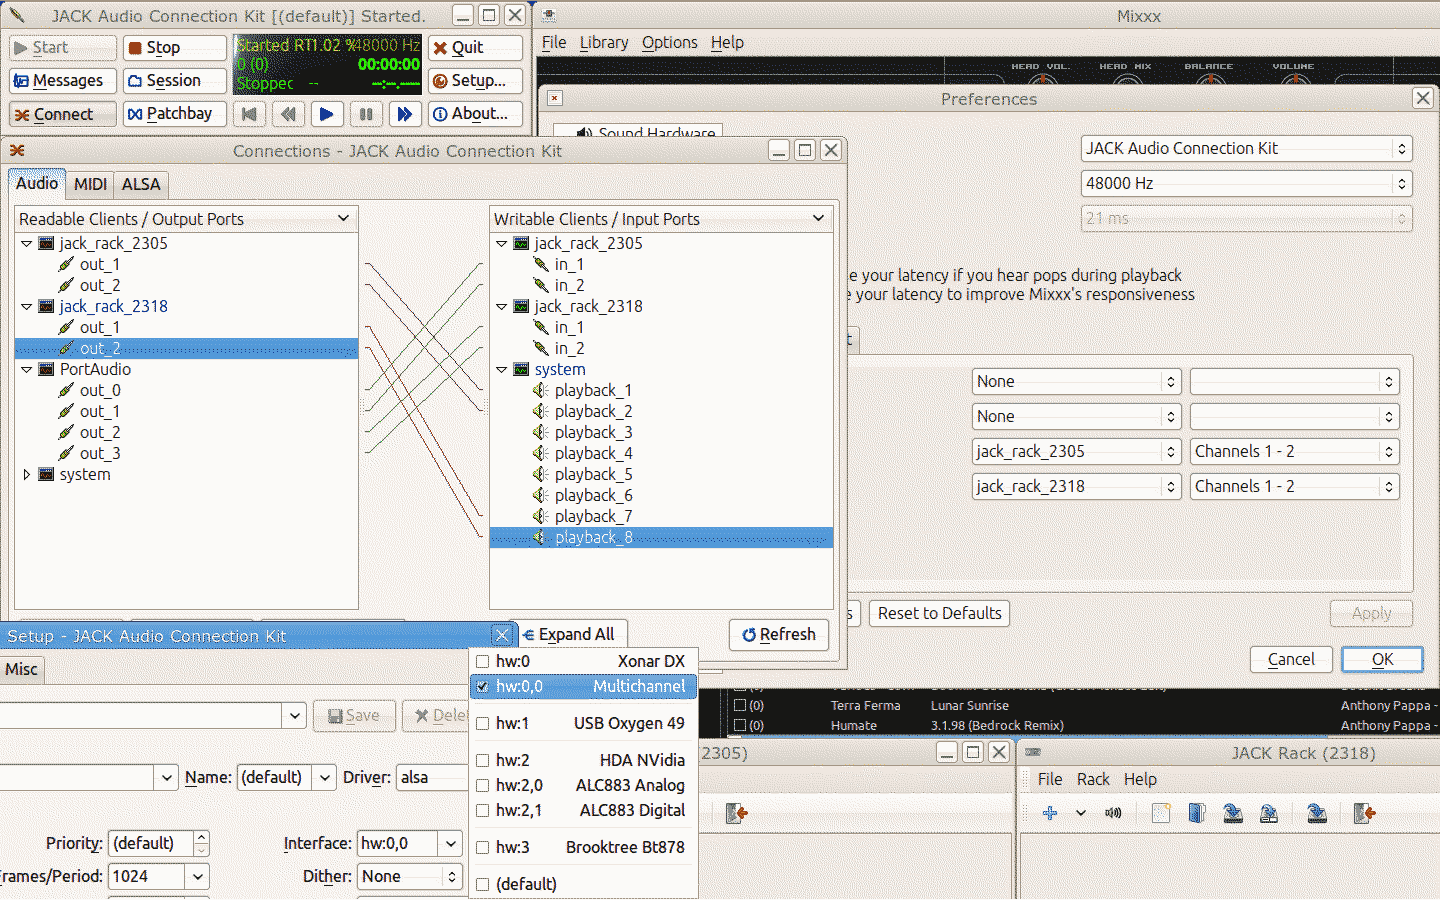
De Jack routering voor externe effecten op GNU/Linux
Gebruik Jack om elk deck direct door JACK Rack effecten-racks te routeren, of voor meer controle kunt u Ardour (of een andere DAW) gebruiken met behulp van sends voor effecten. Dit geeft Mixxx toegang tot de uitgebreide collectie LADSPA-plugins.
Zorg ervoor dat de juiste multichannel audio-interface is geselecteerd in Jack (Jack instellingen zichtbaar linksonder). Merk op dat Mixxx mogelijks de Jack poorten als Portaudio labelt.
14.4. Migreer uw Mixxx bibliotheek en voorkeuren naar een nieuwe computer
Wanneer u een nieuwe computer in gebruik neemt, of wanneer u een nieuw besturingssysteem installeert op dezelfde computer, dan kan u uw bestaande Mixxx installatie meenemen. Dit omvat uw track bibliotheek, instellingen, controller toewijzingen en broadcast profielen.
U hoeft niet noodzakelijkerwijs in staat te zijn om uw vorige Mixxx installatie op te starten, noodzakelijk zijn enkel de instellingen map en de muziek mappen die u in uw Mixxx bibliotheek heeft geïmporteerd via .
Voorbereiding
Wanner u nog steeds toegang heeft tot uw Mixxx installatie, open Mixxx, ga naar en deactiveer Her-scan bij opstarten. Indien u Mixxx niet langer kan opstarten, bv. indien u er enkel in slaagde uw instellingen map te recupereren, dan kan u dit manueel doen in het instellingen bestand: open
mixxx.cfgmet een tekst editor, verwijder de lijn met:file:RescanOnStartup en bewaar het bestand.Maak een kopie van zowel de Mixxx instellingen map en uw muziek mappen. Plaats deze allemaal op een veilige plaats. Verander niets aan de mappen-structuur van uw muziekmappen!
Installeer uw nieuw besturingssysteem, maak uw PC klaar.
Download the laatste stabiele versie van Mixxx van de officiële download pagina.
Installeer Mixxx, maar start Mixxx nog niet op!
Migratie
Kopieer uw Mixxx instellingenmap naar de gepaste locatie, zie De Mixxx Instellingen Map. In geval u Mixxx reeds voordien opgestart heeft hernoem of verwijder dan de bestaande instellingenmap om bestandsconflicten te vermijden.
Kopieer uw muziek mappen naar de nieuwe omputer.
Start Mixxx.
Indien u uw instellingen map op de juiste locatie heeft geplaatst dan zal Mixxx niet vragen naar uw muziekmappen en al uw instellingen zouden moeten zijn zoals ze voordien waren.
Ga naar en Her-link elk van uw muziek mappen zoals beschreven in Muziek mappen wijzigen.
Nu moeten al uw muziek bestanden beschikbaar zijn, al uw afspeellijsten, kratten en de geschiedenis zijn hersteld. Een bibliotheek her-scan is niet vereist. Configureer een sound output en test of u alle tracks zoals voordien kan afspelen. Let op: dit houdt natuurlijk geenszins rekening met de externe bibliotheken (iTunes, Traktor etc.), deze dient u opnieuw te configureren.
Gekende problemen
Indien u migreerde naar een ander besturingssysteem, een andere versie van besturingssysteem of een andere Mixxx versie, dan kunnen de gebruikte audio decoders gewijzigd zijn. Dit kan als gevolg hebben dat beatgrids en cue punten verschoven lijken, bv. ze zijn verschoven ten opzichte van de gewenste punten in de audio stream. Helaas is er nog geen automatische oplossing beschikbaar, nog niet. U dient voor elke track de cue punten te verschuiven in de beat grid met de cue shift toetsen die zich in de beatgrid editeer besturingen bevinden, zie Waveform Weergaven.