Numark Mixtrack (Pro) 3
The Numark Mixtrack 3 and Numark Mixtrack Pro 3 are the same controller except that the Pro version has an integrated 4 channel output sound card and costs $50 more. If you use the non-Pro version, you would need a splitter cable or separate audio interface to be able to preview tracks in headphones.
The microphone input on the Pro version is not available to the computer through the controller’s sound card. It is mixed with the main output in hardware, so this controller’s sound card is not suitable for broadcasting or recording the inputs. If you want to use the controller for broadcasting or recording, getting the non-Pro version with a separate audio interface with a microphone input is suggested.
Të reja në versionin 2.1.
Mapping Description
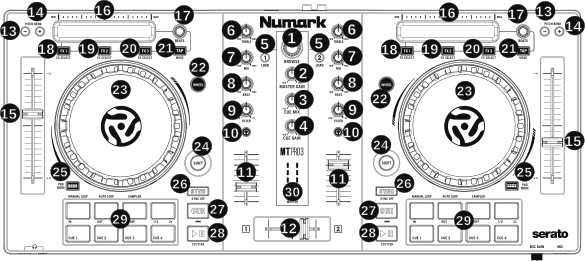
Numark Mixtrack (Pro) 3 (schematic view)
1. Browser Knob
Rotate this knob to cycle through tracks in main library window. Press
the Knob to expand library view.
SHIFT + Turn: allows selecting Play Lists and side navigation bar items.
SHIFT + Push: opens / closes selected side navigation bar item.
Configurable option: In Focus mode the Browse encoder affects the library widget which currently has keyboard focus. This requires the Mixxx window to have focus and allows to control the searchbar, too. In Classic mode the Browse encoder can select items in the sidebar and tracks table only, but independent of keyboard focus.
2. Master Gain
Adjusts the main volume in the software.
Note: This control does not affect the microphone volume which is
summed with the final output of the main gain to the main output.
Use the Mic Gain knob to control the microphone volume.
3. Cue Mix
Adjusts the software’s audio output to the headphones, mixing between the cue (PFL) output and the main mix output.
4. Cue Gain
Adjusts the volume for headphone cueing in the software.
5. Load
Press one of these buttons while a track is selected in the library window to assign it to Deck 1 and 2, respectively, in the software.
SHIFT + LOAD: Activates Fader Start mode for the corresponding (PFL Button is then blinking).
Fader start guide: In fader start mode,
not only you can press the play/pause button to play/pause the track,
but if you move up the level fader (the volume fader if you prefer) of
the deck, the track will be played and if you close it to zero, the
track will be paused.
Configurable option: If the smartPFL option is set to true, the Cue/PFL button is automatically activated on the deck being loaded and deactivated on the other deck.
6. High EQ Knobs
Adjust High frequencies of the deck
SHIFT + HIGH: Adjust parameter 1 of the currently focused effect on this deck.
7. Mid EQ Knobs
Adjust Mid frequencies of the deck
SHIFT + MID: Adjust parameter 2 of the currently focused effect on this deck.
8 Low EQ Knobs
Adjust Low frequencies of the deck
SHIFT + LOW: Adjust parameter 3 of the currently focused effect on this deck.
9. Filter
Adjusts the amount of the filter effect. Turning the knob left controls the low pass filter; turning it right controls the high pass filter.
SHIFT + FILTER: Adjust parameter 4 of the currently focused effect on this deck.
If effect is unfocused then;
SHIFT + FILTER Adjust the gain of the deck.
Configurable option: Adjust FX parameter 4 (default) or deck gain when unfocused.
10. Cue/PFL/Headphones
Sends pre-fader audio to the headphone output SHIFT + CUE/PFL: Toggle quantize mode
11. Volume fader
Adjusts the volume of the deck
12. Crossfader
Controls the blend between the two decks
13-14. Pitch Bend Down/Up
Press and hold to momentarily reduce the speed of the track.
SHIFT + PITCH BEND -/+: Jump 1 beat backward/forward.
- If loop is activated, move loop by beatjump amount instead.
15. Pitch Fader
Adjust the speed of the music (activate keylock to adjust tempo without affecting pitch). Note that moving the fader down increases speed, as marked by the “+” at the bottom of the fader on the controller. This can be reversed in Mixxx’s preferences under Interface > Speed slider direction
16. Touch Strip
Use the Touch Strip to adjust the deck’s Effect Unit Superknob. If Effects are assigned to Instant FX , they will be enabled instantly on touch, and disabled on finger lift.
SHIFT + Touch Strip: search through a track’s timeline
17. Beats Multiplier
Adjusts the Dry/Wet mix of the deck’s Effect Unit
TAP + BEATS: Moves the beat grid left (turn counterclockwise) or right (turn clockwise)
SHIFT + BEATS: Adjust beatjump amount
PADMODE + BEATS: Adjust Sampler Volume.
Left beat knob will adjust Samplers 1-4; Right knob will adjust Samplers 5-8
18. FX 1 On/Off
Turns FX1 on and off
SHIFT + FX1: Select from the list of available effects for the respective effect.
PADMODE + FX1: Assign / unassign FX 1 to Instant FX. When assigned to Instant FX, the FX is instantly activated by touching the Strip and stopped when finger is lifted.
TAP + FX1: Focus this effect to allow adjusting its metaknob with the touch strip.
19. FX 2 On/Off
Turns FX2 on and off
SHIFT + FX2: Select from the list of available effects for the respective effect.
PADMODE + FX2: Assign / unassign FX 1 to Instant FX. When assigned to Instant FX, the FX is instantly activated by touching the Strip and stopped when finger is lifted.
TAP + FX2: Focus this effect to allow adjusting its metaknob with the touch strip.
20. FX 3 On/Off
Turns FX3 on and off
SHIFT + FX3: Select from the list of available effects for the respective effect.
PADMODE + FX3: Assign / unassign FX 1 to Instant FX. When assigned to Instant FX, the FX is instantly activated by touching the Strip and stopped when finger is lifted.
TAP + FX3: Focus this effect to allow adjusting its metaknob with the touch strip.
21. Tap BPM
Press this 8 or more times on beat to manually enter a new BPM. The
software will ignore the track’s BPM and follow your manually entered
tempo.
SHIFT + TAP: Toggles deck between deck 1-3 (left side) or deck 2-4
(right side). TAP LED will be RED when deck 3 is active (Left Tap) or
deck 4 is active (Right Tap)
TAP + HOTCUE 1: Activates Brake effect
TAP + HOTCUE 2: Activates Spinback effect
23. Platter/Jog Wheel
Touch side: Pitch bend (nudging) if track is playing (Wheel On
(always) & Wheel Off - if
PitchBendOnWheelOff configuration option
is true) and / track positioning (Wheel On)
WHEEL On + Touch platter: scratching: touch the platter and move it
WHEEL Off + Touch platter: If track is not playing, allows
positioning the track
SHIFT + WHEEL Off + Touch platter: fast seek through track
SHIFT + WHEEL On + Touch platter: iCut mode: simulates a scratch
routine with the jog wheel. When the jog wheel is turned back, the
crossfader closes; when the jog wheel is turned forward the crossfader
will open. As a visual reference, TAP LED and Wheel button LED will be
ON.
Configurable Options: The iCutEnabled and fastSeekEnabled options can be used to turn off iCut and fast seeking. These options may be helpful to avoid accidentally using these features when touching the platter with shift lock on. The PitchBendOnWheelOff option allows pitch bending using the jog wheel even when the scratch mode is disabled.
24. Shift
Allows multiple control commands to be triggered when pressed first along with other buttons
25. Pad Mode
This is used to change the operation mode of the top 4 performance pads. Pressing this button will light the pad indicating the currently active mode (Manual Loop, Auto Loop or Sampler).
26. Sync
Enables BPM syncing between decks.
Short Press: Press once to synchronize the tempo (BPM) to that of
to that of the other track
Double Press: press twice QUICKLY to play the track immediately
synchronized to the tempo (BPM) and to the phase of the other track,
if the track was paused
Long Press (Sync Lock): Hold for at least half of a second to
enable sync lock for this deck. Decks with sync locked will all play
at the same tempo, and decks that also have quantize enabled will
always have their beats lined up. If the Sync Lock was previously
activated, it just deactivates it regardless of the Short press/Double
Press
SHIFT + SYNC: Toggle Key Lock
Configuration Options: The noPlayOnSyncDoublePress option can be used to turn off Play on Sync Double Press.
27. Cue (Transport Control)
Behavior depends on the cue mode set in the Mixxx preferences.
SHIFT + CUE: Return the play head to the start of the track.
28. Play/Pause
Starts and suspends playback. If no track is loaded, loads the
selected track (if any) and play.
SHIFT + PLAY/PAUSE: Stutter the track from the last set cue point.
If a cue point has not been set, the play head will return to the
start of the track.
29. Performance Pads
The top row of pads is for controlling loops and samples. To select a mode, hold down the Pad Mode button and press one of the upper pads. An LED under the pad section indicates the currently selected mode. See the subsections below for details about each mode.
The bottom row of pads is used to trigger hotcue points. If a hotcue
point has not already been set for the loaded track, this control will
mark the hotcue point. If a hotcue point has already been set, this
control will jump to it.
SHIFT + HOTCUE: Deletes the assigned hotcue point
Manual Loop Mode
Hold PADMODE and press the pad marked Manual Loop (silkscreened above the pad) to assign the lower 4 pads to the functions listed below:
Loop In – Sets the beginning of a loop: When assigned, the Pad LED will light blue
Loop Out – Sets the end point for the loop: When assigned, the Pad LED will light blue
On/Off – (De)activate the loop. If a loop has not been set, this button will have no effect.: When assigned, the Pad LED will light blue
Loop x1/2 – Halve the length of the loop. Press SHIFT + Loop x1/2 to double the length of the loop. x1/2 button is disabled unless the corresponding deck is set to be quantized
Auto Loop Mode
Hold Pad Mode and press the pad marked Autoloop to assign the lower 4 pads to the functions listed below: When assigned, the respective Pad LED will blink Yellow
Auto 1 – Sets and starts playback of a 2-beat autoloop.
Auto 2 – Sets and starts playback of a 4-beat autoloop.
Auto 3 – Sets and starts playback of a 8-beat autoloop.
Auto 4 – Sets and starts playback of a 16-beat autoloop.
SHIFT + Auto 1 – Sets and starts playback of a 1/8-beat autoloop.
SHIFT + Auto 2 – Sets and starts playback of a 1/4-beat autoloop.
SHIFT + Auto 3 – Sets and starts playback of a 1/2-beat autoloop.
SHIFT + Auto 4 – Sets and starts playback of a 1-beat autoloop.
If the pad is held down more than .5 second (Long Press), the Autoloop will be disabled once pad is released. On Short Press, the pad will behave as a normal button (ON on first press, OFF on second press)
Sample Mode
Hold Pad Mode and press the pad marked Sampler to assign the lower 4 pads to the functions listed below. When assigned, the respective Pad LED will blink Purple Shift + Sample X will play loaded sample, but with Sampler unit Sync disabled
Deck 1 - Sample 1 – Plays the sample assigned to Sample Pad 1 with the unit Sync activated.
Deck 1 - Sample 2 – Plays the sample assigned to Sample Pad 2 with the unit Sync activated.
Deck 1 - Sample 3 – Plays the sample assigned to Sample Pad 3 with the unit Sync activated.
Deck 1 - Sample 4 – Plays the sample assigned to Sample Pad 4 with the unit Sync activated.
Deck 2 - Sample 1 – Plays the sample assigned to Sample Pad 5 with the unit Sync activated.
Deck 2 - Sample 2 – Plays the sample assigned to Sample Pad 6 with the unit Sync activated.
Deck 2 - Sample 3 – Plays the sample assigned to Sample Pad 7 with the unit Sync activated.
Deck 2 - Sample 4 – Plays the sample assigned to Sample Pad 8 with the unit Sync activated.
If the pad is held down more than .5 second (Long Press), the sampler will be disabled once pad is released. On Short Press, the pad will behave as a normal button (ON on first press, OFF on second press)
Load sample by selecting track and pressing Sample X
Pressing sample button when sample is already playing goes back to cue and plays
Shift + sample to stop sample
Eject sample by TAP + Sample X
30. Master Output LEDs
Displays the audio level going to the main output.