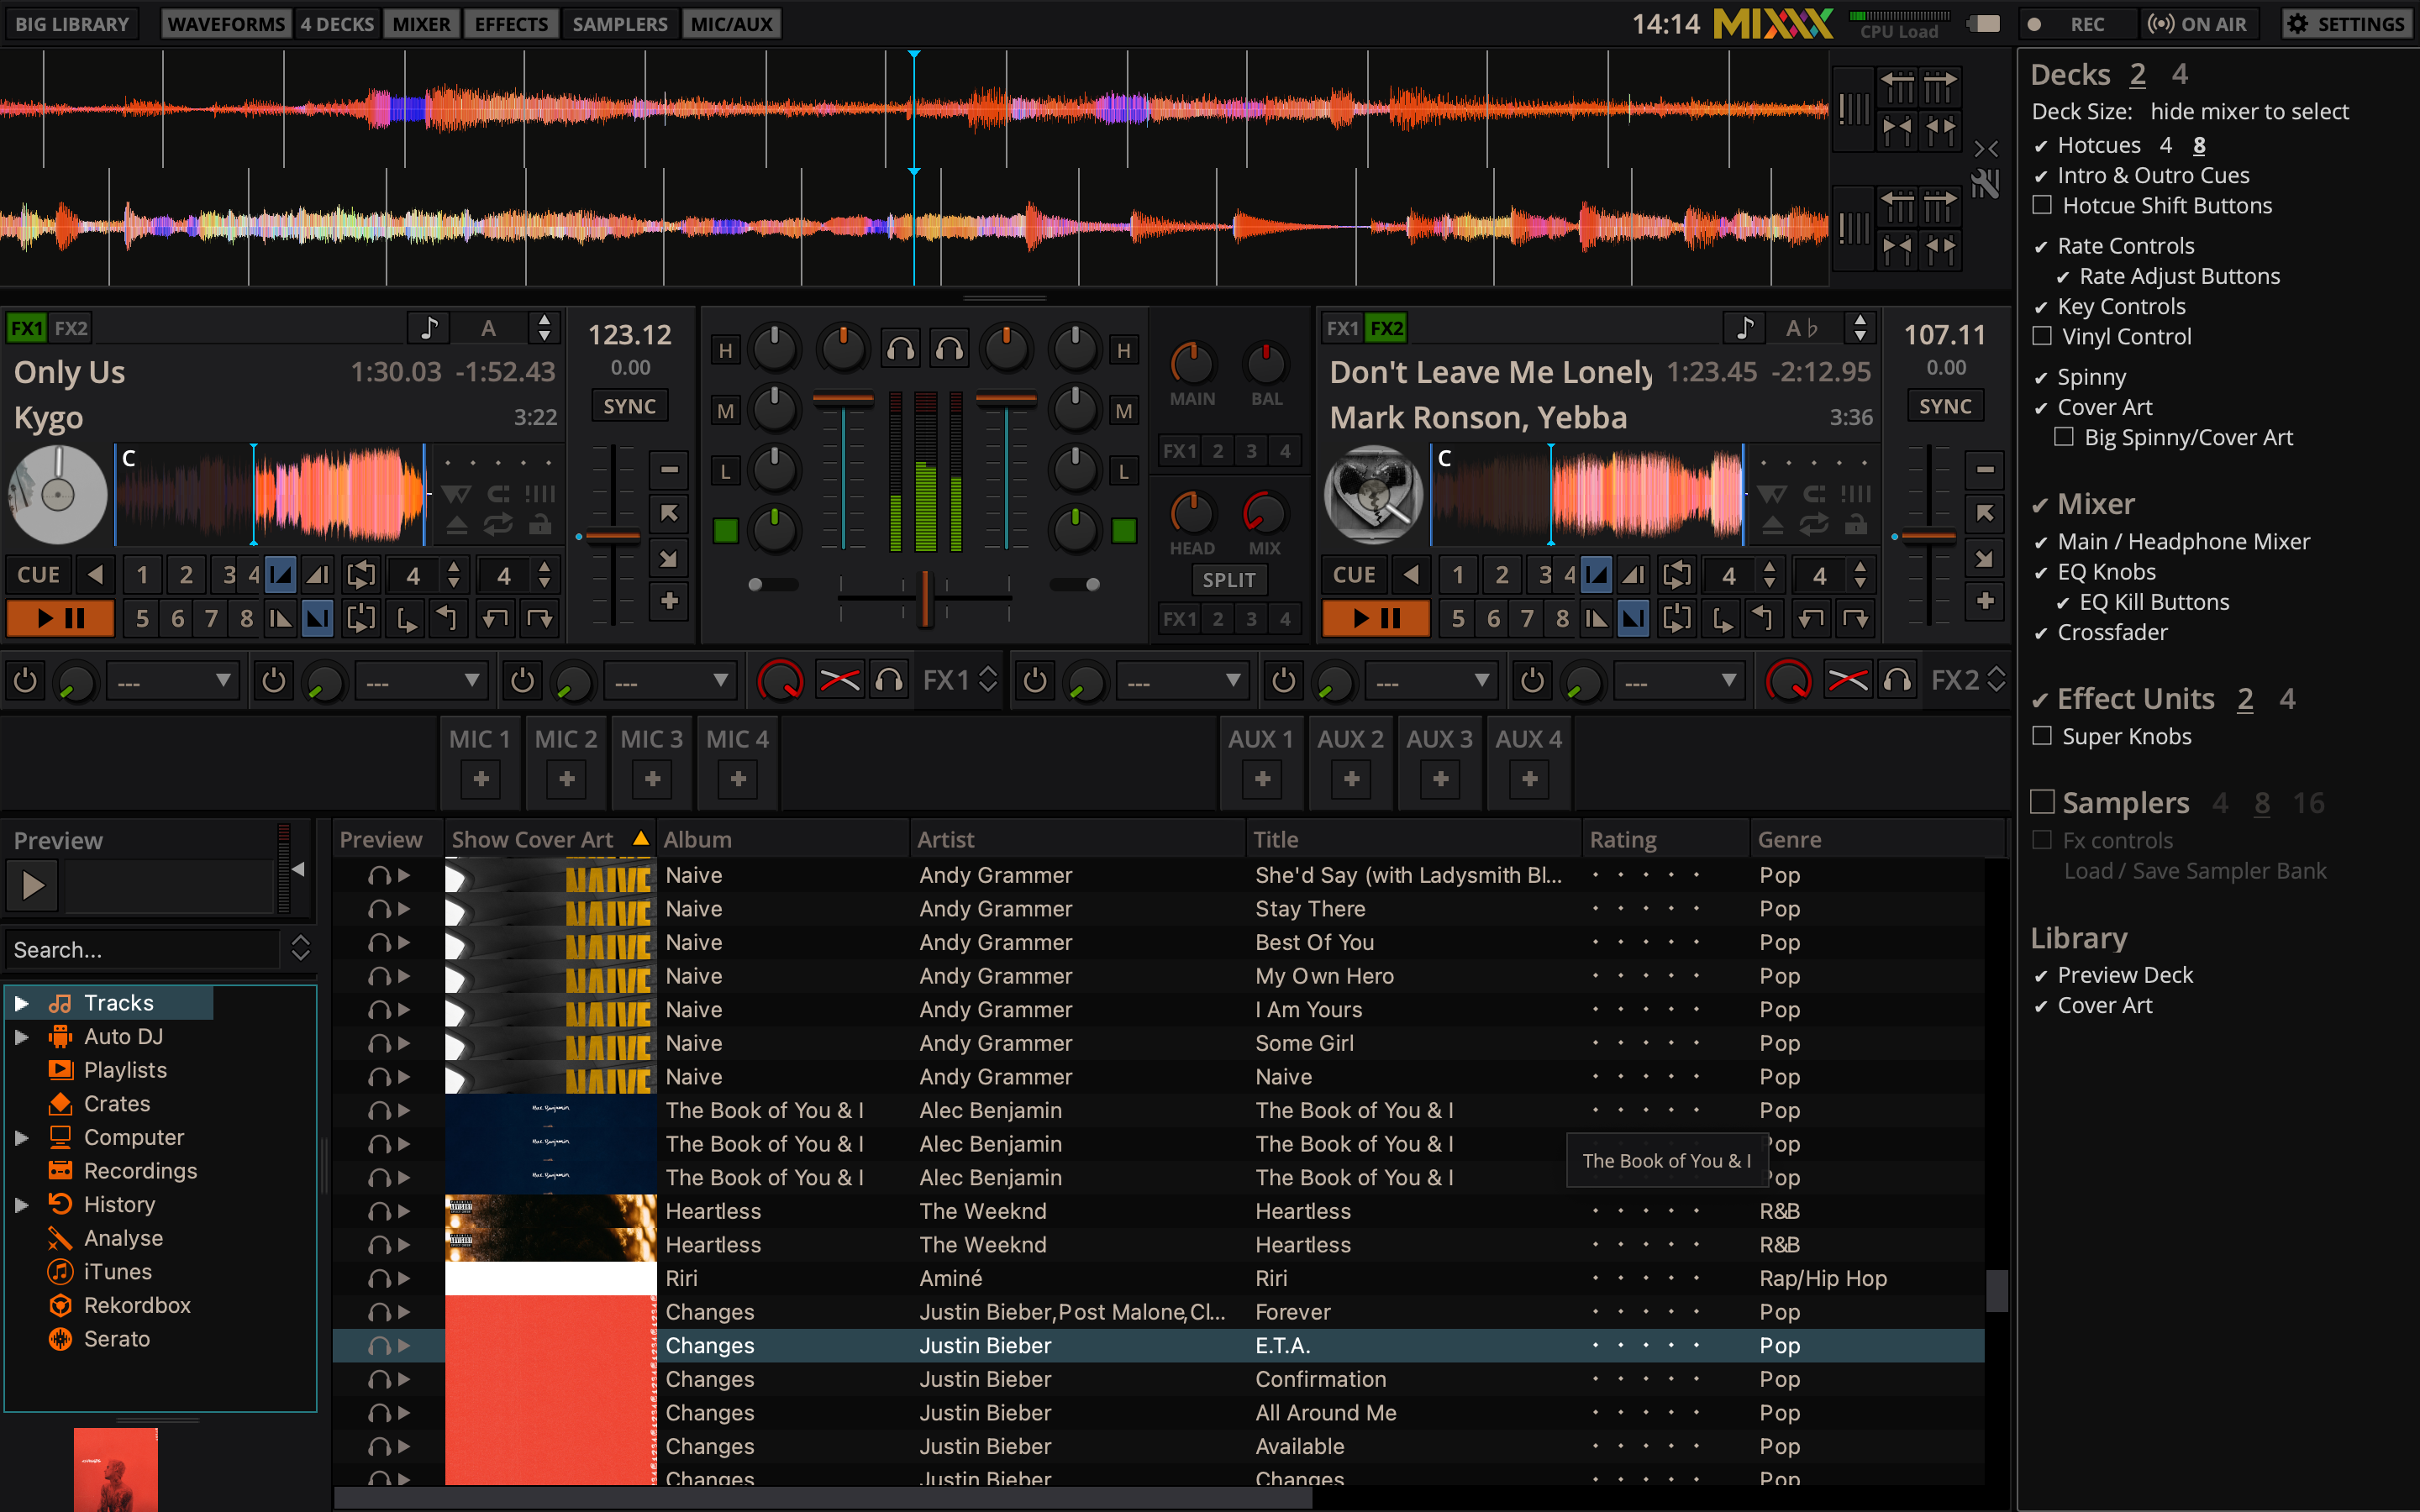
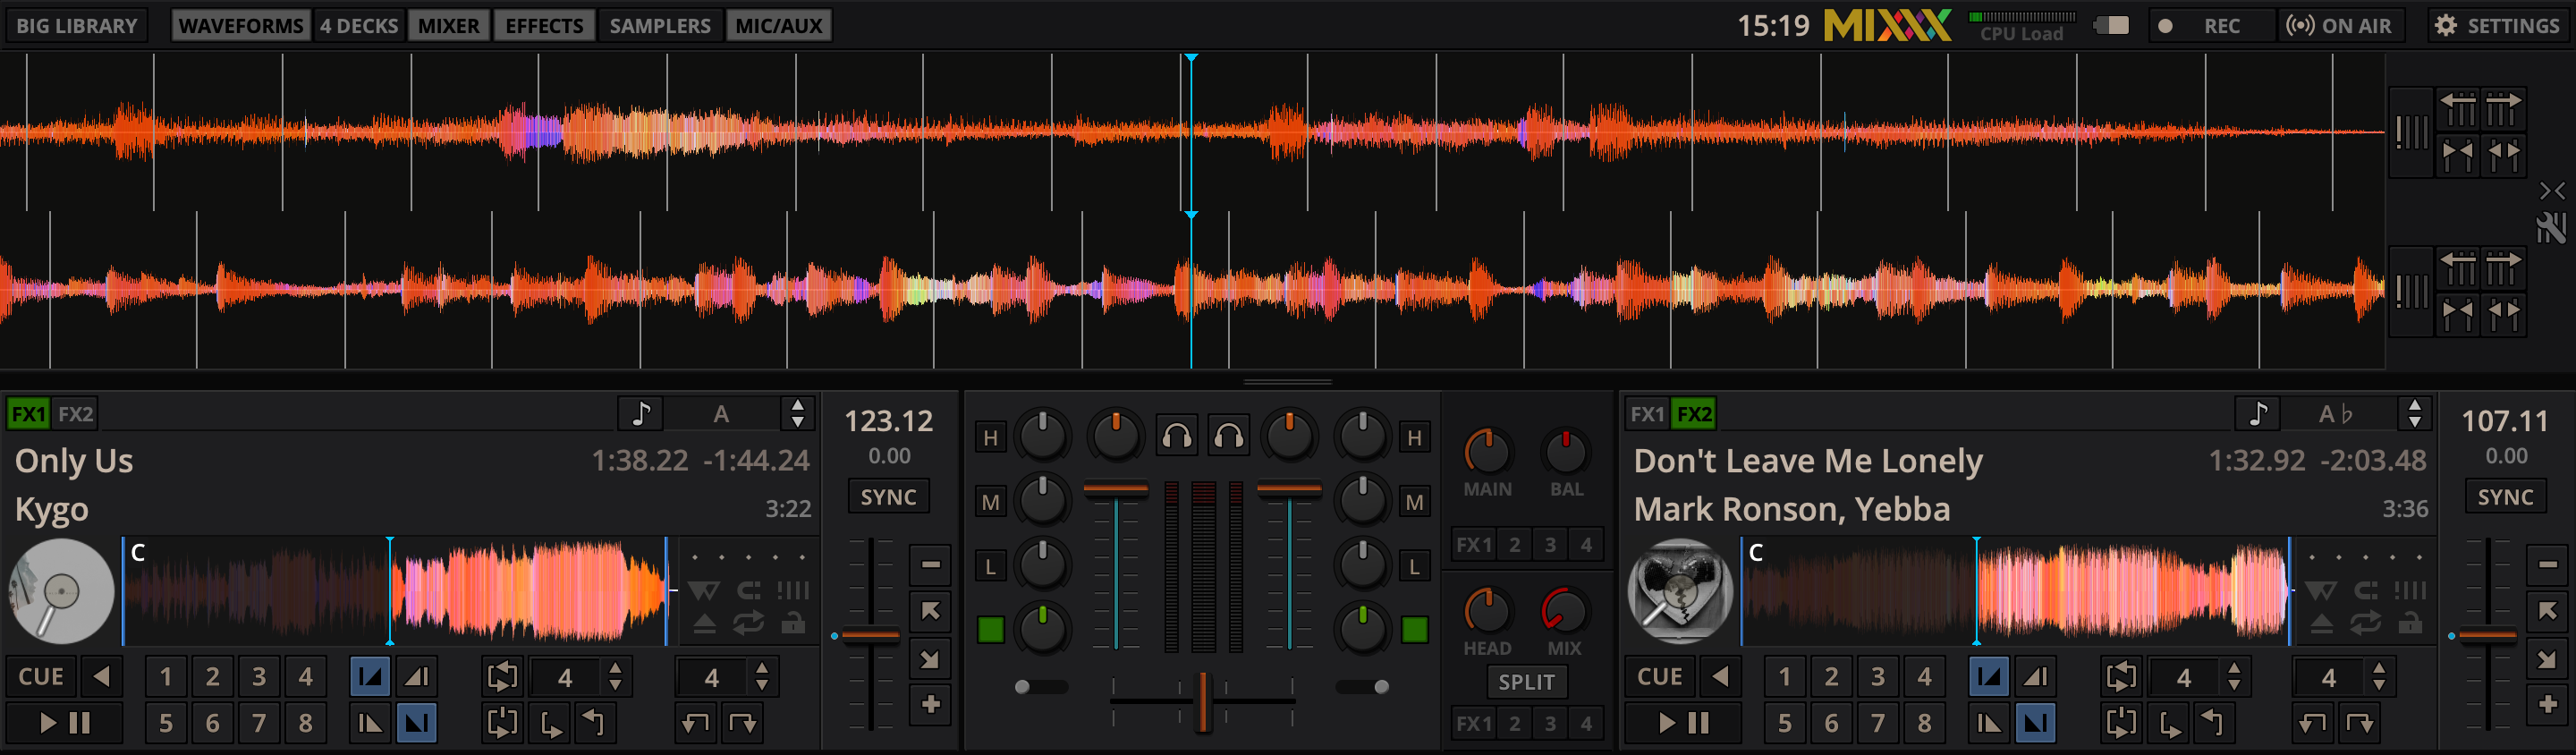
Benvingut a la interfície del Mixxx. Aquí és on es fa màgia. Segurament voldreu familiaritzar-vos molt amb aquesta interfície perquè és la principal manera d’utilitzar-lo. En aquest capítol, us presentem la interfície per defecte del Mixxx i en descrivim els elements, rodetes i controls deslliçants.
This is the LateNight skin, PaleMoon color theme. It is the default skin supplied with Mixxx 2.3. There
are a variety of other skins included with Mixxx. You should explore them all
to figure out which one you prefer. This section will focus on LateNight only, though all Mixxx skins provide most of the controls described here.
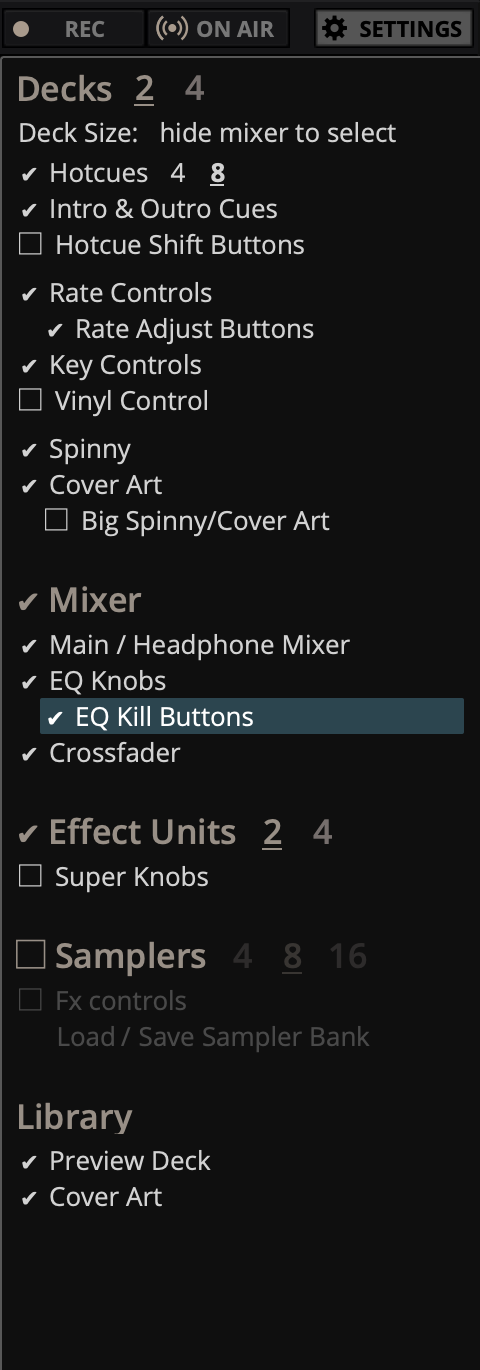
Click the SETTINGS button or gear icon (depending on the skin) to open the skin settings menu. This provides common basic controls as well as some skin-specific options.
The deck section comes in three sizes: Full, Compact and Mini.
You can switch between any of the three sizes by clicking on the Settings button or the gear icon. Under the Decks section, click on «hide mixer to select».
This will automatically select the Compact deck (underlined and bolded). If you wish to change to a different deck size, you can choose FULL or Mini.
The Compact deck has a reduced set of controls for when you don’t need all of them on screen, for example when they’re also accessible from your controller. Reverse is removed from the Playback/Cue Controls, and the Controls Hotcue, Intro/Outro Markers, Controls de bucle and rate adjust buttons are not shown.
The mini deck is of a much smaller size and shows only the waveform and the Visualització de la informació de la pista. You can also use minimal decks with the maximized library.
Suggerència
Hiding the mixer will by default switch to the compact decks.
La secció dels plats us permet controlar tot el que fa referència al tocadiscs virtual, que anomenem plat. La dividirem en diferents elements.
The title of the track that was loaded into a deck is displayed on top. This
is the same as the title listed under the Title column heading in the Mixxx library. This information is initially loaded from the track’s
metadata. If the metadata is missing, the title and artist are guessed
from the filename.
Artista de la pista
The artist of the track is listed below. It is the same as listed under the
Artist column heading in the Mixxx library.
Suggerència
Double-click any track text label to open the Properties editor
where you can edit all track metadata.
Time Elapsed/Remaining/Both
By default it displays the total elapsed time in the track up to the
millisecond. Clicking on the display switches to the Time Remaining view,
which indicates how much time is left before the track reaches the end.
Clicking the display again, both the elapsed and remaining time are shown
simultaneously in the format elapsed time / remaining time.
You can change the default in Preferences ‣ Decks ‣ Deck options.
BPM (Tempo)
El número a la part superior dreta és el BPM efectiu de la pista. Es tracta del BPM de la pista, ajustat a la velocitat de reproducció. Per exemple, si la pista normalment té 100 BPM i es reprodueix a +5%, aleshores el BPM efectiu mostrarà 105 BPM.
Suggerència
You can use a keyboard shortcut and tap with the beat to set the BPM
to the speed you are tapping, go to Amb un teclat d’ordinador for more
information.
The key displays the current musical key of the loaded track after pitch shifting. The key is displayed below the BPM (Tempo). This is the same as the key that is shown under the Key column heading in the Mixxx library.
Clicking the key will expand it to reveal more options:
Pitch Control: This changes the track pitch independent of the tempo. Left-clicking the - button decreases the pitch by one semitone. Right-clicking it decreases the pitch by 10 cents. Left-clicking the + button increases the pitch by one semitone. Right-clicking it increases the pitch by 10 cents.
Sync and Reset Key: Left-clicking the MATCH button sets the key to a pitch that allows harmonic transition from the other track. It requires a detected key on both involved decks. Right-clicking it resets the key to the original track key.
Cover Art
The cover art of the track loaded into the deck is displayed on the left side of the track. This is the same as the cover art that is shown under the Cover Art column heading in the Mixxx library.
In Deere skin you can choose to enable or disable the cover art by clicking the gear icon in the upper right corner, then toggling the Decks ‣ Cover Art option. Clicking on the cover art will expand it into a full blown image.
The cover art is also shown in the Vinyl Widget next to the parallel waveforms.
La secció del gràfic d’ona del plat permet visualitzar com canvia l’àudio al llarg de la pista, de manera que podeu “veure” la música.
By default the waveform displays are aligned parallel to each other in
order to make beatmatching easier, as it is possible to beatmatch
visually by aligning the beats that appear in each waveform.
Parallel waveforms in the default Mixxx skin (LateNight, PaleMoon theme)
Depending on the skin, Mixxx displays either parallel waveforms (default) or
separate waveforms. LateNight and Tango skins only have resizable parallel waveforms while
Shade skin provides only separate waveforms.
In Deere skin you can select your preferred appearance by clicking the gear icon in the upper right corner,
then toggling the Skin Settings ‣ Parallel Waveforms option.
Avís
If you have a slower computer and notice performance issues with
Mixxx, try lowering the frame rate or changing the waveform type
in Preferences ‣ Waveforms.
Gràfic d’ona de reproducció
El gràfic d’ona de reproducció mostra l’envolvent de la pista al voltant de la posició actual de reproducció i es va actualitzant en temps real. Es pot utilitzar el ratolí per a pausar, fer scratch, moure enrere o afegir-hi una pista nova. També permet fer ajustaments momentànis del pitch si es fa clic amb el botó dret i s’arrastra cap als costats.
Suggerència
You can select from different types of displays for the waveform,
which differ primarily in the level of detail shown in the
waveform, in Preferences ‣ Waveforms ‣ Waveform type.
Right next to the waveform view there are controls to adjust the beatgrid.
You may stretch, compress or shift the beatgrid in case it was not detected
correctly (see Beat Detection). There are also controls to shift
cue points in case they are set off after decoder changes, for example when you migrated
your Mixxx library to another compouter or operating system. These controls are
hidden by default and need to be enabled in the skin settings menu.
Beatgrid editing controls in the default Mixxx skin (LateNight, PaleMoon theme)
In Deere skin, these controls are located in the expandable BPM section inside
the decks.
Gràfic d’ona de la pista
The smaller, zoomed-out version of the waveform shows the various markers
within the track as well as the waveform envelope of the entire track. This is
useful because they allow DJs to see breakdowns far in advance. As visual aid,
the part of the track that has already been played is darkened.
Clicking somewhere on the waveform allows you to jump to an arbitrary position
in the track. Like with the Waveform summary, you can select from different
types of displays for the overview in
Preferences ‣ Waveforms ‣ Overview type.
Vinil giratori
The line on the vinyl widget rotates if the track moves. It is similar to the
position marker found on scratch records. Use the mouse on the vinyl widget to
pause, scratch, spin-back or throw tracks - just like a real record.
When performing rolling loops or when using
Slip Mode,
a “ghost” marker hints where the playback will continue.
The Vinyl Widget is hidden by default and can be enabled in the
Skin Settings.
If vinyl control is enabled, it can optionally display the time-coded
vinyl signal quality. Activate the option in Preferences ‣
Vinyl Control ‣ Show Signal Quality in Skin.
Zoom de gràfic d’ona
Using the mouse-wheel everywhere in the waveform summary will zoom the
waveform in or out. You can choose whether to synchronize the zoom level
between the decks in Preferences ‣ Waveforms.
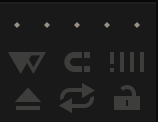
Marques del gràfic d’ona
Mentre es mescla, poden aparèixer diferents marques addicionals als gràfics d’ona:
Position marker: The static vertical line in the center of the waveform
summary indicates the playback point of the deck. The waveform overview
includes a vertical line to show the current position within the track.
Marca de toc: Les línies blanques del gràfic d’ona indiquen la posició dels tocs de compàs en l’àudio, que tenen el nom de graella de tocs
Marca de punt cue: Indica la posició d’un punt cue.
Marca de hotcue: Indica la posició i número d’un punt hotcue, si n’hi ha.
Marca d’inici/fi de bucle: Indica el començament i el final d’un bucle.
superposició de bucle: Es dibuixa entre els punts d’inici i final de bucle, i canvia el color depenent d’on està ubicat el bucle.
Notificació de final de pista: Si el gràfic d’ona parpalleja en vermell, vol dir que queden 30 segons o menys per a que s’acabi la pista.
The six buttons at the bottom right below the waveform allow you to configure
the deck. Starting from the top row (left to right) and the bottom row (left to right), the buttons are as
follows:
Slip Mode Toggle
When active, the playback continues muted in the background during a loop, reverse, scratch, etc.
Once disabled, the audible playback will resume where the track would have been.
Commutador de mode quantitzat
Si s’activa, tots els punts cue, hotcues, bucles i bucles de tocs s’alinearan de manera que comencin en un toc.
Botó d’ajustar la graella de ritme
Clicking this button adjusts the track beat-grid so that the current position
is marked as a beat. This is useful if Mixxx was able to accurately detect the
track’s BPM but failed to align the beat markers on the beats. For
more information, go to the chapter Beat Detection.
Botó d’extreure la pista
Clicking this button ejects the track from the deck. If no track is loaded the
last-ejected track (of any deck) is reloaded.
Double-click to reload the last
replaced track. In empty decks the second-last ejected track is reloaded.
Alternatively you can use a keyboard shortcut, go to the chapter
Amb un teclat d’ordinador for more information.
Commutador de repetició
Si s’activa el mode de repetició, la pista tornarà al principi quan acabi i continuarà reproduint.
Commutador de bloqueig de clau musical
Key lock locks the track’s pitch so that adjustments to its
tempo via the rate slider do not affect its pitch. This is useful if you would
like to speed up or slow down a track and avoid the “chipmunk” effect that
speeding up vocals has.
En fer clic al botó de reproducció/pausa s’inicia o es pausa la reproducció.
Vegeu també
El comportament del botó reprodueix/pausa depèn del mode de punts cue.
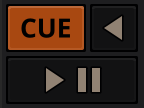
Cue Button
Si es prem el botó mentre sona la pista, la reproducció salta al punt cue de la pista, i es posa en pausa. Un cop la pista està pausada al punt cue, podeu pre-escoltar-la prement el botó cue. Si no heu mogut el punt cue, el punt cue inicial és l’inici de la pista.
Press and hold this button to temporarily play the track backwards during regular playback.
Right-click and hold for “Censor” mode. This reverses the track while the playback continues
muted in the background. On release playback is resumed where the track would have been
if it had not been reversed.
Mixxx supports various Cue modes that adapt to fit other devices in your setup
or your personal preferences. The actual behavior of the Play, Pause, and Cue
buttons depends on the selected Cue mode. To change the Cue mode, go to
Preferences ‣ Decks ‣ Cue mode.
Mode Mixxx (per defecte)
Mentre està pausat en un punt cue (botó Cue encès):
Hold down the Cue button to play the track from the Cue point,
as long as the button is pressed. After releasing the Cue button, the track
jumps back to the Cue point and pauses again.
Press Play/Pause before releasing the Cue button to continue playback normally.
Mentre està pausat en un punt diferent al punt Cue (botó Cue interminent):
Tap the Cue button to store the current position as new Cue point.
Mentre es reprodueix:
Tap the Cue button to jump to the Cue point and pause playback.
Mixxx mode (no blinking)
Same as the default Mixxx mode, but without blinking indicators.
Mode Pioneer
Same as Mixxx mode, but the buttons are more flashy matching a Pioneer CDJ player.
El botó Reprodueix/Pausa està en intermitent un cop per segon quan la pista està pausada.
The Cue button flashes twice a second when the next push will move the Cue point.
Mode Denon
While paused at Cue point (Cue button lit) - same as Mixxx mode:
Hold down the Cue button to play the track from the Cue point,
as long as the button is pressed. After releasing the Cue button, the track
jumps back to the Cue point and pauses again.
Press Play/Pause before releasing the Cue button to continue playback normally.
Mentre està pausat en un punt diferent al punt Cue (botó Reprodueix intermitent):
Tap the Cue button to move the track back to Cue point.
Tap the Play/Pause button to move the Cue point to the current
position and start playback.
While playing - same as Mixxx mode:
Tap the Cue button to jump to the Cue point and pause playback.
Mode Numark
Same as Denon mode, but without a flashing Play/Pause button.
Aquest mode és útil si voleu implementar una aparença amb plats de 3 botons, un botó Cue, un botó pausa separat, i un botó Reprodueix/Salta.
CUP (Cue + Play) mode
Press the Cue button to jump to the Cue point and pause,
continuing playback only when either the Cue button is released or Play/Pause
is pressed.
If the Cue button is pressed while paused, the Cue point is
first moved to the current position.
Suggerència
Podeu utilitzar els botons hotcue per a tenir més punts de referència en una pista.
Vegeu també
Podeu també utilitzar dreceres de teclat per a fer Cue. Aneu a Amb un teclat d’ordinador per a més informació.
You can use the Intro/Outro Markers with Auto DJ to mix in and out of points but unlike hotcues, they do not mark only one point.
The intro and outro are sections and each section is defined by two points. See DJ Automàtic - Mescleu de manera automatitzada.
Intro Start/End Markers
The analyzer places the intro start point at the first sound of a track and you can decide where to place the intro end point.
Left-clicking on the marker when it is set jumps to the marker. When it is not set, clicking sets the marker to the current play position.
Right-clicking on the marker when it is set clears the marker.
Outro Start/End Markers
The analyzer places the outro end point at the last sound of a track and you can decide where to place the outro start point.
Left-clicking on the marker when it is set jumps to the marker. When it is not set, clicking sets the marker to the current play position.
Right-clicking on the marker when it is set clears the marker.
Nota
If quantization is enabled, left-clicking on any of the markers snaps to the nearest beat.
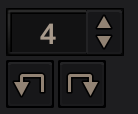
You can type, use the arrow keys or scroll vertically in the input box to select the number of beats to jump or move, with the Beatjump Forward/ Backward buttons.
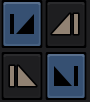
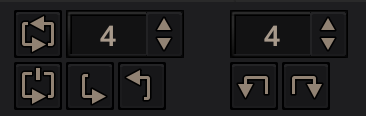
Beatjump Backward button
Clicking this while the loop is inactive will make the track jump backward by the set number of beats (left click) or by one beat (right click).
Clicking this while the loop is active will move the loop backward by the set number of beats (left click) or by one beat (right click).
Beatjump Forward button
Clicking this while the loop is inactive will make the track jump forward by the set number of beats (left click) or by one beat (right click).
Clicking this while the loop is active will move the loop forward by the set number of beats (left click) or by one beat (right click).
El mode de control de vinil i les opcions de control de punts cue d’un plat
The control above the waveforms relate to the vinyl control feature in
Mixxx and is hidden in the default
Mixxx user interface. Click the gear icon in the upper right corner, then toggle Skin Settings ‣ Vinyl Control Options, or use the specific Application shortcuts to show or hide the
section.
Vegeu també
Per a més informació de com utilitzar el control de vinil, aneu al capítol Vinyl Control / DVS.
Vinyl button
This button enables vinyl control. When enabled in Mixxx, the track
on the Mixxx deck is controlled by the external vinyl control.
Pass button
This button enables passthrough. When enabled, audio from an external vinyl
can be played on the Mixxx deck.
Botons Abs/Rel/Const
Mode absolut: La posició de la pista correspon a la posició i velocitat de l’agulla.
Mode relatiu: La velocitat de la pista correspon a la velocitat de l’agulla, però sense importar la seva posició.
Mode constant: La velocitat de la pista correspon a l’última velocitat estable coneguda, independentment del que es rebi ara mateix.
Cue/Hot button
Aquests botons determinen com es comporten els punts cue quan s’utilitza el mode relatiu del control de vinil:
Off: Els punts cue s’ignoren.
Cue: If the needle is dropped after the cue point, the track will seek
to that cue point.
Hot: The track will seek to the nearest previous hotcue point.
Els controls de velocitat permeten canviar la velocitat a la que es reprodueixen les pistes. Això és molt útil per a fer beatmatching de dues pistes en una mescla. Podeu fer canvis de la velocitat també des del teclat de l’ordinador, veieu Amb un teclat d’ordinador per a més informació.
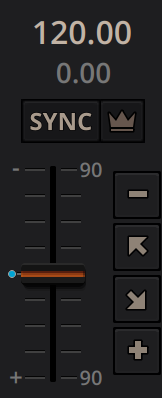
Botó SYNC
Clic amb el botó esquerra: Canvia la velocitat de la pista de manera que el BPM i la fase de la pista concideix amb l’altre plat.
Clic amb el botó dret: Només canvia la velocitat de la pista per a que concideixi amb l’altre plat, però no canvia la fase.
Els plats i els reproductors de mostres trien al moment a quin altre plat sincronitzar-se. Tant els plats com els reproductors de mostres només es poden sincronitzar amb altres plats. El candidat per als reproductors de mostres és:
The sync leader, identified by the lit sync-lock button and the crown symbol.
El primer plat (en ordre numèric) que estigui reproduïnt una pista amb graella de ritme detectada, i la velocitat de reproducció sigui diferent a la de per defecte.
El primer plat (en ordre numèric) que tingui una pista carregada amb la graella de ritme detectada, independentment de si està reproduïnt o no.
So basically, if you sync a sampler and both deck 1 and deck 2 are playing a
track with a beatgrid then deck 1 will win since numerically it is first. The
sync targets for decks are chosen with the new sync lock feature, see
Sync Lock for more information.
Control lliscant de velocitat
The slider allows you to change the speed of the song from the track’s
original tempo. In default configuration the speed will increase as you move
the slider down, and decrease as you move the slider up (similar to the
behaviour found on DJ turntables and CDJ units where moving the
slider towards you increases the speed). Note that the direction can be
inverted, and the range of adjustment widened/narrowed by the settings found
under «Decks» in Mixxx’s preferences.
Indicador de la velocitat
El percentatge amb que s’augmenta o disminueix la velocitat de la pista. Si el control lliscant de velocitat està al mig, l’indicador mostrarà el text +0.0%, que vol dir que no canvia.
Suggerència
To make the rate and/or pitch automatically reset whenever a new
track is loaded go to Preferences ‣ Decks ‣
Speed (Tempo) and Key (Pitch) options ‣ Reset on track load.
Botons de velocitat momentani (Empeny)
Pushing the diagonal arrow buttons is like nudging the metal edge of
a turntable, or the outer edge of a CD player. It will give the track a push
or pull forwards or backwards. If the buttons are released the previous tempo
is restored. The buttons can act as either a fixed pitch bend or a
ramping pitch bend.
Botons de velocitat
Clicking the - button will set the pitch/rate lower while the + button will set the pitch/rate higher. This is like moving the pitch slider up or down by a fixed amount. Unlike using the temporary pitch/rate buttons, the change is permanent so these button s don’t need to be held down.
Vegeu també
To customize the amount by which the buttons alter the pitch of
the track, the slider range as well as the direction, go to
Preferences ‣ Interface ‣
Adjustment buttons ‣ Permanent / Temporary.
Suggerència
Si canvieu la velocitat d’una pista, veureu que el to també canvia (per exemple, si s’accelera molt, la veu sona com la dels barrufets). Podeu activar el bloqueig de clau musical per a que es mantingui el to constant.
In this section of the Mixxx interface you can control (beat-)loops and set the
loop points of a track.
You can also shift loops using the beatjump / loop move controls shown at the right side of the looping controls.
Beatloop size
The input box allows you to set the size of the loop in beats to set with the Beatloop button. Changing this resizes the loop if the loop already matches the size.
If a loop is set, a loop overlay will be drawn on the
waveforms.
Beatloop
Left-clicking the Beatloop button starts a loop over the set number of beats. If the loaded track has no beats, the unit is seconds. If quantize is enabled, it snaps to the nearest beat. This works for manually placed loops as well as automatic loops set by
the beatlooping buttons. Depending on the current status of the loop, the
loop overlay on the waveforms changes color. Right-clicking the Beatloop button temporarily enables a rolling loop over the set number of beats. Playback will resume where the track would have been if it had not entered the loop.
Double loop
Clicking on the arrow pointing up will double the current loop’s
length up to 64 bars. The length of the loop overlay in the waveform will
increase accordingly.
Halve loop
Clicking on the arrow pointing down will halve the current loop’s
length down to 1/32 bars. The length of the loop overlay in the waveform will
decrease accordingly.
Loop-In
This button allows you to manually set the start point of a loop.
A loop-in marker is placed on the waveform indicating the position.
If clicked when a loop was already set, it moves the start point of a loop
to a new position.
Loop-Out
This button allows you to manually set the end point of a loop.
A loop-out marker is placed on the waveform indicating the position. If
clicked when a loop was already set, it moves the end point of a loop to a new
position.
Reloop
Left-clicking this button toggles the current loop on or off. If the loop is ahead of the current position, looping will start when the loop is reached. This works only if the Loop-in and Loop-Out marker are set.
Right-clicking this button enables the loop, jumps to Loop-in marker and stops playback.
Suggerència
If you are playing inside a loop and want to move the end point
beyond its current position in the track, click on the Beatloop button
first and when the play position reaches the desired position, click
on the Loop-Out button.
Vegeu també
Si el mode quantitzat està activat, els bucles s’ajustaran atumàticament al toc de compàs més proper. Aquest està desactivat per defecte, i podeu activar-lo fent clic a Commutador de mode quantitzat.
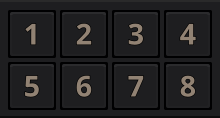
Per saltar a diferents parts de la pista, podeu utilitzar aquests botons numerats. Podeu també utilitzar dreceres de teclat, aneu a Amb un teclat d’ordinador per a més informació.
En fer clic en un dels botons numerats, es defineix un hotcue a la posició de reproducció actual. Es posarà una marca amb el número corresponent al gràfic d’ona i el botó s’iluminarà per indicar que està definit.
Mentre està reproduint: Feu clic al botó de hotcue per fer que la pista vagi immediatament a la posició del hotcue i continuï reproduint. Si esteu reproduint dins d’un bucle i feu clic a un hotcue que està fora del bucle, aleshores la reproducció anirà al punt hotcue, i es desactivarà el bucle.
Mentre està parat: Feu clic al botó hotcue per a que la pista vagi immediatament a la posició del hotcue i comenci a reproduir mentre el botó es mantingui premut. Premeu la drecera de teclat de Reprodueix mentre el botó de hotcue està premut per a que continui la reproducció i es pugui deixar el botó hotcue.
It’s possible to add labels or colors to your hotcues to make them easier to
distinguish and make it possible to get their «meaning» at first glance.
Labels and colors can be assigned from the Hotcue context menu, which can be
opened by right-clicking either the hotcue button or the hotcue marker in the
waveform overview.
To delete a hotcue, right-click on the hotcue button or the waveform marker in
the overview waveform to open the context menu, then click the trash icon.
Nota
El Mixxx suporta fins a 36 hotcues per plat. Per defecte, només se’n mostren uns pocs a la interfície. Podeu configurar les dreceres de teclat o les assignacions de la controladora per utilitzar-los tots.
Vegeu també
Igual que amb els bucles (veure més amunt), si el mode quantitzat està activat, els punts hotcue s’ajustaran automàticament al toc més proper. Aquest està desactivat per defecte, i podeu activar-lo fent clic a Commutador de mode quantitzat.
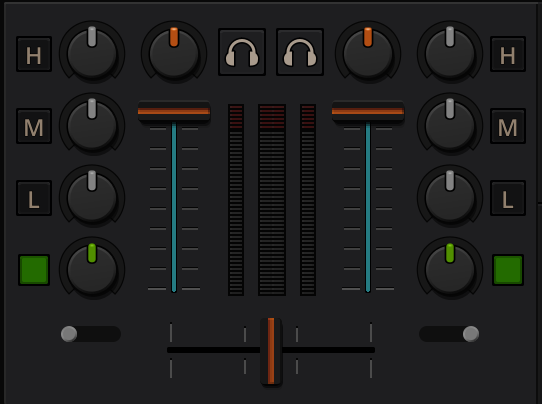
La secció del mesclador de la interfície d’usuari del Mixxx permet controlar com els diferents plats i reproductors de mostres es mesclen entre ells.
Monitors de nivell i controls lliscants del canal
Monitors de nivell
The left meter shows the volume level for the left deck,
while the right meter shows the volume level for the right deck.
The double meter at the center shows the current volume of the main output’s left and right channel separately.
These should stay at the top of the green region, with the loudest parts of the music
(transients) briefly going into the yellow region. They should never be in
the red region. Refer to
Setting your levels properly (gain staging)
for more details.
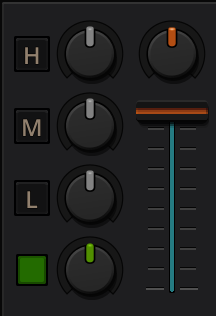
Control de volum del canal
Els dos controls lliscants llargs a cada costat dels monitors de nivell són els faders de volum dels plats, també coneguts com a faders de canal o de línia. Serveixen per ajustar el volum de cada plat.
Suggerència
Alguns DJs prefereixen utilitzar els controls de volum en comptes del crossfader per a canviar de volum entre les pistes. Proveu-ho, potser us agrada.
The gain knob (orange) above the volume fader allows you to adjust the gain applied to the deck.
Use this to compensate for the differences in recording levels between tracks.
In general, you should adjust this knob so that the track’s level meter
stays around the top of the green region with the loudest parts of the track
(the transients) briefly going into the yellow region. Do NOT turn the
Gain Knob up so much that the level meter is in the red region. At this point
the track is clipping, which sounds bad and could damage equipment.
Nota
By default, Mixxx automatically applies an additional ReplayGain so
tracks have approximately equal loudness at unity gain. Your tracks
must be analyzed to take
advantage of this feature. When an unanalyzed track is
loaded, Mixxx calculates its ReplayGain value, but will not apply a
newly calculated ReplayGain value to a track after it has
already started playing (to avoid a sudden change in the gain of a
playing track).
The low, mid, and high EQ knobs allow you to change the filters of the audio.
This allows you to selectively reduce or boost certain frequency ranges of the audio.
Les capses petites al costat de cada rodeta d’EQ són els kills. Manteniu premuts aquests botons per eliminar completament el rang de freqüències corresponent. Si feu un clic ràpid, es quedarà activat, i es tornarà a desactivar si torneu a fer clic. Si els botons de kill no funcionen adequadament, comproveu les opcions de EQ high/low shelf a les preferències.
Quick Effect Super knob
This knob lets you control the Meta knob of the deck’s Quick Effect chain. “Filter” is the default.
Right-click or double-click this knob to reset it to the default position defined by the loaded
chain preset. This is equivalent to “no audible effect” for the built-in
filter effects only (Filter, Moog Ladder 4 Filter).
The button next to the knob toggles the effect. It provides the same latching capabilities
like the EQ Kill switches.
Vegeu també
You can customize the EQ settings in
Preferences ‣ Mixer.
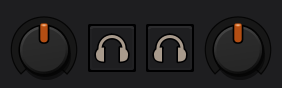
Els botons d’auriculars dels dos plats del mesclador
El botó d’auriculars també es coneix amb el nom de PFL i permet pre-escoltar utilitzant els auriculars. És a dir, permet escoltar la pista que esteu preparant abans de que la senti el públic. Això us permet decidir on començarà la pista i manipular-la per a que s’ajusti millor amb la pista que sona (per exemple, sincronitzant els tocs, posant un bucle o equalitzant-la). A l’activar la pre-escolta escoltareu la pista pels auriculars al volum màxim, independent de la posició del fader del canal. Així doncs, per a que l’audiència no senti la pista que esteu pre-escoltant, premeu el botó de pre-escolta i poseu el crossfader cap al plat contrari, o poseu el volum del canal a zero.
Nota
La pre-escolta per auriculars només està disponible si heu configurat la sortida d’auriculars en les Preferències ‣ Maquinari de so.
Nota
Si utilitzeu un mesclador físic extern, connecteu-hi els auriculars, en comptes de a la sortida de la targeta de so. Així mateix, utilitzeu els botons d’auriculars del mesclador extern i no els del Mixxx.
El crossfader determina el volum de cada plat movent el control d’esquerra a dreta. Si els dos plats estan reproduïnt i el crossfader està al mig, escoltareu tots dos plats. Feu clic amb el botó dret per tornar el control a la posició per defecte.
To move the crossfader left or right, you can use the keyboard shortcutG and H.
To apply small crossfade left and small crossfade right, the shortcuts are Shift + G and Shift + H respectively.
Podeu invertir la configuració del crossfader, fent que per escoltar el plat dret s’hagi de posar el control a l’extrem esquerra i viceversa. Això es coneix també amb el nom en anglès «Hamster style». Per canviar-ho aneu a Preferències ‣ Crossfader.
The crossfader orientation switches determine to which side of the crossfader the deck is assigned.
It can be set to the left or right side, or to the center where it is unaffected by the crossfader knob.
Suggerència
Si feu anar el DJ Automàtic del Mixxx, podeu automatitzar el crossfading entre plats.
Allows you to control how much of the Main output you hear in the
Headphones output. It works like a crossfader between the stereo
Main and stereo PFL signal. If the knob is set to the left, you
only hear the PFL signal, which is the usual position for prelistening tracks.
This can be used to practice DJing with only one stereo output and a set
of either speakers or headphones.
Additionally, this can be used to mix in headphones when you cannot hear the
speakers connected to the main output and there are no booth
monitor speakers. Some DJs prefer to use this knob to mix in headphones all
the time, but many find it to be a difficult way to play. If there is only one
set of speakers and no booth monitors, you can avoid the need to mix in
headphones by setting up the speakers behind you so both you and your
audience can hear them.
Nota
No oblideu activar el botó Auriculars al plat que voleu escoltar pels auriculars.
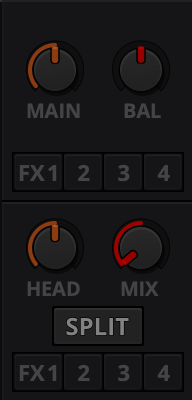
Head knob (Headphone gain)
This knob controls the gain applied to the headphone output signal that Mixxx
sends to your sound card. Generally, this knob should not be adjusted. To
adjust the volume in your headphones, adjust your sound card’s gain on the
headphone output. Most external sound cards have a gain knob specifically for
the headphone jack. If you use an onboard sound card for your headphones,
adjust the gain control in your OS mixer program.
If your sound card only has one gain knob that controls both the Main output
and the headphone output, then adjust the Head knob in Mixxx
to control the volume of your headphones without affecting your Main output.
Nota
Not all controls may be present in all skins anymore. However, these controls can be mapped to keyboards and MIDI controllers. See Mixxx Controls for detailed information.
Headphone Split Cue button
If activated, two mono signals are sent to the headphone output instead of one
stereo signal. The main signal plays in the right channel, while the cueing
signal plays in the left channel. You can still adjust the
Head Mix knob to control the mix of the Main and cue signals in
the left channel.
Rodeta de balanç
This knob allows you to adjust the balance (left/right orientation) of
the Main output.
Main Knob
The Main Gain Knob controls the gain applied to the Main output signal that
Mixxx sends to your sound card, Internet broadcasting servers, and recorded
mixes. Generally, this knob should not be adjusted. To change the output
volume, a gain control should be adjusted as close to the speakers as possible
for the best signal-to-noise ratio throughout your signal chain. Ideally, the
volume would only be adjusted by adjusting the gain on the power amplifier.
On active speakers, including computer speakers, studio monitors, and PA
systems that do not require a separate amplifier, this means adjusting the
gain on the speakers (which may be labeled «Volume»).
As a DJ, you may not have access to the power amplifier. In that case,
adjust the volume by adjusting the gain on the equipment closest to the power
amplifier that you have access to. Typically, this is a DJ mixer. If you are
not going through a mixer, adjust the gain of your sound card. If your sound
card does not have any controls on it (for example, for sound cards built into
computers), adjust the sound card settings with your OS
mixer program. The Main Gain Knob in Mixxx should be a last resort for
adjusting volume.
Avís
Sota cap circumstància hauríeu de permetre que la senyal saturi en algun punt. Això passa quan un monitor de nivell entra a la zona vermella, o quan s’ilumini un LED que tingui l’etiqueta «clipping».
Els reproductors de mostres són com plats en miniatura. Permeten reproduir mostres curtes i «jingles», o si voleu, també més pistes. Tenen un petit gràfic d’ona de la pista completa i un nombre limitat de controls. Tots els controls funcionen com als plats, veieu Decks.
The Sampler section can be hidden in the
Mixxx user interface. Click the
SAMPLERS button at the top of the user interface, or use the specific
Application shortcuts to show or hide the section.
El gràfic d’ona mostra les diferents marques de la pista, així com l’envolvent de tota la pista. En fer clic en el gràfic, es pot saltar a aquella posició de la pista.
Marques del gràfic d’ona
Mentre es mescla, poden aparèixer més marques als gràfics d’ona:
Marca de posició: Una línia vertical indica la posició de reproducció de la mostra.
Marca de hotcue: Indica la posició i número d’un punt hotcue, si n’hi ha.
The buttons grid next to the waveform overview allow you to configure the
sampler deck. Starting from the top row (left to right) and the bottom row (left to right), the buttons are as
follows:
Commutador de repetició
Si s’activa el mode de repetició, la pista tornarà al principi quan acabi i continuarà reproduint.
Botó d’extreure la pista
En fer clic sobre aquest botó, es treu la pista del reproductor.
Commutador de bloqueig de clau musical
El Bloqueix de clau fa que el to de la pista no canviï quan es canvia la velocitat amb el control de velocitat.
Crossfader Orientation Toggle
The crossfader orientation determines to which side of the crossfader the sampler is assigned.
It can be set to the left or right side, or to the center where it is unaffected by the crossfader knob.
En fer clic en aquest botó sempre comença la pista des del punt Cue. Si està reproduïnt, saltarà al punt cue. En fer clic amb el botó dret, la reproducció s’aturarà i tornarà a l’inici de la mostra.
Mixxx comes with some built in sound effects that can be chained together in
effect units. Effect units can be freely assigned to different decks as well
as other inputs. The buttons for routing decks to effect units are in the
Decks.
Vegeu també
The Efectes chapter has a more detailed explanation of the
effects system.
The microphone section is hidden in the default Mixxx user interface. Click the MICS & AUX button at the top of your user interface, or use the specific Application shortcuts to
show or hide the section.
Vegeu també
The Utilitzant micròfons chapter has detailed instructions for
setting up microphones with various hardware.
Hold this button and talk to mix the microphone input into the Mixxx Main
output. Short click on the button for latching. This is handy for talking for
an extended period, for example when streaming a
radio show. When in Latch mode, click again to mute the microphone input.
Commutador d’orientació de la mescla
Aquest control determina la destinació de la mescla de l’entrada de micròfon. Ja sigui al canal esquerra del crossfader, al canal dret, o al centre (per defecte). Feu clic múltiples vegades per canviar entre les diferents possibilitats.
Monitor de volum de micròfon
Aquí es mostra el nivell de volum de l’entrada de micròfon.
Rodeta de guany el micròfon
Utilitzeu aquesta rodeta per ajustar el guany de la sortida del micròfon. Intenteu mantenir el volum a un nivell raonable per evitar que la senyal es saturi.
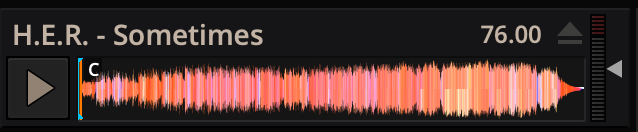
El reproductor de pre-escolta amb una pista carregada
The Preview Deck is a special deck that allows you to pre-listen to tracks in the
headphones before using them in your mix. Pre-listening to a track does not change
its Played state as well as the play counter and is not
logged in the History. Press CTRL + 4
(Windows/Linux) or CMD + 4 (Mac) to display the Preview Deck.
Les característiques en detall:
Track Artist/Title:
The artist and title of the track is displayed here. This is the same as that
listed under the Track and Title column heading in the Mixxx library. This information is initially loaded from the track’s metadata.
Eject Track button:
Clicking this button ejects the track from the deck.
Play/Pause button:
Clicking the button starts and pauses the playback. Right-clicking on the
button will stop playback and seek the play position to the beginning of the
tracks.
Gràfic d’ona de la pista: Mostra diferents marques (punts Cue, Hotcues) de la pista això com l’envolvent de la pista sencera. Feu clic en qualsevol lloc per a anar a aquell punt de la pista.
Gain slider:
Move the slider to adjust the gain of the track.
Volume Meter:
Shows the current volume of the track. If it’s too loud and distorted, a
peak indicator flashes red.