6. Voorbeeldopstellingen
Dit hoofdstuk bevat enkele voorbeelden van hardware-opstellingen met instructies voor het configureren van Mixxx om met deze opstellingen te werken.
Zie ook
DJ Hardware: background information about different types of equipment.
Configuratie van de geluidsingang en -uitgang: details about each available input and output option.
Gebruik van Microfoons: details for configuring Mixxx to work with microphones.
DJ Hardware Guide lists specific devices with information about their prices, features, and compatibility with Mixxx.
6.1. Enkel Computer
De ingebouwde audio-interface op de meeste computers wordt geleverd met een enkele stereo line-out en een microfooningang. Dit kan op twee manieren worden ingesteld met Mixxx:
Oefenen op Mixen / Uitzenden
This setup can be used with a single audio output for speakers or headphones to practice DJing without investing in any equipment other than a computer and a set of speakers or headphones. With this configuration, use the Pre/Main Knob to switch back and forth between the main mix and PFL signal. This setup cannot be used to play for a live audience because the main mix is not sent to an audio interface output. However, it can be used by radio DJs who only need to send the main mix to a broadcast audience.
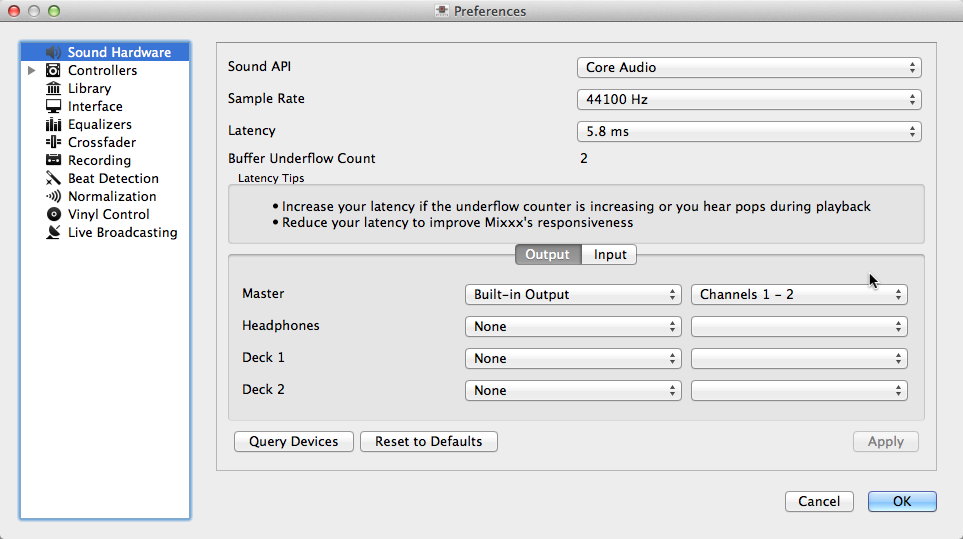
Open
Select the Output tab
From the Headphones drop-down menu, select your built-in audio interface, then Channels 1-2. Although this is labeled Headphones, you can also plug speakers into the output jack of your computer.
Depending on your audio interface, you can specify a microphone
Gebruik de ingebouwde microfoon of sluit een microfoon aan op uw computer
Check that your microphone is detected by your OS
Open the Input tab
From the Microphone drop-down menu, select the input your microphone is connected to
Click Apply to save the changes.
Spelen voor een publiek
This setup allows for playing to an audience without headphone cueing.
Mixxx gebruiken met je ingebouwde geluidskaart
Open
Select the Output tab
From the Main drop-down menu, select your built-in audio interface, then Channels 1-2
Depending on your audio interface, you can specify a microphone
Gebruik de ingebouwde microfoon of sluit een microfoon aan op uw computer
Check that your microphone is detected by your OS
Open the Input tab
From the Microphone drop-down menu, select the input your microphone is connected to
Click Apply to save the changes.
6.2. Laptop- en splitterkabel
The cheapest way to DJ and cue with headphones uses a stereo-to-mono DJ splitter cable (also known as a “Y cable”) plugged into the headphone jack of a laptop or other computer. This cable divides the stereo output from a single jack into two separate mono signals.
Met deze opstelling kun je beginnen met DJ’en zonder te hoeven investeren in dure apparatuur. Omdat de signalen echter in mono zijn, zullen jij en je publiek niet kunnen genieten van de door muziekproducenten audio-opbouw (hoewel veel PA-systemen van clubs sowieso in mono zijn bedraad). Bovendien zijn audio-interfaces die in computers zijn ingebouwd meestal van lage kwaliteit en vangen ze vaak interferentie op van andere componenten van de computer.
Gebruik van een ingebouwde audio-interface en een stereo-naar-mono-splitter.
Open
Select the Output tab
Controleer of uw hoofdtelefoon is aangesloten aan de zijde van de kabel met een hoofdtelefoonsymbool en dat de luidsprekers zijn aangesloten aan de zijde van de kabel met een luidsprekersymbool.
From the Main drop-down menu, select your built-in audio interface, then Channel 1
From the Headphones drop-down menu, select your built-in audio interface, then Channel 2
Click Apply to save the changes.
Waarschuwing
De meeste splitterkabels, met name die welke op de markt worden gebracht als hoofdtelefoon splitterkabels, geven hetzelfde stereosignaal af aan twee hoofdtelefoonaansluitingen en werken niet voor deze DJ-setup. Als je een algemene stereo-naar-mono-splitseradapter gebruikt, kan het zijn dat je maar aan één kant van je luidsprekers en koptelefoon kunt horen. Met DJ-splitsingskabels kunt u hetzelfde monosignaal aan beide zijden van uw koptelefoon en luidsprekers horen.
6.3. Laptop en externe USB-audio-interface
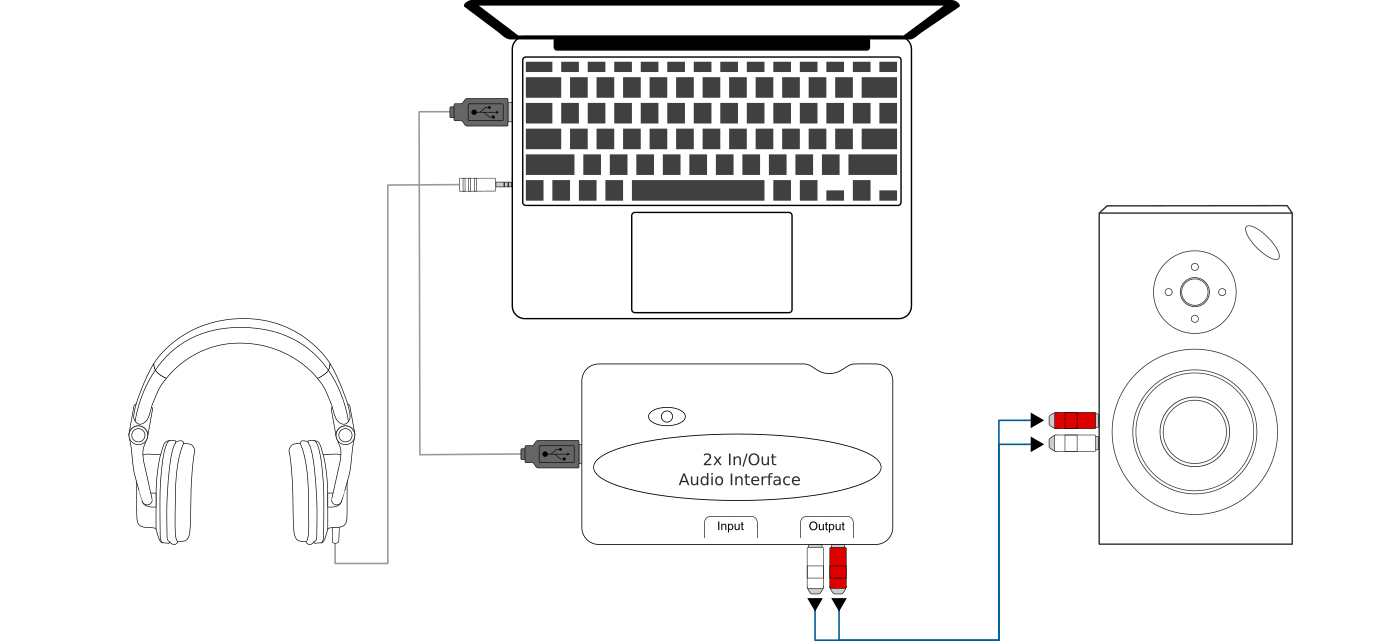
Mixxx gebruiken in combinatie met een externe audio-interface
Gebruik van twee audio-interfaces (ingebouwd + extern)
Open
Select the Output tab
From the Main drop-down menu, select the external audio interface, then Channels 1-2
From the Headphones drop-down menu, select the built-in audio interface, then Channels 1-2
Gebruik van een externe multi-kanaals audio-interface
Open
Select the Output tab
From the Main drop-down menu, select the external audio interface, then Channels 1-2
From the Headphones drop-down menu, select the external audio interface, then Channels 3-4
Click Apply to save the changes.
6.4. Laptop en MIDI of HID-controller
Zie ook
The Controllers section of the DJ Hardware chapter has background information about controllers
Controllers met een geïntegreerde audio-interface
Veel DJ-controllers hebben een geïntegreerde multi-channel audio-interface. Een opstelling met dit soort controllers kan er uitzien als het onderstaand weergegeven schema:
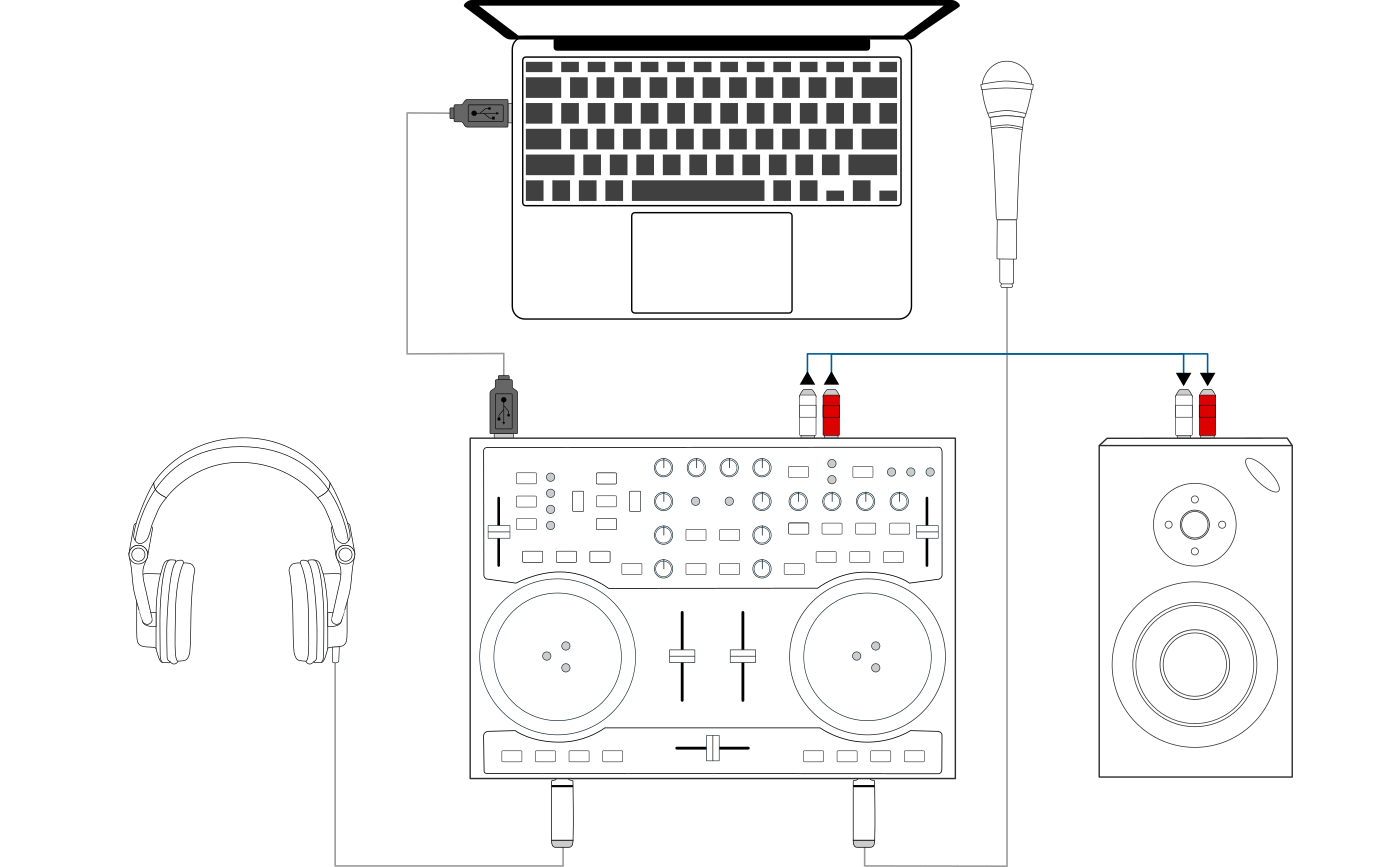
Mixxx gebruiken in combinatie met een DJ-controller met een geïntegreerde audio-interface
Gebruik van een controller met een geïntegreerde multi-kanaals audio-interface
Open
Select the Output tab
From the Main drop-down menu, select your controller’s audio interface, then Channels 1-2
From the Headphones drop-down menu, select your controller’s audio interface, then Channels 3-4
Click Apply to save the changes.
Controllers zonder geïntegreerde audio-interface
Controllers zonder geïntegreerde audio-interface kunnen worden gebruikt in combinatie met een USB-audio-interface zoals weergegeven in het onderstaande diagram:

Mixxx gebruiken in combinatie met een DJ-controller en een externe audio-interface
Gebruik van een controller zonder geïntegreerde audio-interface
Open
Select the Output tab
From the Main drop-down menu, select the external audio interface, then Channels 1-2
From the Headphones drop-down menu, select the built-in audio interface, then Channels 1-2
Click Apply to save the changes.
6.5. Laptop, externe hardwaremixer en vinylbesturing
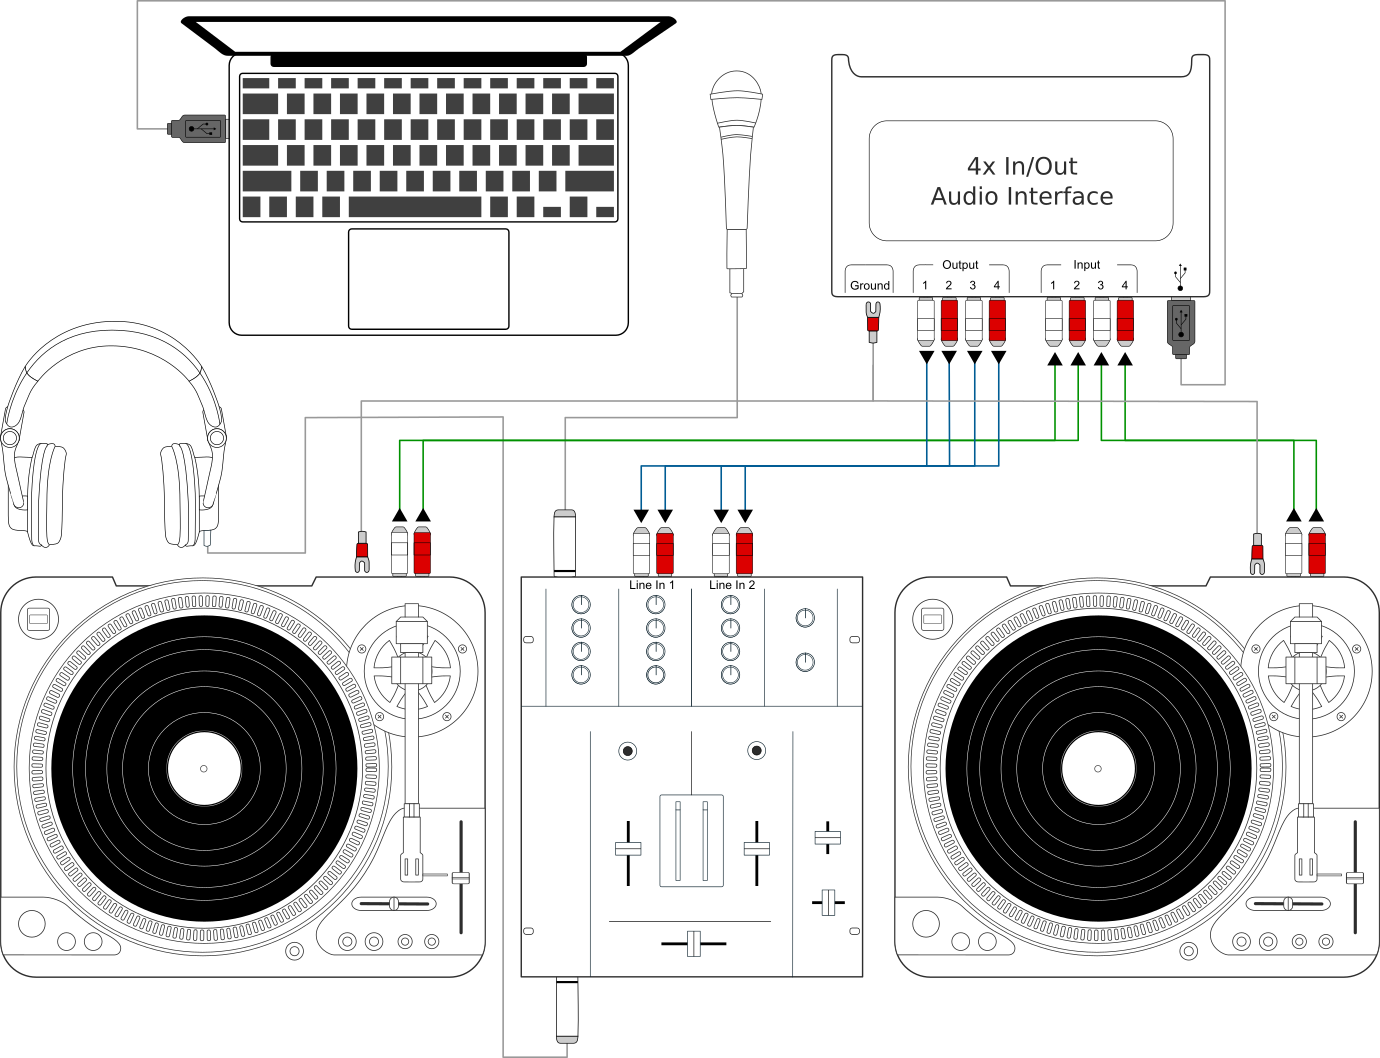
Gebruik van Mixxx in combinatie met draaitafels en externe mixer
This setup allows DJs to use the techniques of DJing with vinyl record turntables combined with the portability and flexibility of a laptop computer. Instead of carrying crates of records or CDs, DJs can carry their entire music collection on their laptop. In addition to a laptop and headphones, this setup requires an audio interface with at least two pairs of stereo inputs and outputs as well as a pair of timecode records.
Zie ook
Go to the chapter Vinyl Control / DVS for detailed information.